Last updated on 25/11/2022
This blog post will show you how I do modern Power Pages site branding with Visual Studio Code, Power Platform CLI, CSS, and SCSS. This way I have my SCSS code automatically compiled into a CSS file, add it to the Portals Web Files folder and upload it with the rest of the portal code using Portals CLI.
YES – this works for Power Pages too!
Power Pages and Power Apps Portals are the same product from a technical perspective.
Read all about it this blog post by Nick Doelman here:
https://readyxrm.blog/2022/10/12/power-apps-portals-is-now-power-pages/
Setup – short version
- Use Portals Design Studio to upload a custom css-file called “main.css” with simple styling.
- Install visual studio code
- Install Power Platform VS Code Extension
- Git clone your repository and open it with visual studio code
- Connect to your portal environment using Portals CLI and download portal content
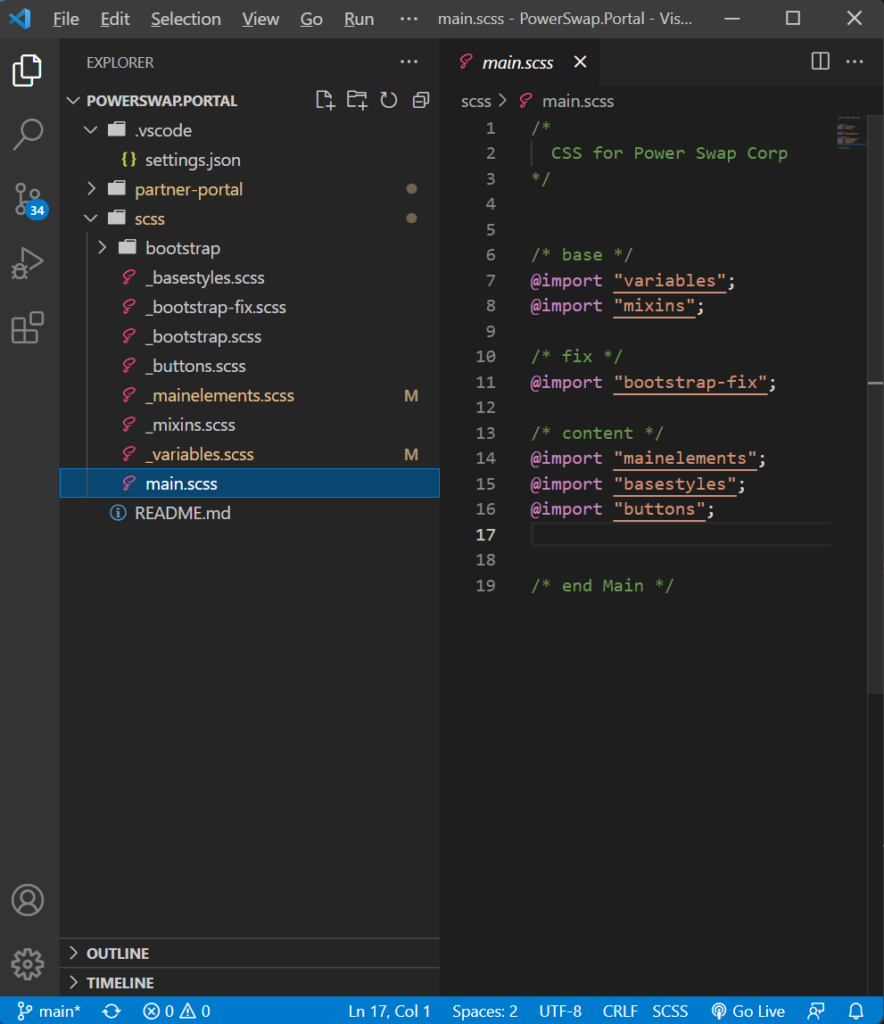
- Create folder “SCSS” in the project. Create SCSS file “main.scss” and add simple styling.
- Install Live SASS compiler extension in vscode
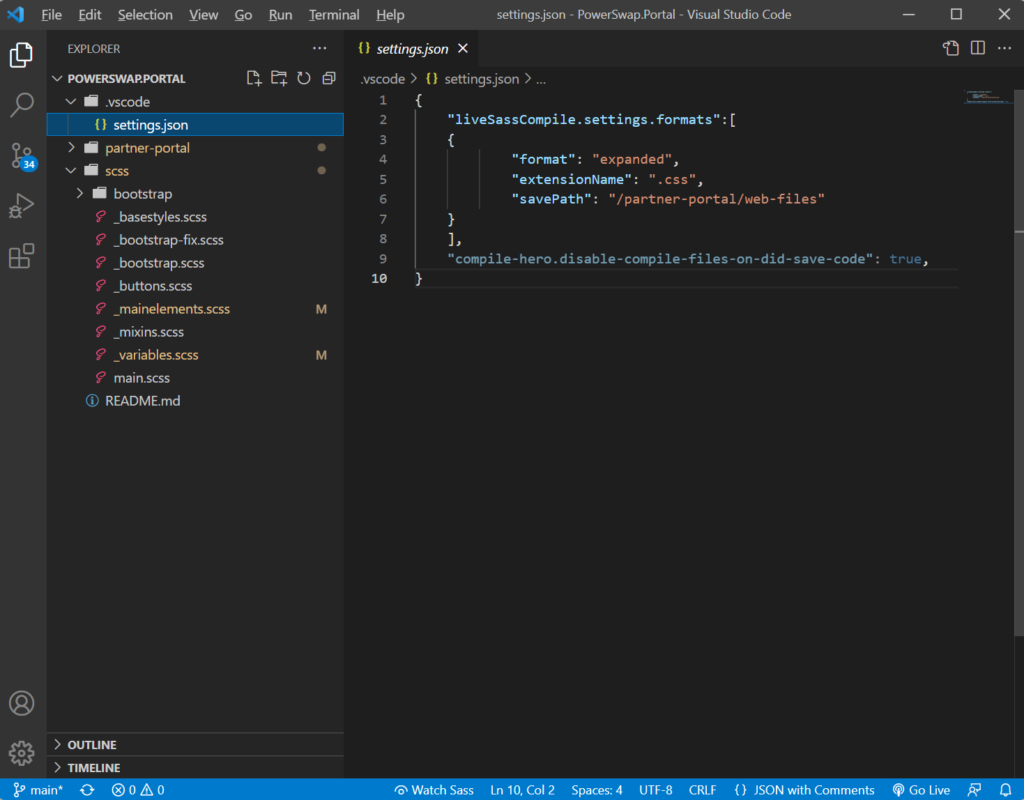
- Create a folder in the project called “.vscode” and inside create a file “settings.json”
- Insert the following snippet into the file
- Activate “Watch Sass” from status bar and SCSS files will automatically compile into “main.css” located in the “Web Files” folder in the portal folder structure
- Upload portal content to the portal
- Refresh Cache
- Open portal in browser to confirm that simple styling is applied
If you are not too familiar with some of the steps; here is the longer version
Setup – the longer version
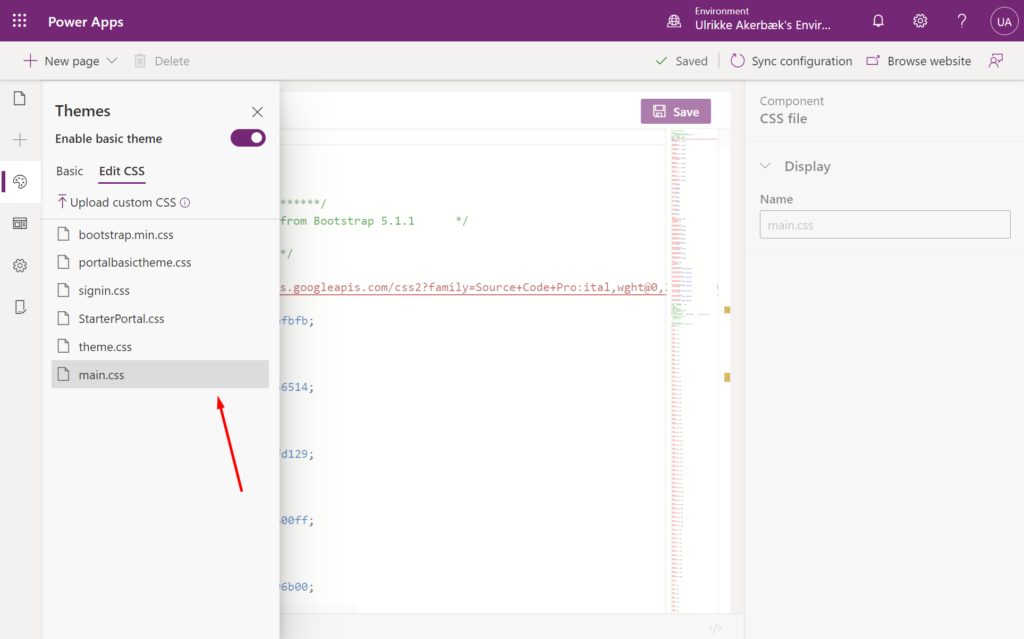
Upload custom CSS in Portals Design Studio
Go to make.powerapps.com, open “Apps” in the left navigation and locate your portal. Choose “Edit” to open Portals Design Studio.
Open “Themes” in the left menu, open “Edit CSS” and then click the “Upload custom CSS” link.
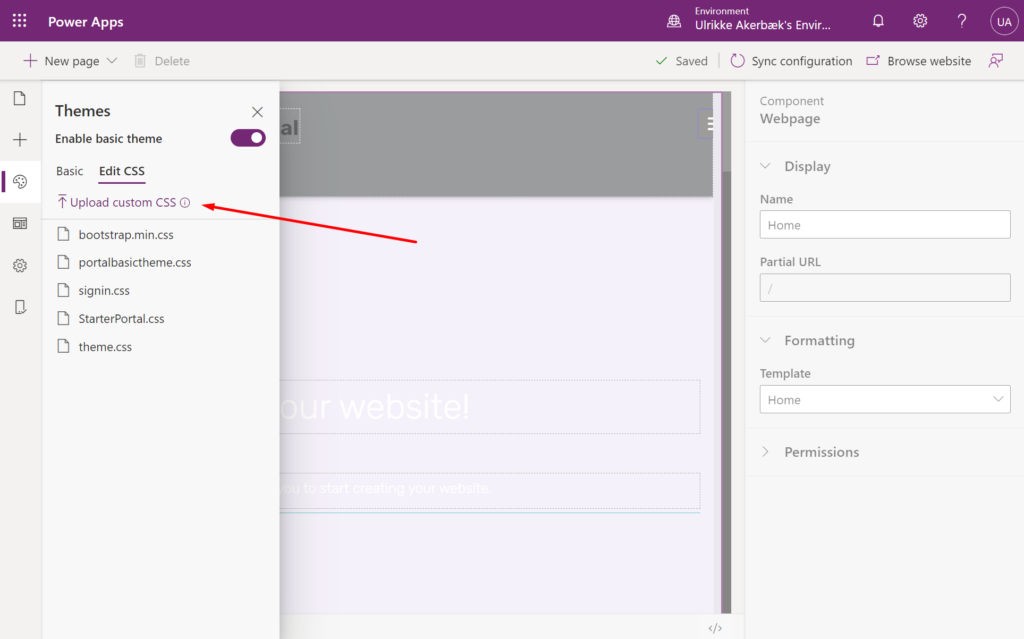
This opens a dialogue that allows you to upload a CSS file to the portal. Open the location and select the file we just created when compiling SCSS to CSS in VS Code.
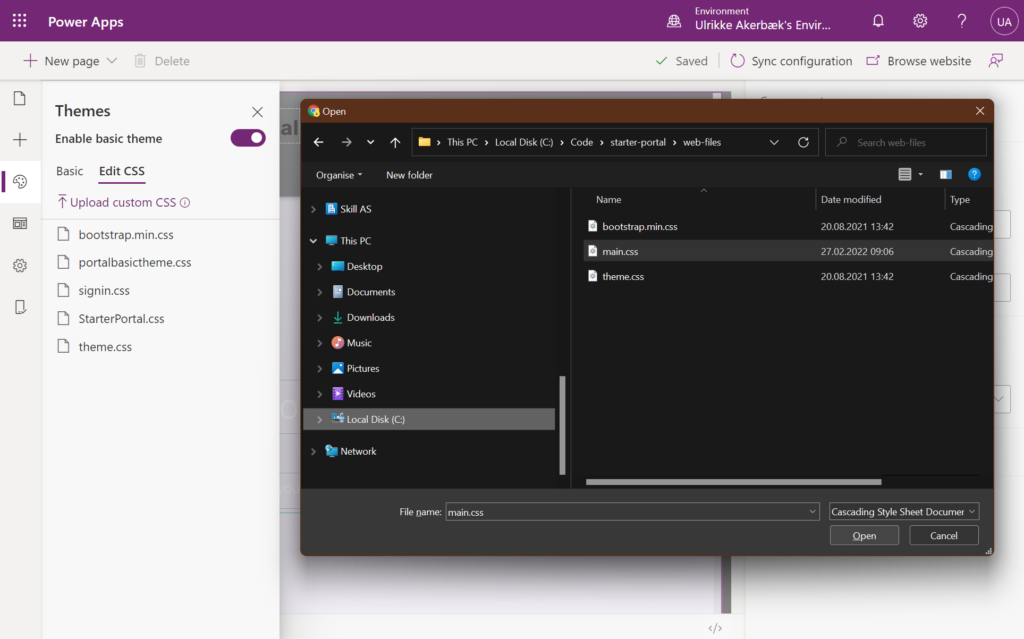
When we open this file the Portal will create all the connections it needs to this file. and apply the styling. Just hit “Save” and browse your portal to see that the styling is applied.
This will result in a project where you have your portal code and file structure in a folder with the name of your portal. My portal is called “partner-portal”.
Install Visual Studio Code
VS Code is a free code editing tool from Microsoft. If you don’t have it installed already learn more here: https://code.visualstudio.com/download)
Install Power Platform VS Code Extension
This extension to VS Code makes it easier to handle Portal code directly in the code editor with IntelliSense, nice looking icons and brings the Power Platform Command-line interface (CLI) into VS Code.
More information in this blog post: https://powerapps.microsoft.com/en-us/blog/power-platform-extension-for-vs-code.
Direct link to install: https://marketplace.visualstudio.com/items?itemName=microsoft-IsvExpTools.powerplatform-vscode
Git clone your repository and open it with visual studio code
One of the most important capabilities that this approach enables is source control. Learn more about how you work with Git and VS Code by following this link.
Connect to your portal environment using Portals CLI
Learn how here: https://docs.microsoft.com/en-us/powerapps/maker/portals/power-apps-cli)
pac auth create -u [dynamics365-evrironment-url]
(Follow login procedure)
pac paportal list
Get portal id from the list of portals
Download Portal content
pac paportal download --path C:\code\[project-folder-name]-id [portal-id]
Setting up SCSS files
Create another folder as a sibling to the portals folder named “SCSS”.
Create these files inside the folder:
- “_variables.scss”
- “_basestyles.scss”
- “main.scss”
The “Main.scss” will be the mother of all your scss files. In the “main.scss” insert the following code:
@import “variables”;
@import “basestyles”;
Now, create other files in your folder to hold your styling. There are multiple ways of structuring your styling, and there are some standards and best practices.
You can download and use this SCSS boilerplate that follows the 7-1 structure from GitHub:
https://github.com/KittyGiraudel/sass-boilerplate
Learn more about SCSS architecture here: https://sass-guidelin.es/#architecture
To start simple you can create a few essential files to start:
- _variables.scss: Put all your variables in here; colours, border-radius, sizes, fonts, etc.
- _mixins.scss: The web is full of smart mixins you can use to work smart with styling. Gather them all in one file.
- _bootstrap-fix.scss: Bootstrap has some default styling you’ll need to workaround. To have them in a separate file will make it easier to update them when (if?) the portals bootstrap version is updated.
- _mainelements.scss: Keep styling for header, footer, layout and templates separate.
- _basestyles.scss: Set the styling for lists, forms, tables, navigation elements, etc. These are reusable elements that you style once and use all over the place.
- _buttons.scss: When a section in “basestyles” becomes too big I split it into a separate file, like buttons.
Let your code grow from this point organically if you like – or start with a structure that fit the size of your project. The most important thing is to use descriptive names that most people will understand and keep the structure as consistent as you can. Use comments throughout your files to describe what you are doing and leave breadcrumbs to where you can find related styling across your structure.
Are you new to SCSS files and how the syntax works and what it can do? Learn more here:
https://sass-lang.com/documentation/syntax
Compile SCSS
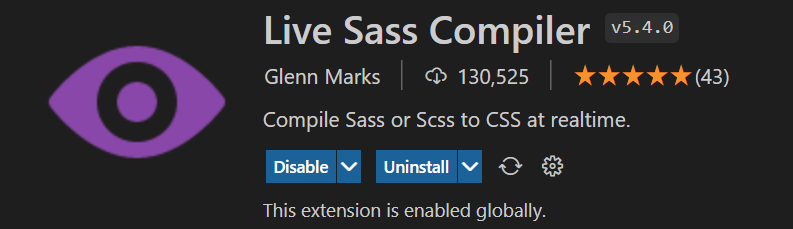
Install Live SASS compiler
When you have your SCSS-files full of great styling you need to compile them into a CSS file that the portal can understand. I use “Live Sass Compile” extension to VS Code for this job. Read more about the extension here:
https://marketplace.visualstudio.com/items?itemName=glenn2223.live-sass
Install Live SASS compiler extension in VS code from here: https://marketplace.visualstudio.com/items?itemName=glenn2223.live-sass
Name: Live Sass Compiler
Id: glenn2223.live-sass
Description: Compile Sass or Scss to CSS at realtime.
Version: 5.4.0
Publisher: Glenn Marks
VS Marketplace Link: https://marketplace.visualstudio.com/items?itemName=glenn2223.live-sass
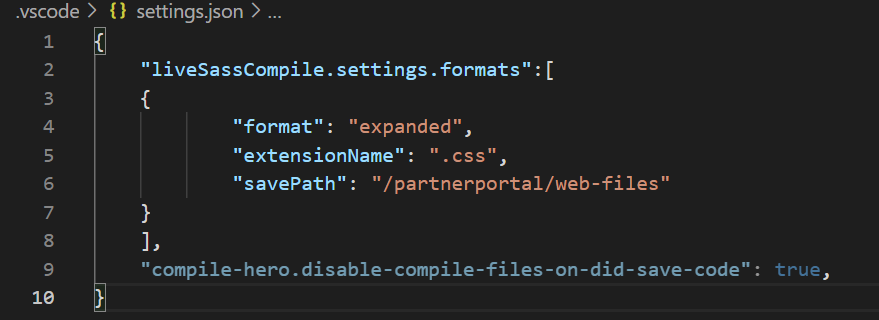
Create folder “.vscode”
Create a folder in the project called .vscode
Inside .vscode create settings.json
Insert the following snippet into the file:
{
    "liveSassCompile.settings.formats":[
	{
            "format": "expanded",
            "extensionName": ".css",
            "savePath": "/partner-portal/web-files"
	}
    ],
}Code language: JSON / JSON with Comments (json)
This will result in a project where you have your portal code and file structure in a folder with the name of your portal. My portal is called “partner-portal”.
Once the extension is installed and enabled you will see a “Watch Sass” button in the status bar at the bottom of your VS Code workspace.
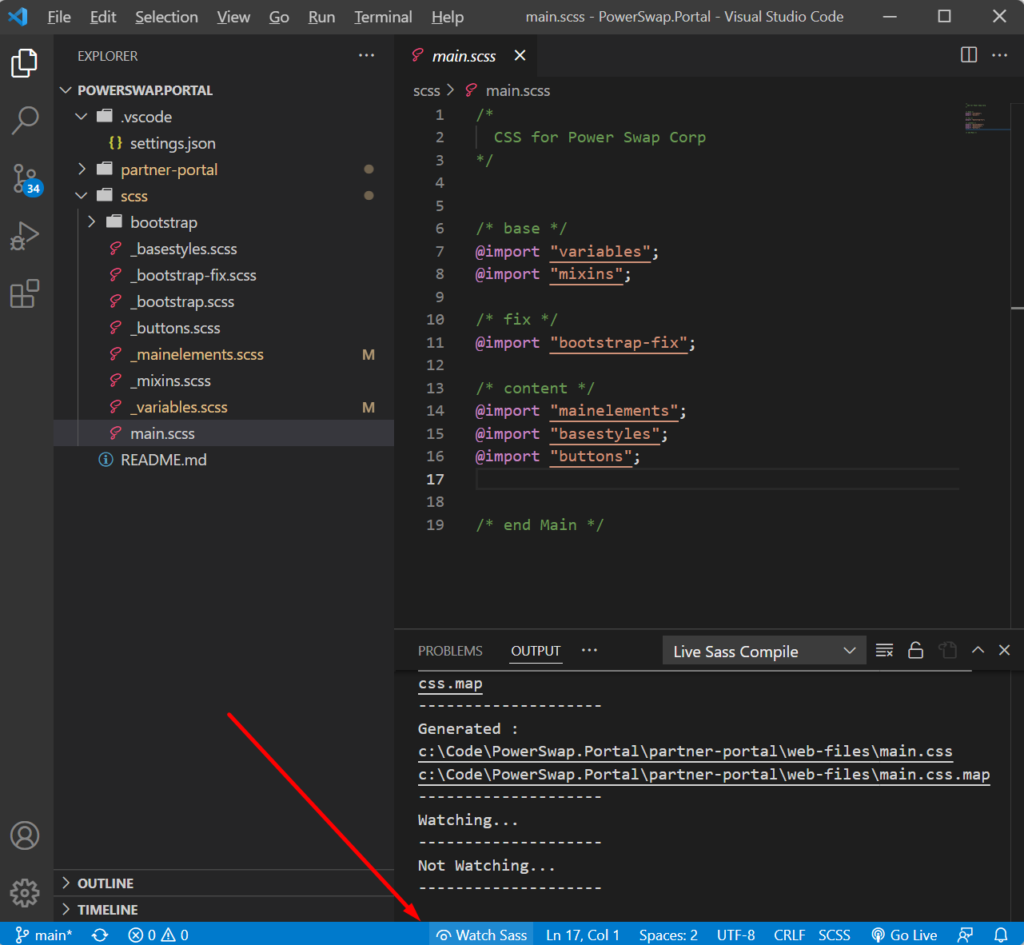
When your compiler extension is working it will automatically compile the files and tell you of any errors along the way:
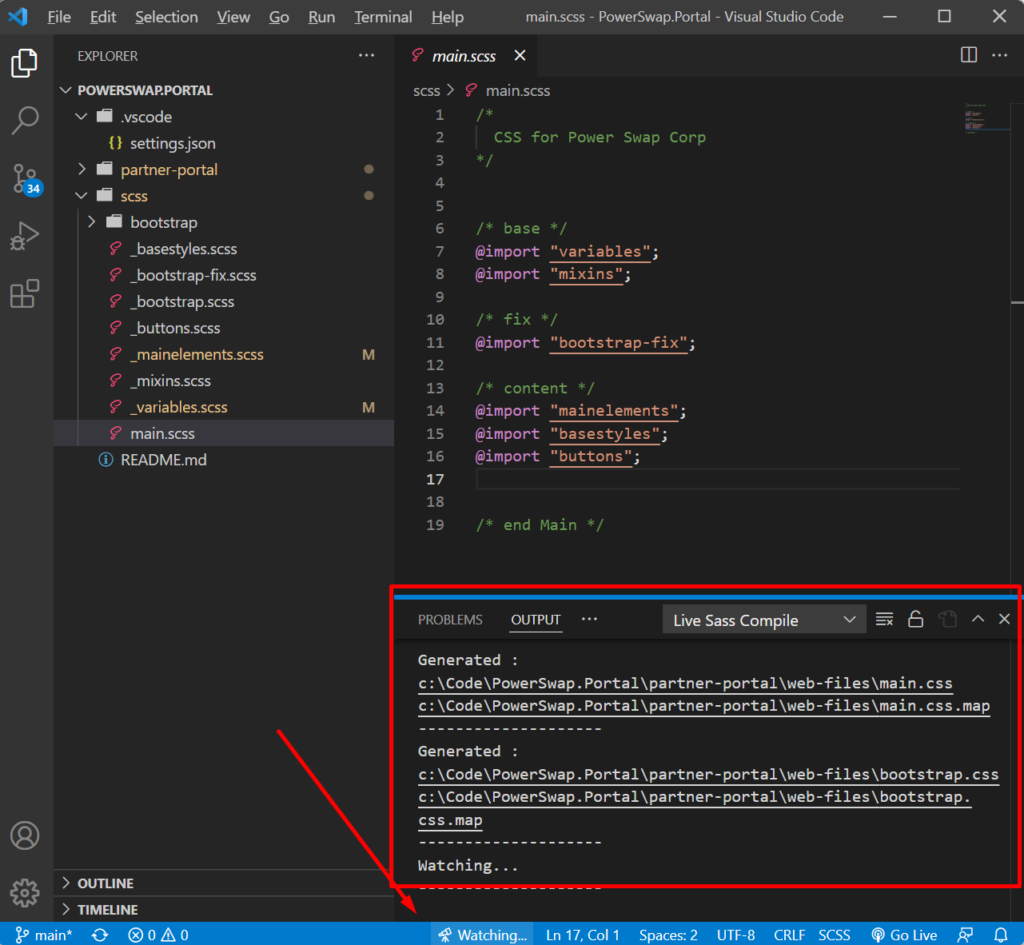
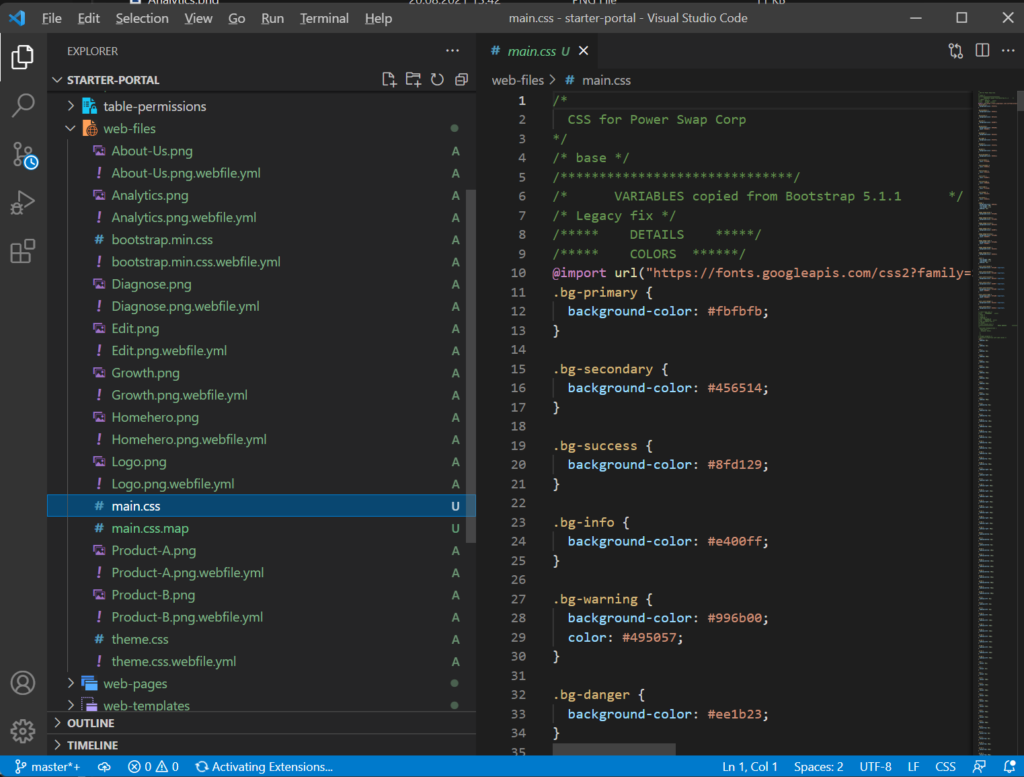
The result is a CSS file in your portal’s “Web files” folder that will upload with the rest of the portal code.
Upload Portal code
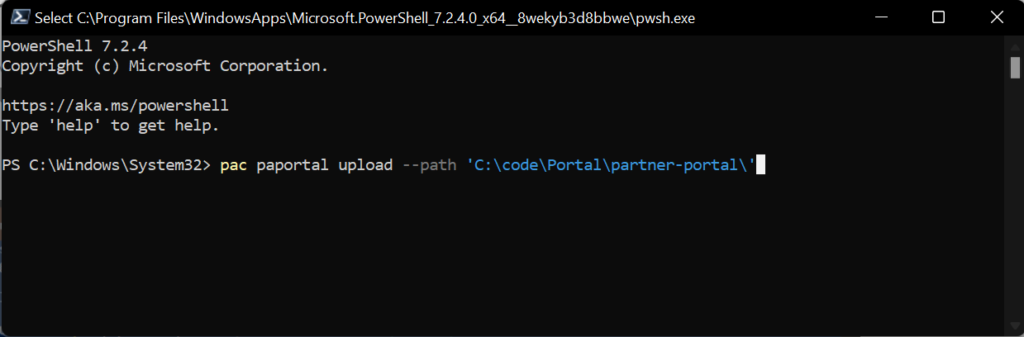
Now we have our file structure and initial files set up. Now we need to upload these files to the portal. We use the Portal CLI for this.
Open “Windows Powershell” and connect to your portal using the Portals CLI.
Need more information about how this works? This is where you find all the commands and how to use Portals CLI: https://docs.microsoft.com/en-us/powerapps/maker/portals/power-apps-cli#microsoft-power-platform-cli-commands-for-portals
Use the Portals CLI to download your portal content once again, and all the connections will follow. Now, when you make changes to the SCSS files and compile them down to “main.css”, and then upload it to the portal, the new styling is applied.
Source Control
When you make changes to the portal code in VS Code you can commit the changes to git and have full source control.
Warning! When you are multiple people working on the same portal project make sure that you communicate well on what areas of the portal you are working on - and let each other know whenever you need to upload code to the portal. I have overwritten my own and other developers' portal config when uploading code to the portal.
I would love to know more about how you work with portal branding. Please leave a comment on this blog article and let me know!
Have fun and take care!
[…] Power Apps Portals branding – VS Code, CLI, CSS and SCSS […]
[…] Power Apps Portals branding – VS Code, CLI, CSS and SCSS […]
[…] Power Apps Portals branding – VS Code, CLI, CSS and SCSS […]
Do you know if there is a similar method that will work for enabling SCSS in Power Pages?
Hi Ole Einar. Yes, Power Pages and Power Apps Portals are the same product from a technical point of view. The only difference is the Power Pages Workspace that is new 🙂
[…] Power Apps Portals branding – VS Code, CLI, CSS and SCSS […]
[…] Power Pages branding – VS Code, CLI, CSS and SCSS […]
[…] Power Pages branding – VS Code, CLI, CSS and SCSS […]
[…] Power Pages branding – VS Code, CLI, CSS and SCSS […]