Last updated on 16/10/2020
Wouldn’t it be great if you navigate between records without going back to the case list every time? This blog post will show you how to make it happen.
The idea is pretty simple; I render an entity list on the edit case web page and with some custom liquid code generate “next” and “prev” arrow buttons. You know the left “Record set navigator” in D365 model driven apps?
That is what we’ll create in the portal.
Web Template Copy
I start with an OOTB (out-of-the-box) Partner Portal, and use the “Customer Service – My Portal – Cases List” entity list, a copy of the “Customer Service – Edit Case” Web Template, a custom Web Template and the edit case web page.
Crate a copy of the web template: “Customer Service – Edit Case” and give the new template the name “Customer Service – Case with LeftNav”.
Inside the div with class=”row” I create a new div with class=”col-md-3″. This will be the container for the left menu. Then I change the class of the next element from “col-md-12” to “col-md-9”. This will make the navigation take 3/12 part and the main content area take up 9/12 of the space available.
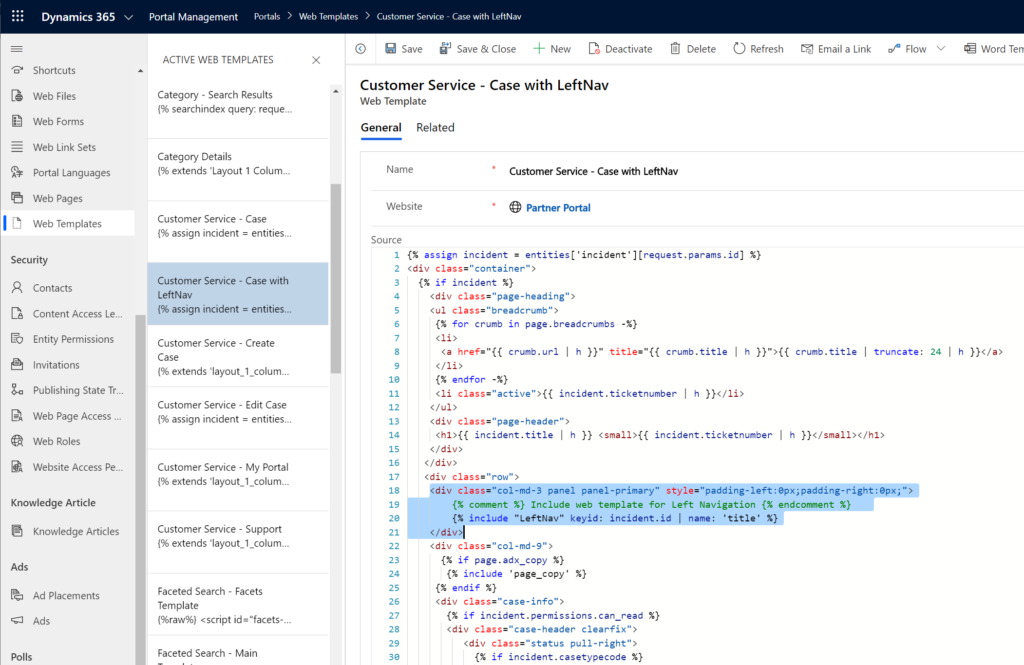
More information about the Bootstrap Grid system here: https://getbootstrap.com/docs/3.3/css/#grid
I put the code for the left navigation in a separate web template. This way I can reuse the code. The include code send two parameters to the web template;
- “keyid” is the current record id
- “name” is the field name for the name of the record
This way I can use the left menu web template for different types of entities; it is generic.
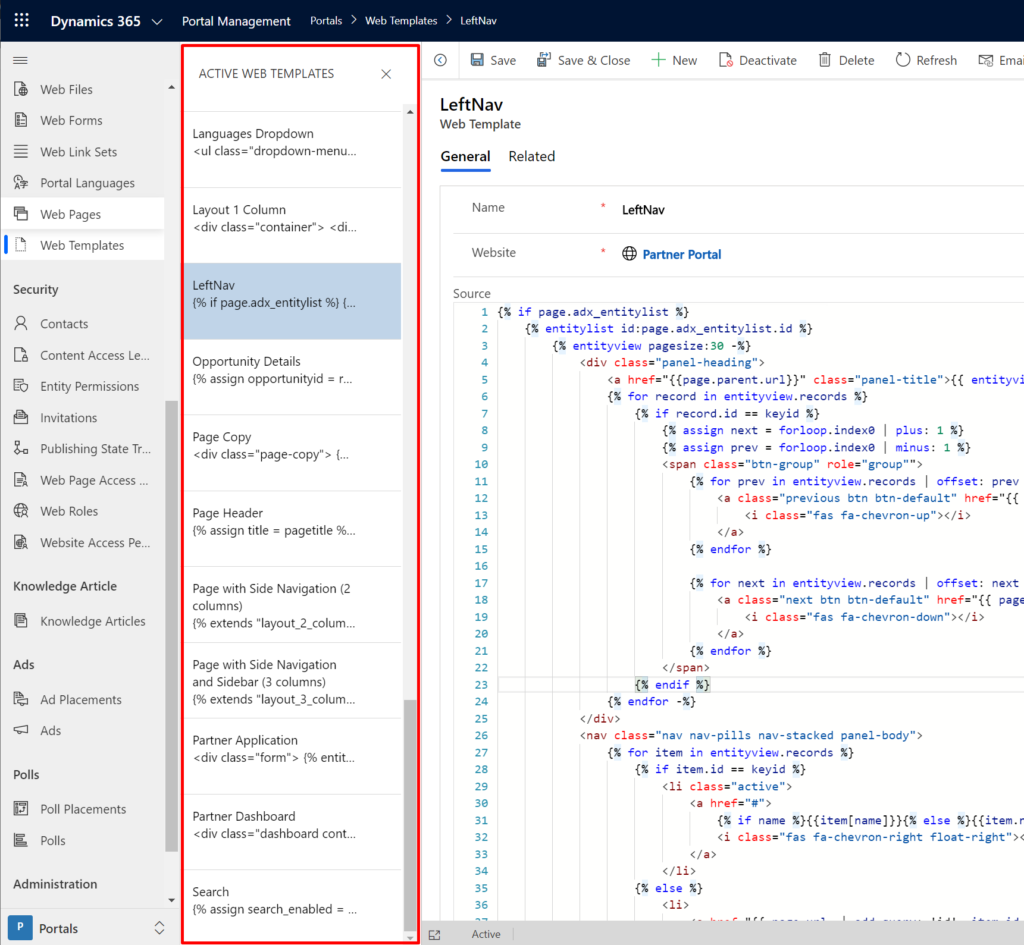
“LeftNav” web template
Create a new web template called “LeftNav”.
This is the whole code snippet you’ll need:
{% if page.adx_entitylist %}
    {% entitylist id:page.adx_entitylist.id %}
        {% entityview pagesize:30 -%}
            <div class="panel-heading">
                <a href="{{page.parent.url}}" class="panel-title">{{ entityview.name }}</a>
                {% for record in entityview.records %}
                    {% if record.id == keyid %}
                        {% assign next = forloop.index0 | plus: 1 %}
                        {% assign prev = forloop.index0 | minus: 1 %}
                        <span class="btn-group" role="group"">
                            {% for prev in entityview.records | offset: prev | limit:1 %}
                                <a class="previous btn btn-default" href="{{ page.url | path | add_query: 'id', prev.id }}">
                                    <i class="fas fa-chevron-up"></i>
                                </a>
                            {% endfor %}

                            {% for next in entityview.records | offset: next | limit:1 %}
                                <a class="next btn btn-default" href="{{ page.url | path | add_query: 'id', next.id }}">
                                    <i class="fas fa-chevron-down"></i>
                                </a>
                            {% endfor %}
                        </span>
                    {% endif %}
                {% endfor -%}
            </div>
            <nav class="nav nav-pills nav-stacked panel-body">
                {% for item in entityview.records %}
                    {% if item.id == keyid %}
                        <li class="active">
                            <a href="#">
                                {% if name %}{{item[name]}}{% else %}{{item.name}}{% endif %}
                                <i class="fas fa-chevron-right float-right"></i>
                            </a>
                        </li>
                    {% else %}
                        <li>
                            <a href="{{ page.url  | add_query: 'id', item.id }}">
                                {% if name %}{{item[name]}}{% else %}{{item.name}}{% endif %}
                            </a>
                        </li>
                    {% endif %}
                {% endfor -%}
            </nav>
        {% endentityview %}
    {% endentitylist %}
{% endif %}Code language: HTML, XML (xml)
Let me explain the code
The first part is creating a header for the navigation with the list title and navigation arrow buttons for navigating up and down in the list.

Get the entity list and view associated with the web page
Line 1: Check if there is a list associated with this page
Line 2: Get and initiate the list by ID
Line 3: Set the number of records to display for the view (can be set to the default value for the entity view by removing the “pagesize:30”)
Create the wrapper and title for the navigation header:
Line 4: Wrapper element for the header
Line 5: Create header title with the entity view name as a link back to the parent page (entity list page)
Line 6: Loop trough all items in the view
Line 7: Identity the current item in the list
Line 8: Set “next” to the index of the next item in the loop
Line 9: Set “prev” to the index of the previous item in the loop
Line 10: Create wrapper element for the navigation arrow buttons
Create the links for the up and down navigation arrows
Line 11: Loop trough records in result starting at index of “prev” and get only 1 record
This will get back only the one record that is the previous one in the for loop.
Line 12: Create a link to that element: The same web page – just with the case ID for the previous element.
Line 13: The button will only be an arrow from FontAwesome.
Lines 14-15: Close link and for loop.
More icons from FontAwesome here: https://fontawesome.com/
Lines 17-21: Do the same for the next element
Lines 22-25: Close open elements
Now we have the start and the navigation header.
List with all the records.
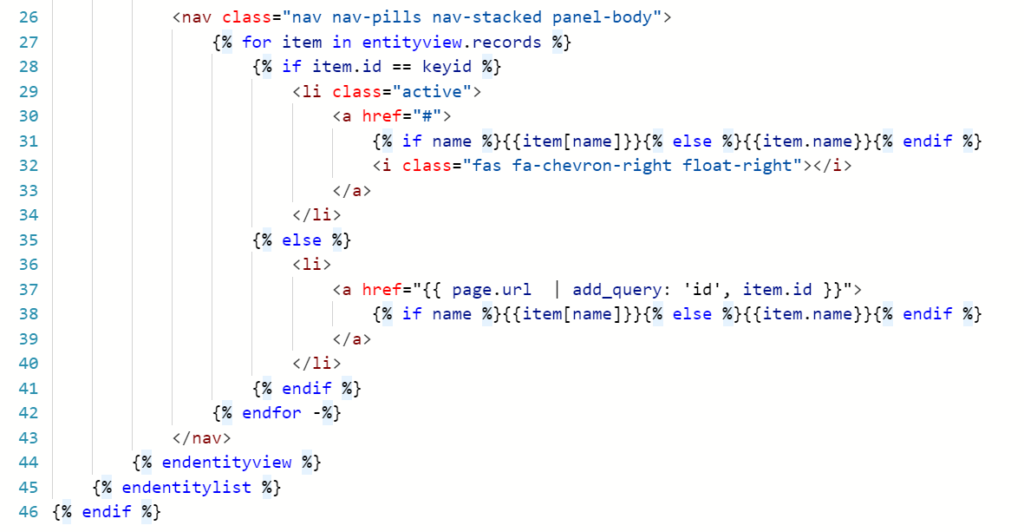
Line 26: Start a list element
Line 27: Loop trough all elements in the entity view
Line 28: When you hit the current (open case) in the list
Line 29: Create a list element with class=”active” to make special styling for current item
Line 30: If the “name” parameter exist for this web template (the one we sent from the “parent” web template) use that field name – if not – default to “name” field (default name for all new entities).
Let me explain the field name thing. For the case entity the name we want to display is stored in the “title” field on the “incident” entity. For the contacts; the “fullname” field name is the one we cant to display. That’s why we send the field name to the web template as a parameter. More information about parameters in include tags for web templates here: https://docs.microsoft.com/en-us/powerapps/maker/portals/liquid/template-tags#include
Wrapping it up
Line 31: Add a nice arrow to the right for usability
Lines 32: Close list element
Line 33: For any other record then the current one
Line 34-44: Repeat the same code as for the current one WITHOUT the “active” class and close all open elements.
That’s it! Now, save the web template.
To see this new template in action we just create a new Page Template, assign it to the “Customer Service – Edit Case” web page and delete the cache.
New Page Template
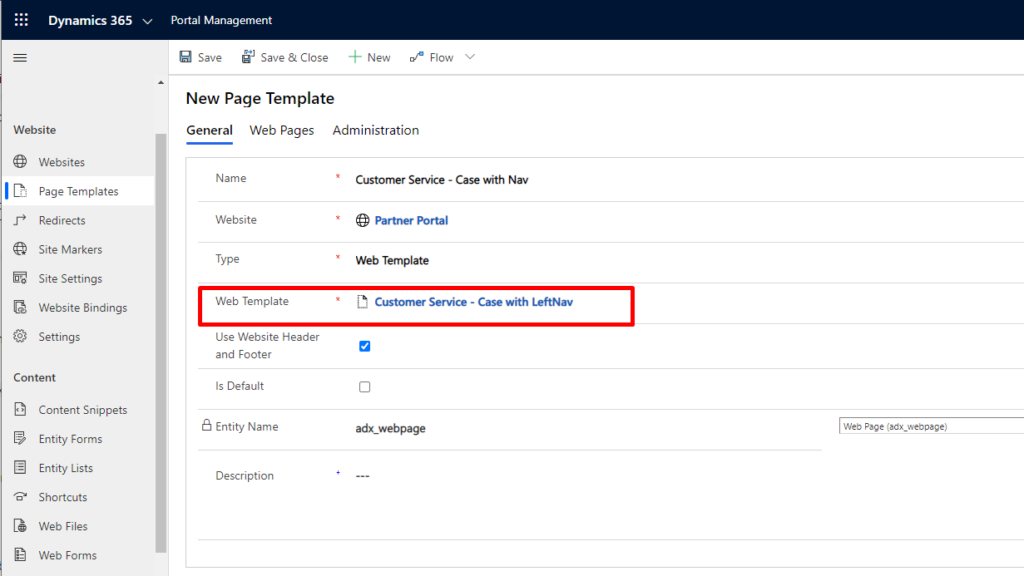
Edit the “Customer Service – Edit Page” and set Page Template to “Customer Service – Case with nav” and add the Entity List “Customer Service – My Portal – Cases List”:
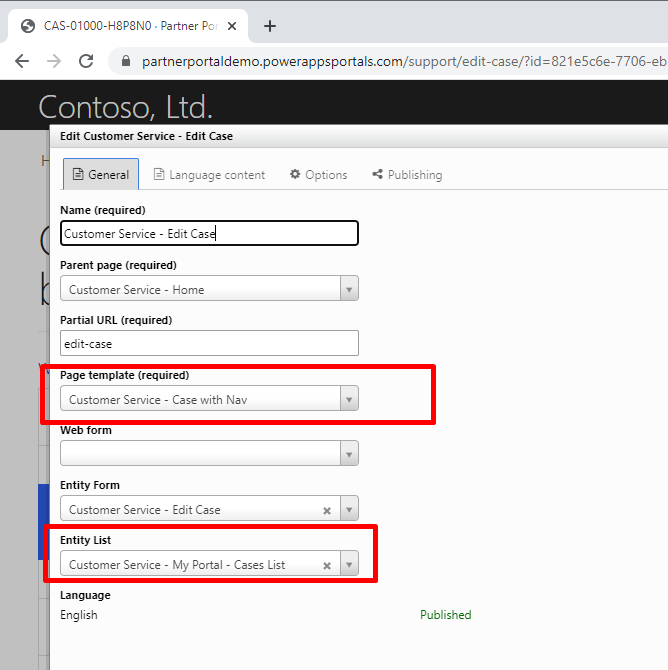
Refresh the cache by adding “_services/about” to your portal URL and click “Clear Cache” button.
Now it’s time to see this baby in action. Go to “https://[yourportalurl]/support” and create some cases. Choose “Edit” for one of them and prepare to be amazed!
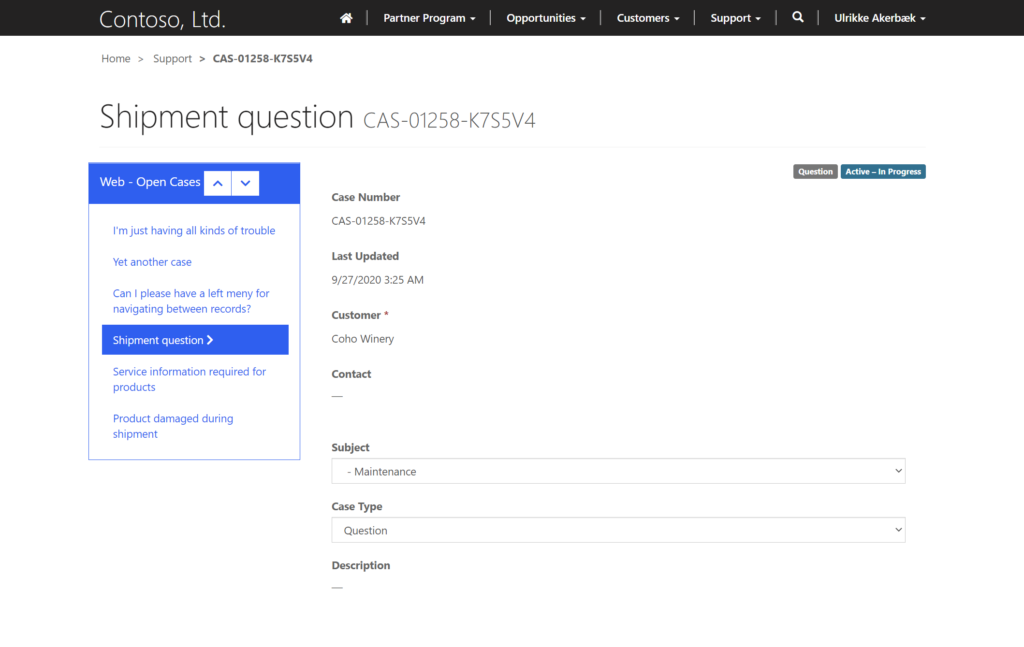
Now you are able to navigate between records on the left navigation; jump between records, navigate up and down in the list using the arrow buttons and get back to the list via the header.
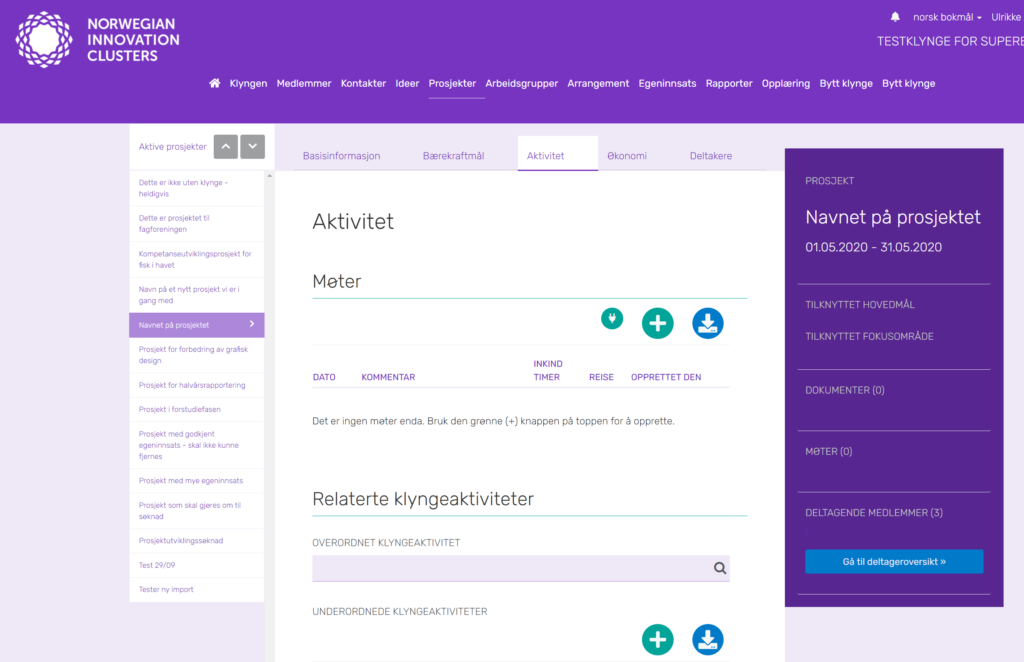
This is what it looks like with other styling in another portal:
Have fun and enjoy!
Feature Photo background by Andrej Lišakov on Unsplash
Your work is amazing. Do you work with Clients in the U.S.?
Thank you, Alvin. Remote work for clients in the U.S is not a problem. Please sent me an email at ua@skill.no with more details and I will see what I can do. Always happy to help. Cheers!
[…] U. (2020). Navigate Between Records in Power Apps Portals. Available at: https://ulrikke.akerbak.com/2020/10/05/navigate-between-records/ [Accessed: 6th March […]
I have a requirement to display case information in the form of dynamics cards on a dashboard page. These cards would show up based on number of cases linked to an account. How can i achieve this?
Hello Jspreet. I’m sorry but this is a bit to far from my core competency. I have worked very little with dashboards in Dynamics. I have worked with “Quick View Forms” on Forms that display data form related records (rows), maybe that’s what you are looking for? Give “Dynamics 365 Quick View Forms” a google and see is that will do the trick. Good luck.
[…] Wouldn’t it be great if you navigate between records without going back to the case list every time? This blog post will show you how to make it happen. — Read on ulrikke.akerbak.com/2020/10/05/navigate-between-records/ […]
[…] process in Power Apps Portals Navigate between records in Power Apps Portals Map to Configuring Power App Portals Send Portal Invitation to Contact with Power Automate Flow […]
Great article. I know to to implement left nav in power pages using Liquid templates
https://www.youtube.com/watch?app=desktop&v=jpHGvMsKxtk
Have you heard how to implement “Microsoft left navigation” in power pages ? This is a specific left nav like in MIcrosoft Office 365 with icons which users can collapse and uncollapse. Sometimes it is called “Burger menu”
Thanks
Maja