Last updated on 05/05/2023
This blog article will show you how to create clickable tabs in Power Pages at the top of forms. These are the tabs you would love to have in MultiStep forms. They will work like navigation. User experience will be much improved by being able to jump back and forth between forms. This is the number one requirement that always makes me choose Forms over Multistep Forms.
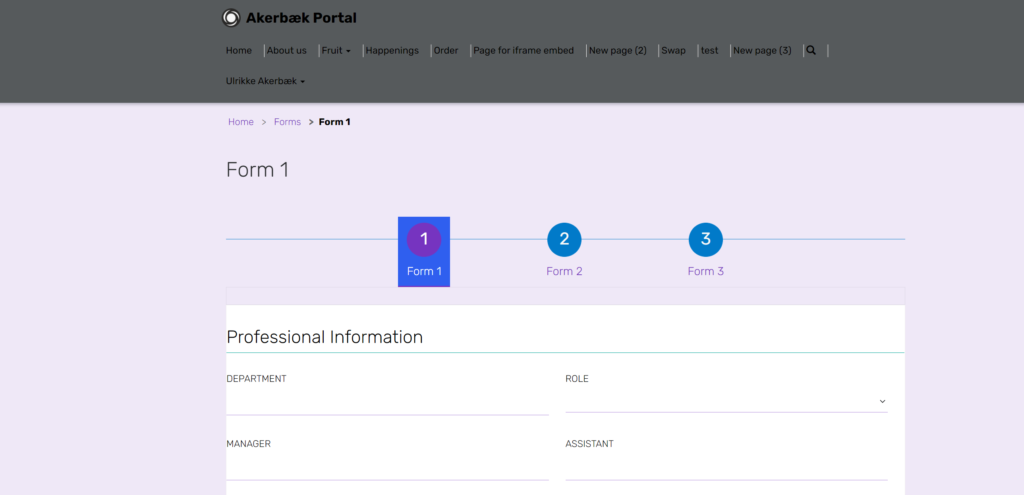
The finished result
What you will have in the end are multiple forms that the end user experience as a set of steps, Tabs on top show the user on which step they are on and allow for easy navigation between steps.
Dataverse forms
The first thing you need to create is the forms you need in Dataverse and publish your changes.
You can choose to create different forms for each of the steps or have one form with one tab for each step. In this example, I created one new form for adding fruits and three tabs.

You will always need to create Dataverse forms first before adding forms to Power Pages. Nick Doenlan wrote a blog post recently where he explain this in more detail:
https://readyxrm.blog/2023/03/11/demystifying-forms-in-power-pages/
Create pages
From Power Pages Design Studio create one parent page with three child pages. Then you will add one form on each child page like this afterward:
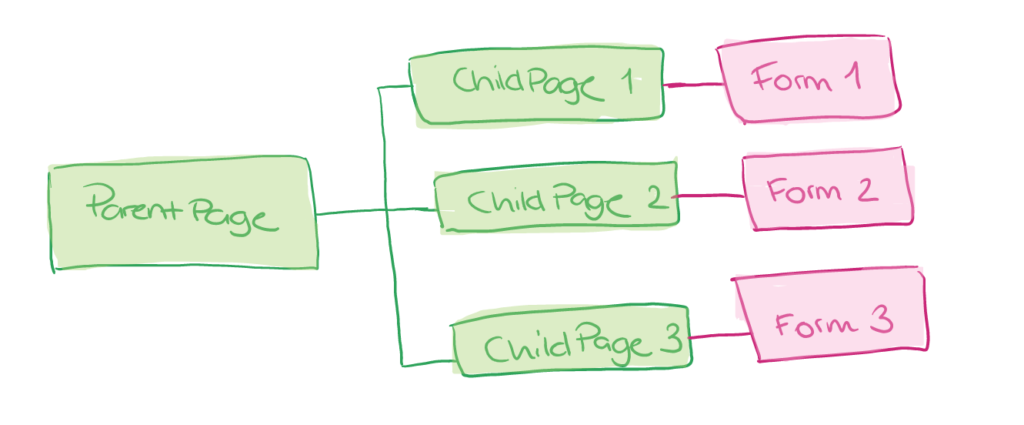
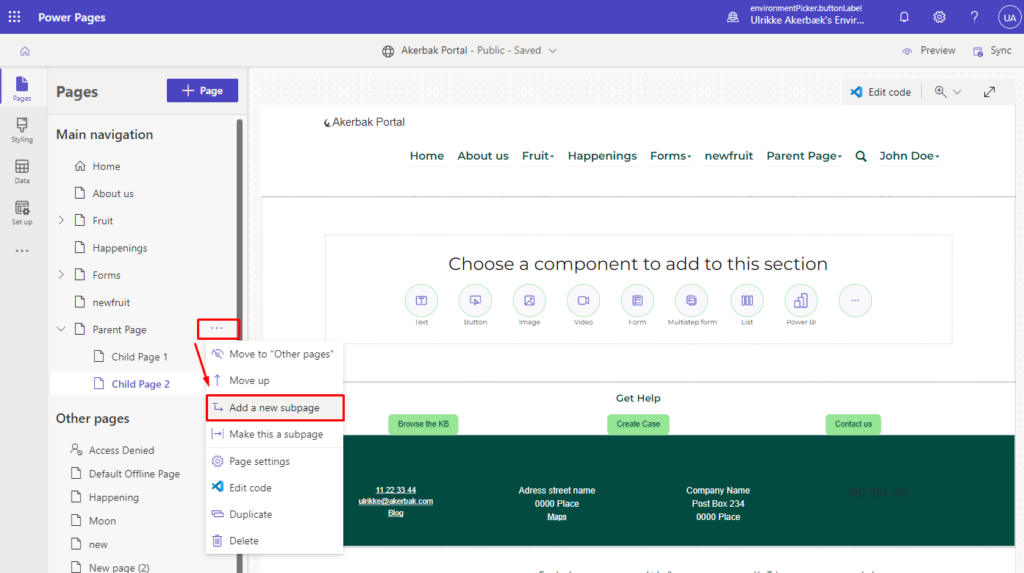
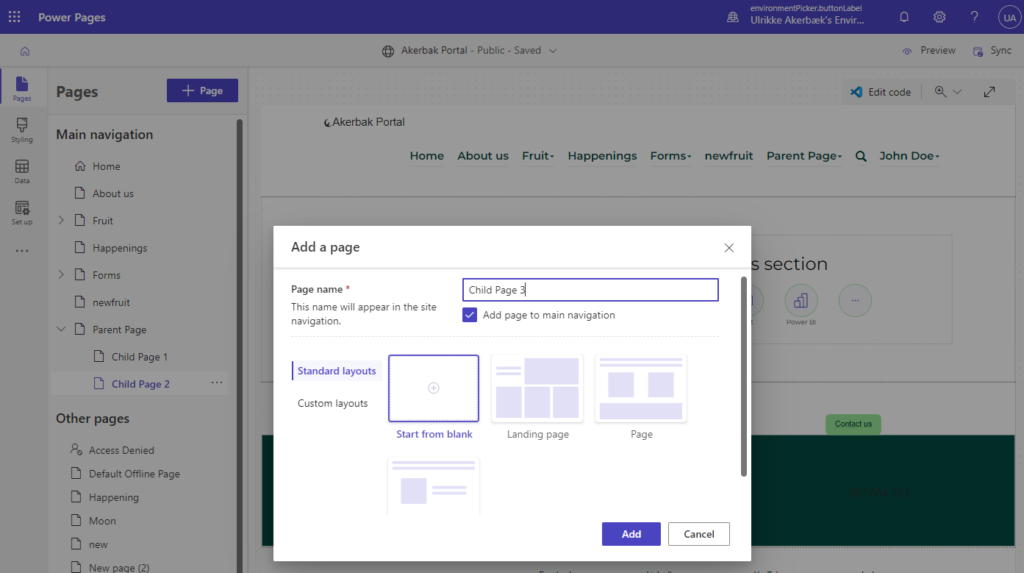
In the Pages workspace add the four new pages:
Add Forms
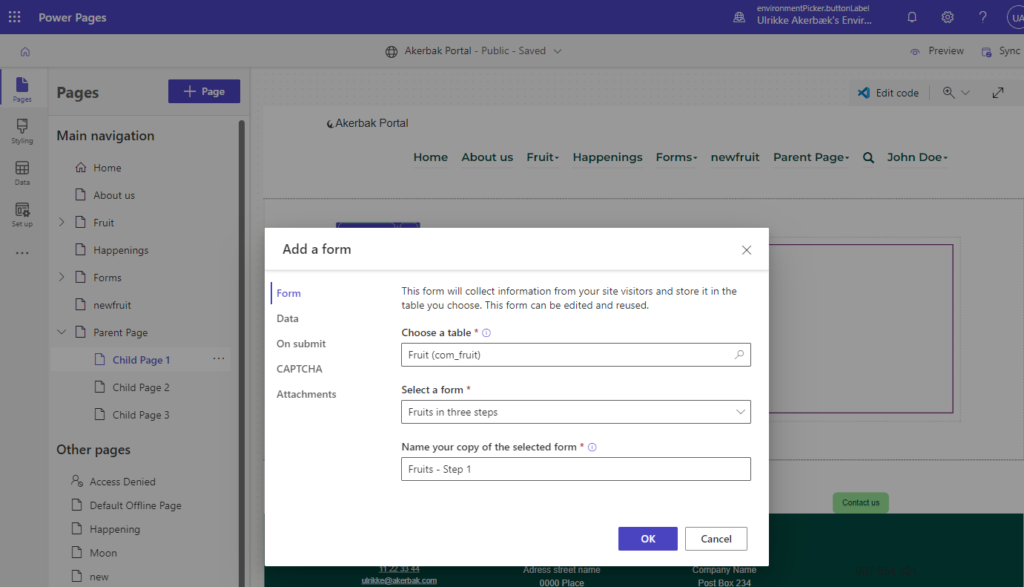
On the first child page add a form.
- Choose “Form” from the “New components” section on the page
- Create new form
- Choose your table
- Select the Dataverse form with three steps – or the form you created to be your first step.
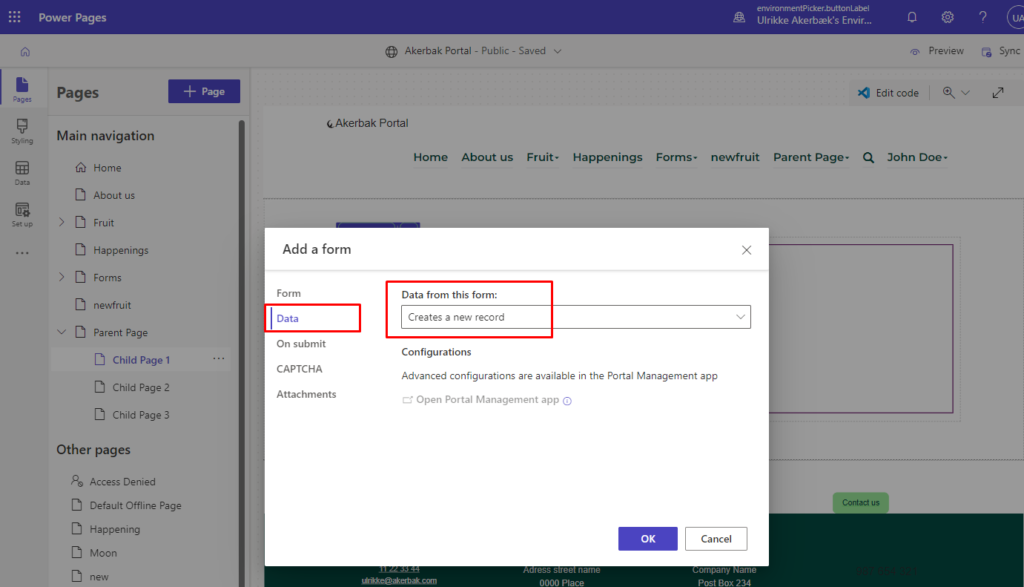
On the “Data” section on the left, I chose “Data from this form”: “Creates a new record”.
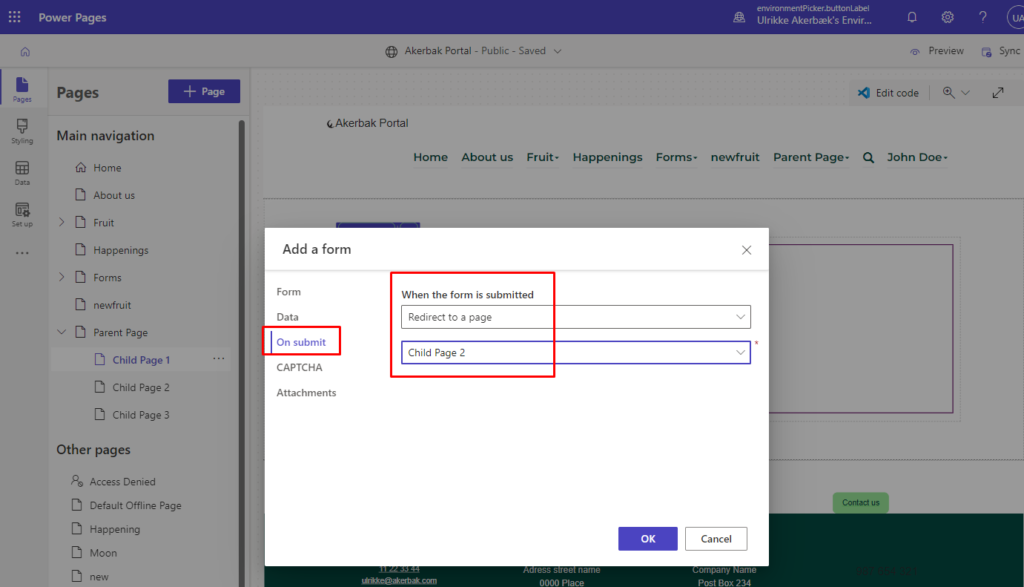
And most importantly, in the “On Submit” section, set “When the form is submitted”: “Redirect to a page” and choose “Child Page 2” from the list of pages.
I also turn off CAPTCHA and make sure attachments are not allowed.
Set form tab
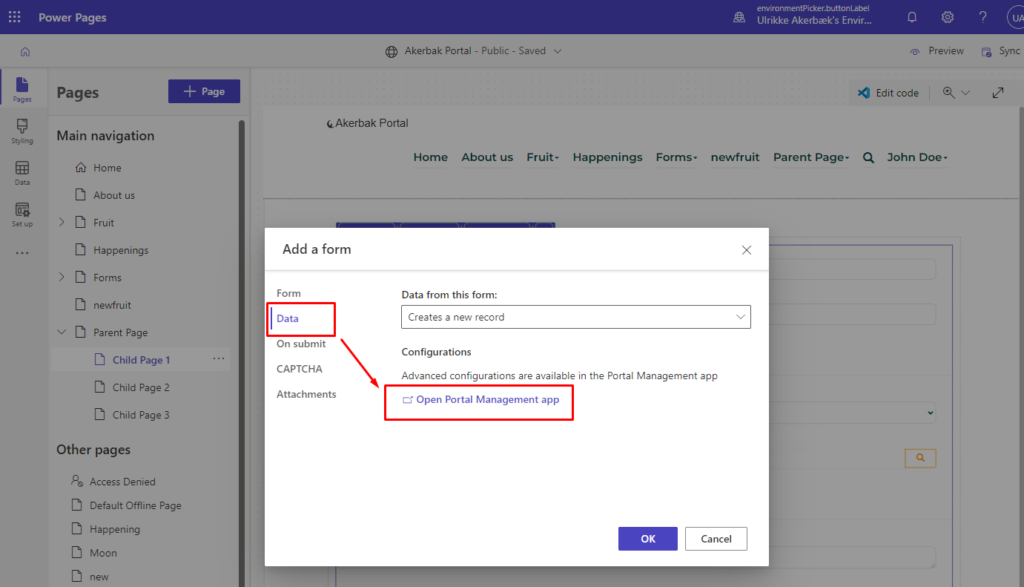
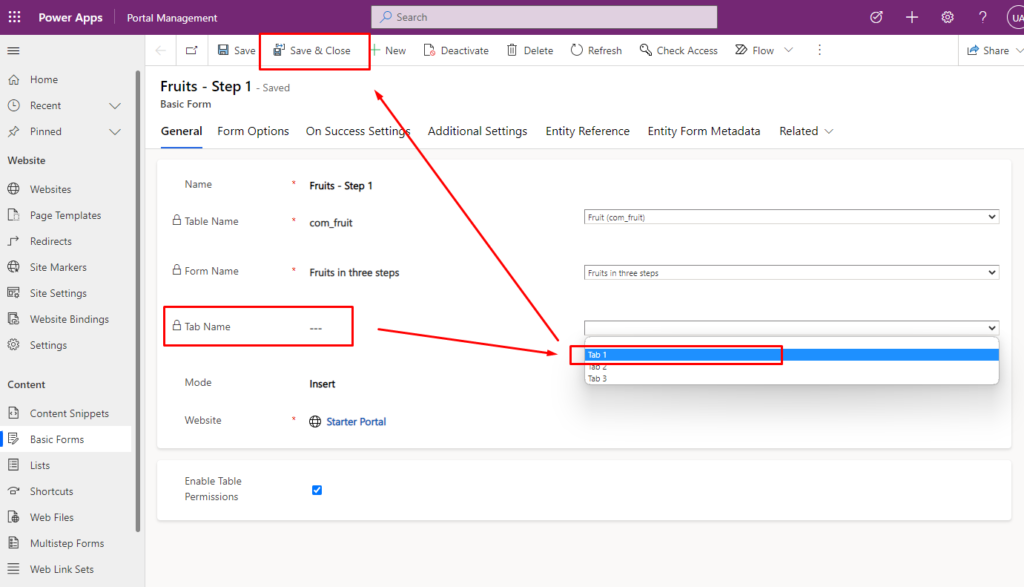
When you add the form to the page it shows all steps from the Dataverse form at once. I want to only show one tab at a time. I hope this functionality will soon be available from the studio, but as I write this blog post I still need to go into the Portal Management App to make the new form only display one form tab.
I click on the form and choose “Edit form”. The modal opens again and I open the “Data” section. From there I can click the “Open Portal Management app” link that will open the portal form in a new browser tab for me (lots of “tabs” going around – stay with me here).
In Portal Management app you will see the form. Open the drop down next to “Tab Name” and choose the tab you want to display for this child page.
Also, there is another key adjustment that we can only make through this app.
- Open “On Success Settings”
- Check the “Append Record ID To Query String” checkbox
- Set “id” as “Record ID Query String Parameter Name”
- Save
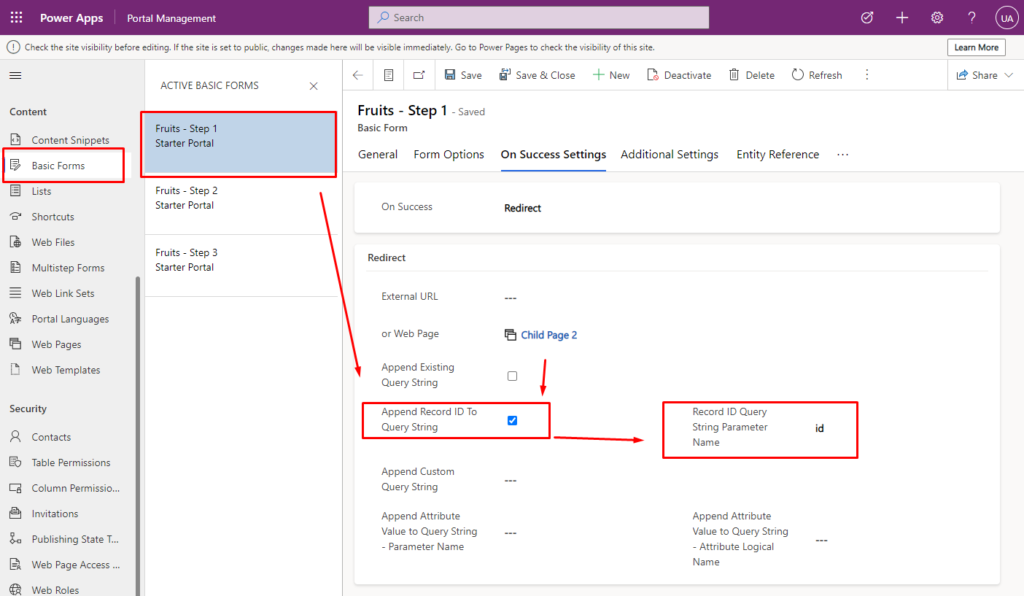
Do this for all steps except the last one, where you display that success message instead.
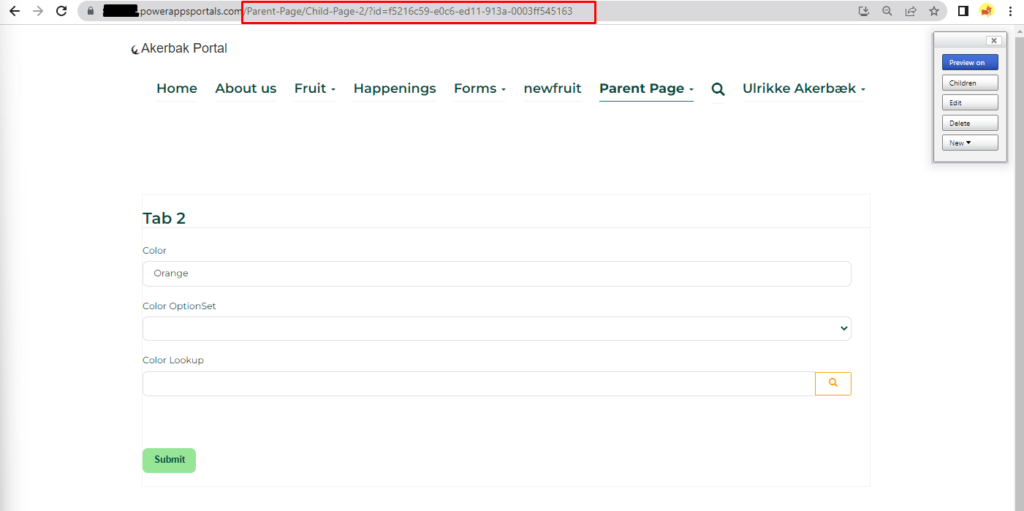
This will add a parameter to the URL as you move between the forms that look like this:
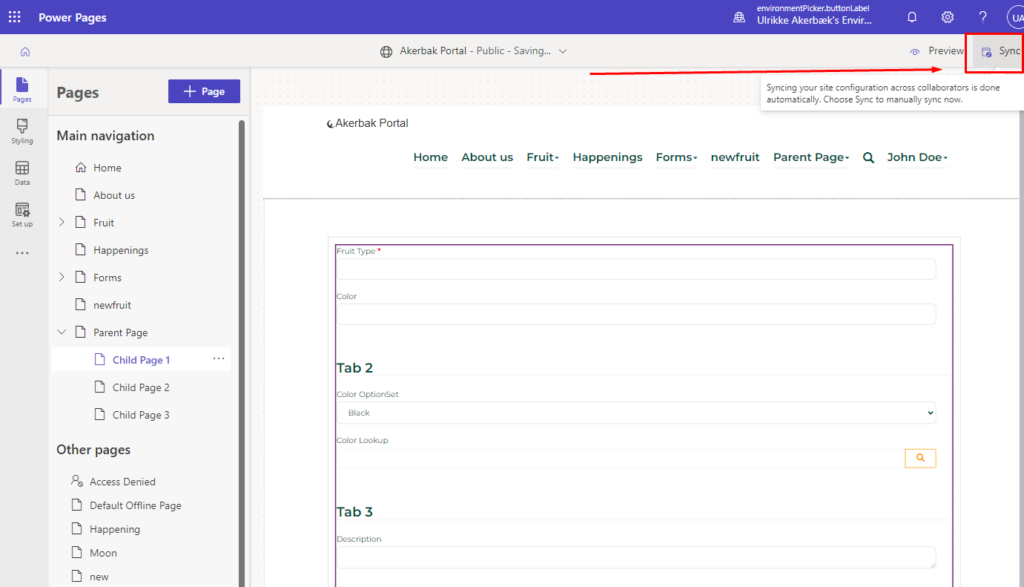
Back in the Power Pages Studio browser tab you will need to sync your changes from Portal Management App before you see the effects. Click the “Sync” button in the top right corner.
Now it’s a matter of just adding new power pages forms to child page 2 and 3. This time I make sure to open the “Data” section and set “Data from this form”: “Updates an existing record”, and redirect on success to the next page. On the form on Child Page 3 I set a display message on submit.
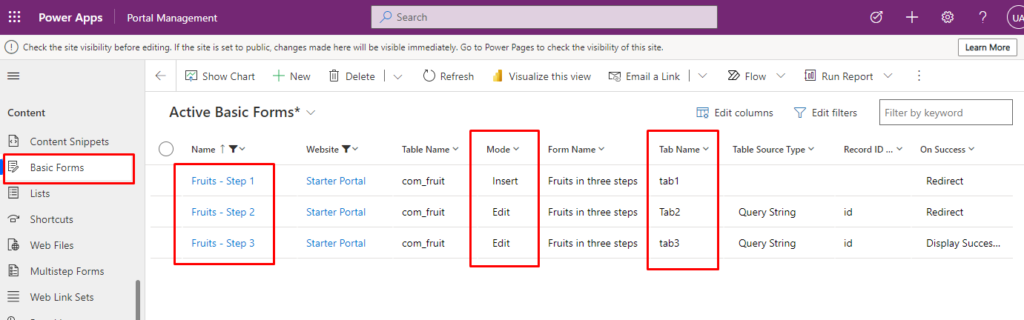
You will need to go into Portal Mangement App to select the Form Tab for each of the forms if you choose to follow my example. This is not necessary if you have three individual Dataverse forms to go with each Power Pages Form.
When I look at my Basic forms from Portal Management App they look like this:
Honestly, I needed to "Preview Page" from the studio before my changes in Portal
Management App came through to the studio.
If you visit the first child page now you will be able to go through the steps by using the forms.
By adding a custom liquid code snippet at the top of our web template that automatically creates navigation links to the sibling pages. This approach can be used for all types of pages to create “local” navigation – not just pages with forms.
Web Template “Form with tabs”
For this example, I create a simple web template I will create as a page template later. This web template has a header with a breadcrumb and a title, and then the main area where lists, primary forms, and advanced forms will render.
<div class="wrapper-body">
    <div class="container">
        <div class="page-heading">
            {% block breadcrumbs %}
                {% include 'Breadcrumbs' %}
            {% endblock %}
            {% block title %}
                {% include 'Page Header' %}
            {% endblock %}
            <!-- ENTER TABS CODE HERE -->
        </div>
        {% block main %}
            {% include 'Page Copy' %}
            {% if page.adx_entitylist %}
                {% include 'entity_list' key: page.adx_entitylist.id %}
            {% endif %}

            {% if page.adx_entityform %}
                {% entityform id: page.adx_entityform.id %}
            {% endif %}

            {% if page.adx_webform %}
                {% webform id: page.adx_webform.id %}
            {% endif %}
        {% endblock %}
    </div>
</div>Code language: HTML, XML (xml)
Add the code for tabs
This is the code that creates tabs from sibling pages.
When you have forms and pages in this structure you can use the liquid “page” object to automatically get the sibling pages and create a tab navigation element based on the pages.
Documentation for the Pages liquid object:
https://docs.microsoft.com/en-us/powerapps/maker/portals/liquid/liquid-objects#page
We add this code to the “Form with tabs” web template.
{% assign depth_offset = depth_offset | default: 0 %}
            {% assign current_page = current_page | default: page %}
            {% assign current_depth = 0 %}
            {% assign parentpage = current_page.parent %}
            {% assign totnum = current_page.parent.children.size %}

            <nav class="reportsteps">
                <ul class="nav nav-pills nav-justified" role="navigation">
                    {% assign crumb_count = 0 %}
                    {% for sibling in current_page.parent.children %}
                        {% assign crumb_count = crumb_count | plus: 1 %}
                        {% if sibling.url == current_page.url %}
                            <li class="step active">
                                <a href="{{ current_page.url}}" title="{{ current_page.title | h }}">
                                    <span class="number">{{crumb_count}}</span>
                                    {{ current_page.title | h }}
                                </a>
                            </li>
                        {% else %}
                            <li class="step">
                                <a href="{{ sibling.url }}" title="{{ sibling.tooltip | escape }}">
                                    <span class="number">{{crumb_count}}</span>
                                    {{ sibling.title | escape }}
                                </a>
                            </li>
                    {% endif %}
                    {% endfor %}
                </ul>
            </nav>Code language: JavaScript (javascript)
Your finished web template looks like this:


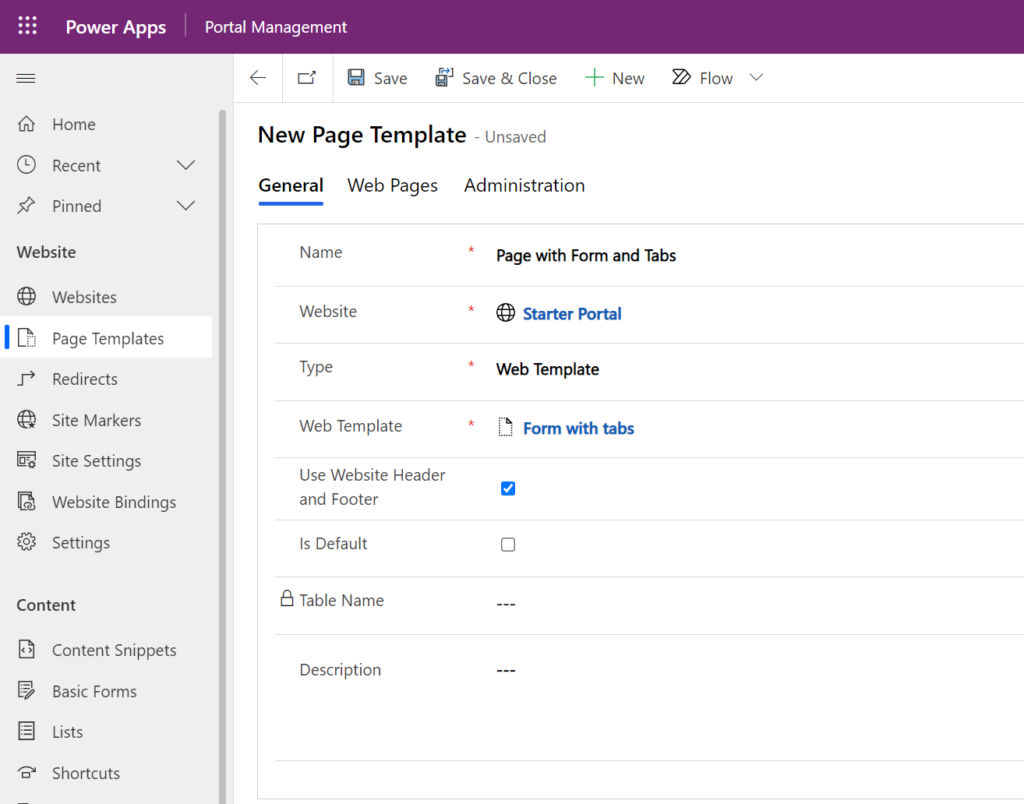
Page template: “Page with Form and Tabs”
Create a page template for your web template
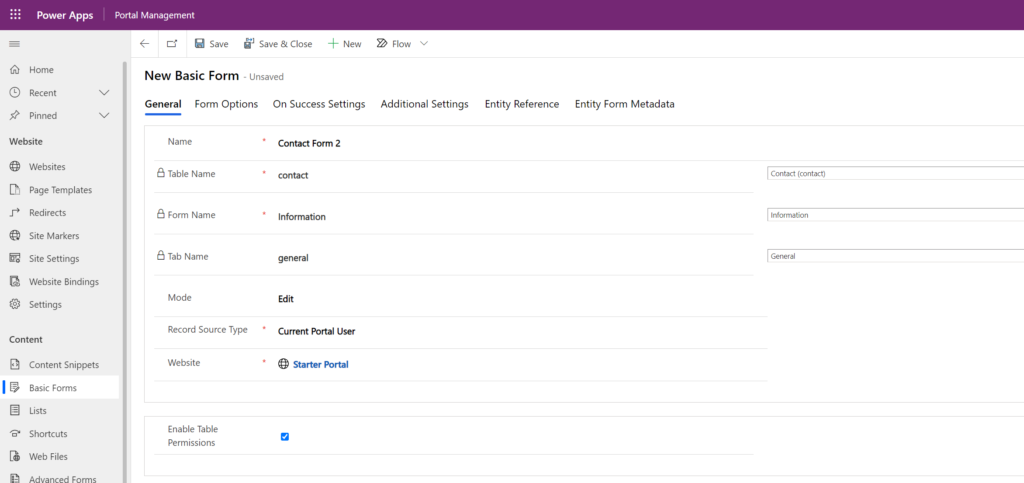
Forms
Create the forms you need and place each form on its own page, like the structure I described earlier. This is what one of my forms looks like.
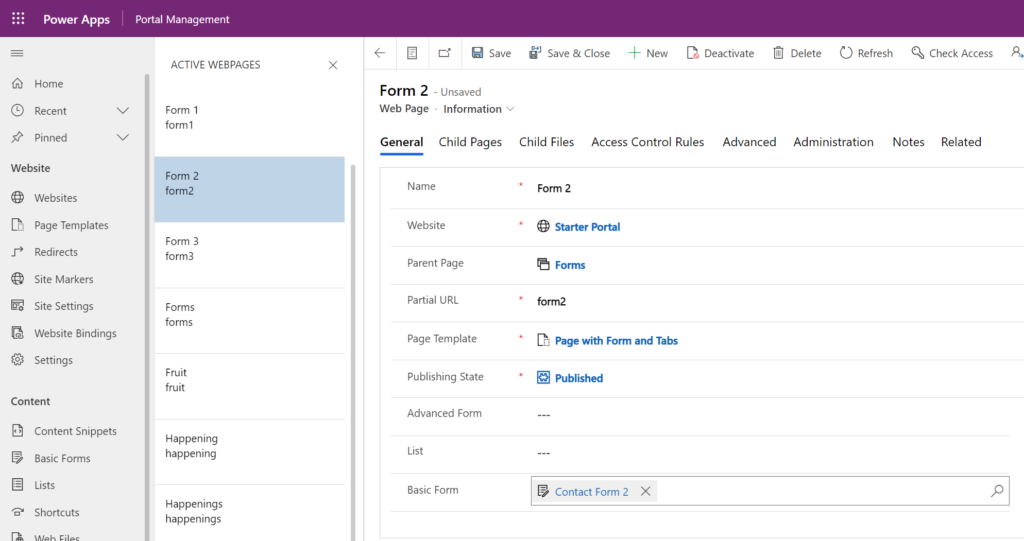
Pages
Create one page for each form and add the form as Basic Form. Choose the “Page with Form and Tabs” page template.
Display order
To ensure that the pages are displayed in the correct order as tabs use the “Display Order” on the pages. Set “Display Order” to “1” for Form 1, etc.:

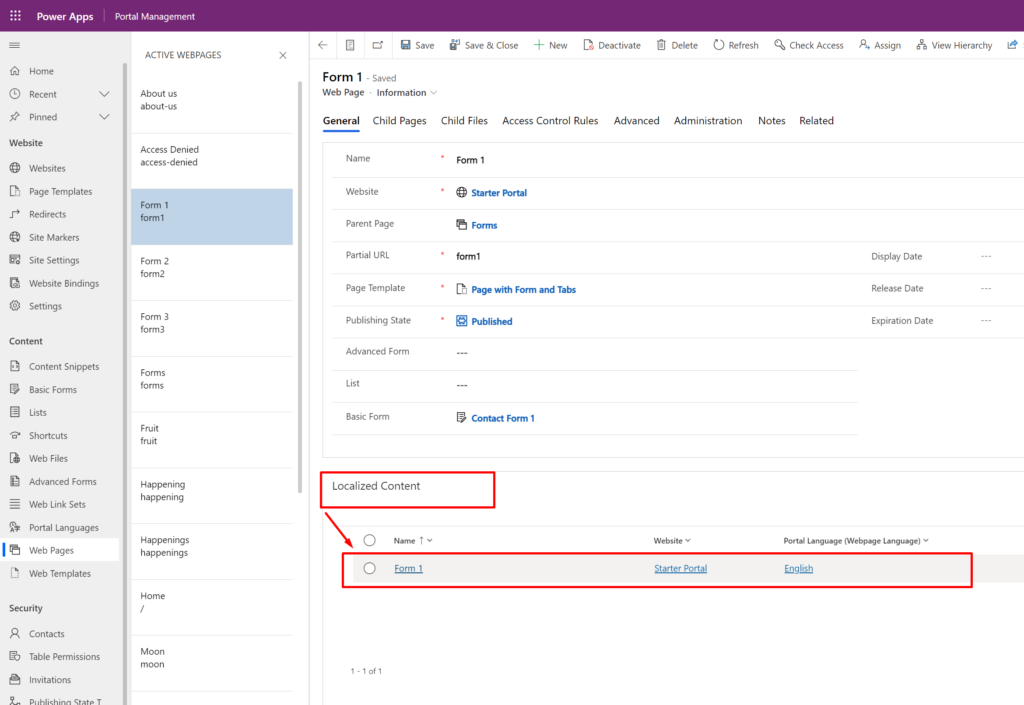
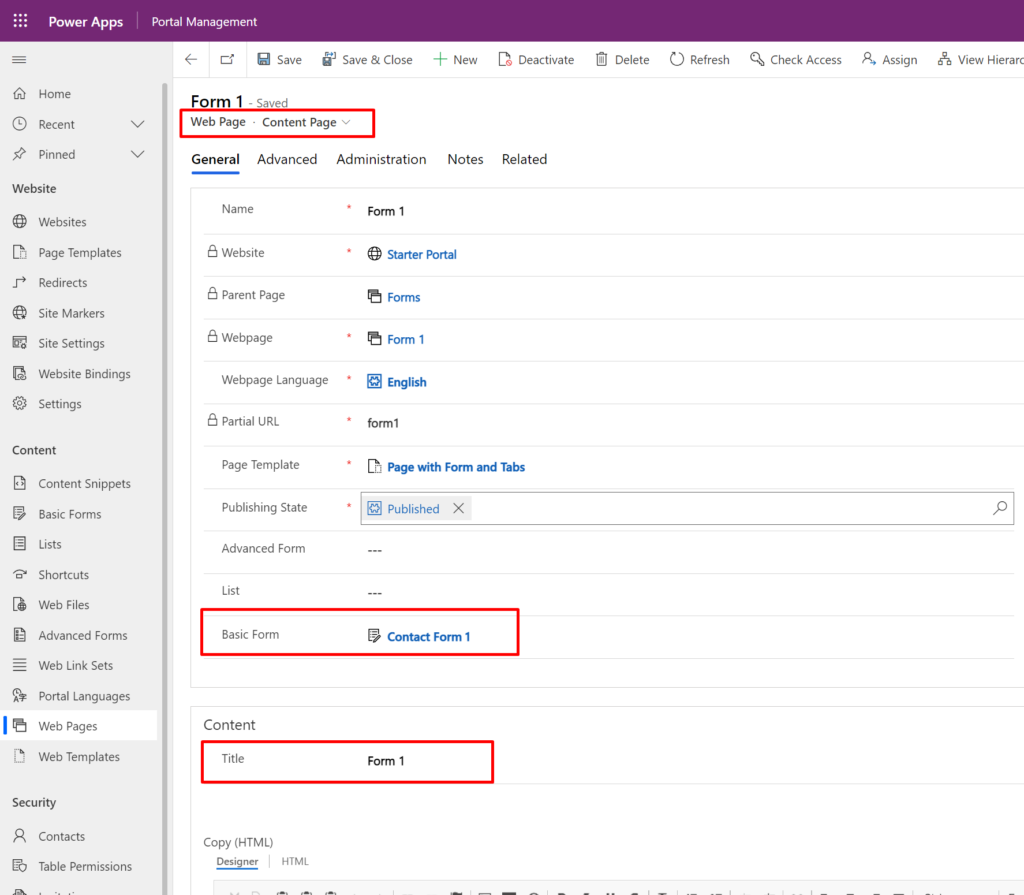
Content Page
Each web page has one or more content pages; one content page for each language on your portal. Make sure you add the form to the Content Page for each web page too:
Save your changes and refresh the cache.
Navigate to the “Form 1” page in your portal and see that at the top of your portal page, there is a line of tabs.
Note! I already have some branding in place in my portal – yours might look different.
Portals use Bootstrap version 3.3.5 and you can use classes and components from Bootstrap directly into your portal code without writing CSS to get the Bootstrap look&feel. More on “Tabs” in Bootstrap 3.3.5 here: https://bootstrapdocs.com/v3.3.5/docs/components/#nav-tabs
Have fun with it and good luck!
Can i do something similar within advanced forms?
Hi Ulrikke, thanks for sharing this,
but where is button save for every page?
can I used this for 1 form in CRM which have 3 tab and then create 3 pages for each tab in Portal but only 1 save button?
Hi Rivai. Sorry for the late response. You can use an Advanced Form for Portals and have one form in CRM witch have 3 tabs and then have the form create one page for each tab – and then have the submit-button at the end. This way the advanced form session keep track of the data entered into the form across the form steps (tabs) and create a record at the last page. Read more about it in the documentation here: https://docs.microsoft.com/en-us/power-apps/maker/portals/configure/load-form-step. Look for “Auto Generate Steps From Tabs” in the “Settings” table to learn more about how it works. Hope this was helpful and not too late. Good luck!
Hi Ulrikke,
Thanks for such a informative post.
we have a similar kind of a requirement where we are displaying a list when click on edit page it should a page with different tabs( of same entity). What I clearly didn’ t get here what is the logic written for forms webpage here which is acting as a parent?
I have created different webpages for each tab as you said but this needs to be linked to one parent page which will be our edit page for the list. How can I achieve that please help.
Thanks,
Sheik
Hello Sheik. Sorry for the late response. You are on to the solution. You need one parent page that is the parent for all your child pages. One form on each child page. The child pages will be displayed as tabs automatically. You have an “edit list” link on the parent page that opens one of the children.
Sorry If I misunderstood your question completely. Hope this was helpful.
Sir, is this outdated ? I can do this but it is showing all the forms links on top as 1, 2, 3 with the pages name, like showing 30 pages.
How to deal with that.
Still power pages haven’t given the multi tab forms.
Hello. Thank you for commenting on this blog post. Yes, you are right, this blog post was written for Power Apps Portals a while ago. I updated it recently with information about how to make this work from the Power Pages new designer. If you click this link you will open the blog post on the section that explain how to use the Portal Management App to set individual tabs on the different forms: https://ulrikke.akerbak.com/2021/10/20/clickable-tabs-navigation-for-power-apps-portals/#setformtab
Hope you make it work. If not; let me know and I will help the best I can. Good luck.
And, by the way; I’m not sir. I am more of a madam 😉
Good morning Ulrikke Akerbaek,
Your solution seems to be the most suitable for what I’m looking for. Unfortunately, it doesn’t work for me. I’ve followed the steps at least 3 times, using a single form and 3 tabs, or 3 different forms. I’m not exactly sure what I’m doing wrong because I don’t see any tab that allows me to navigate between my 3 subpages. Does this tutorial still work? I’m sorry if there are errors in my question; English is not my native language.
Hello Jhoan. I am sorry to learn that this no longer works. This article was written for Power Apps Portals, and I have not been able to refresh the code to work for Power Pages. Now that Bootstrap 5 is finally rolling out I refresh the code in these blog posts, but I can not promise when I will have time to do it, unfortunately.
I will patiently await your work.
Thank you for what you do; you are contributing greatly to the community 🙂
This works wonderfully. Need a little more details.
Hi Ulrikke Akerbaek,
Good Evening!!
My requirement is similar in Power pages. I have already developed the Basic/Multi step form created. Now as a Change request from client, I was asked to build the clickable tabs which doesn’t have the Out of box solution. When i search online, the only solution is yours which is closer to the requirement. Many communities have your URL redirected to this Solution. Wanted to check if there is a solution using JS that is already built.
Thank you
Hello. I do not know of any prebuilt solution for this using JS. I know it is difficult for Multistep forms because it is constrained by the linear navigation back and forth. Even if you manage to visually move the user from one step to another using JS (we have tried to implement this) the session for the multistep form will still be on the same step as before. In my experience the only way to achieve the cross-step navigation on forms is using normal forms like in my blog post. Good luck.
Thank you Ulrikke
I decided to restart the solution to get this feature implemented. So I’ll use the basic forms instead of multi step form. Hope this solution works for me .