Last updated on 30/08/2023
This blog article will show you how to make a Power Automate Flow that replace the old OOTB (Out Of The Box) workflows and enable you to send portal invitation to contact with power automate flow – even to multiple contacts in one action.
First of all I just want to say that there is nothing wrong with using the OOTB workflows. They work like a charm and get you started, just follow the documentation here: Invite contacts to your portal – Power Apps | Microsoft Docs
This OOTB way will make you FIRST create invitations for each of the contacts you want to invite, and then you can send invitations with the workflow. I figured I could do this smarter using Power Automate Flow and automate the whole process into one action. This blog article will show you how.
Second remark is that you can download the Flow that I built here if you want and save yourself the trouble of making it from scratch if you like. But – you will not learn as much. I do recommend building it yourself.
Make your own Power Automate Flow (“flow” for short)
Create you flow logging in to “flow.microsoft.com” and go to “Create” in the left menu. Choose “Instant cloud flow”

Give your flow a name and choose the “When a record is selected” Common Data Service trigger (soon to be renamed “Dataverse” trigger).

At the trigger level choose “Default” environment and “Contact” table (Entity Name).

Generate the unique Invitation Code
Click “+ New Step” and search for “variable”. Select the “Initialize Variable” action:

Give the variable a name and set it to “string” type. Then click the “value” input field and select the “Expression” tab on the content panel. Type guid() and select “Update”. This expression will generate a GUID and store it as a string value in the variable.

Create the Action URL
The action URL is the URL address that the contact will use to redeem their invitation. It should have this structure: https://[YourPortalAddress]/register?invitation=[InvitationCode]
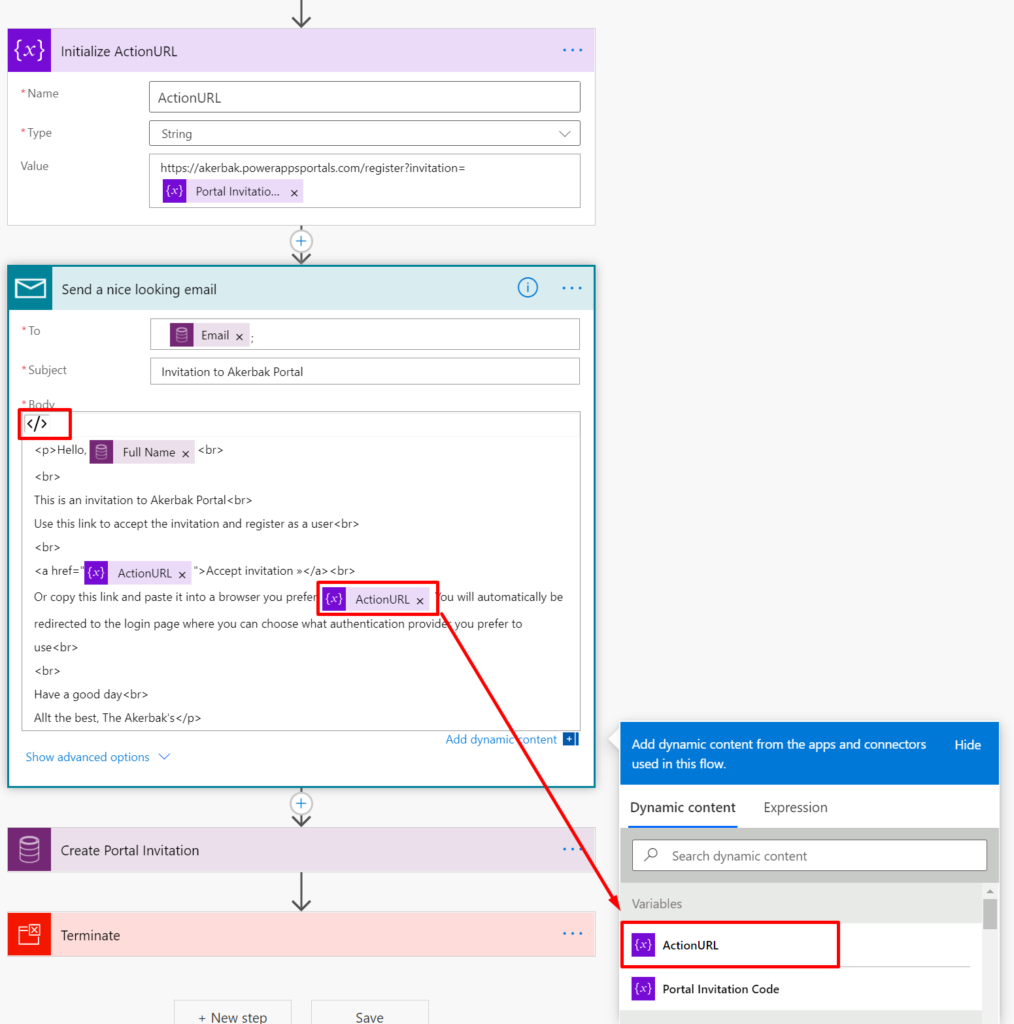
We use another variable to hold this address, so create another “Initialize variable” step, give it a good name and set it to “string” type. Paste the address to your portal and the rest of the structure, and then click the “Portal Invitation Code” variable from the content panel to add it after the “=”.

This will create a string containing the full URL the user will need to redeem their invitation. Now we need to get this URL to the contact, and we’ll get it done with the “Send Email Notification” action.
Send an email

If you have a user to use for one of the Outlook connections then that is the best option. The Email connector works fine as well.

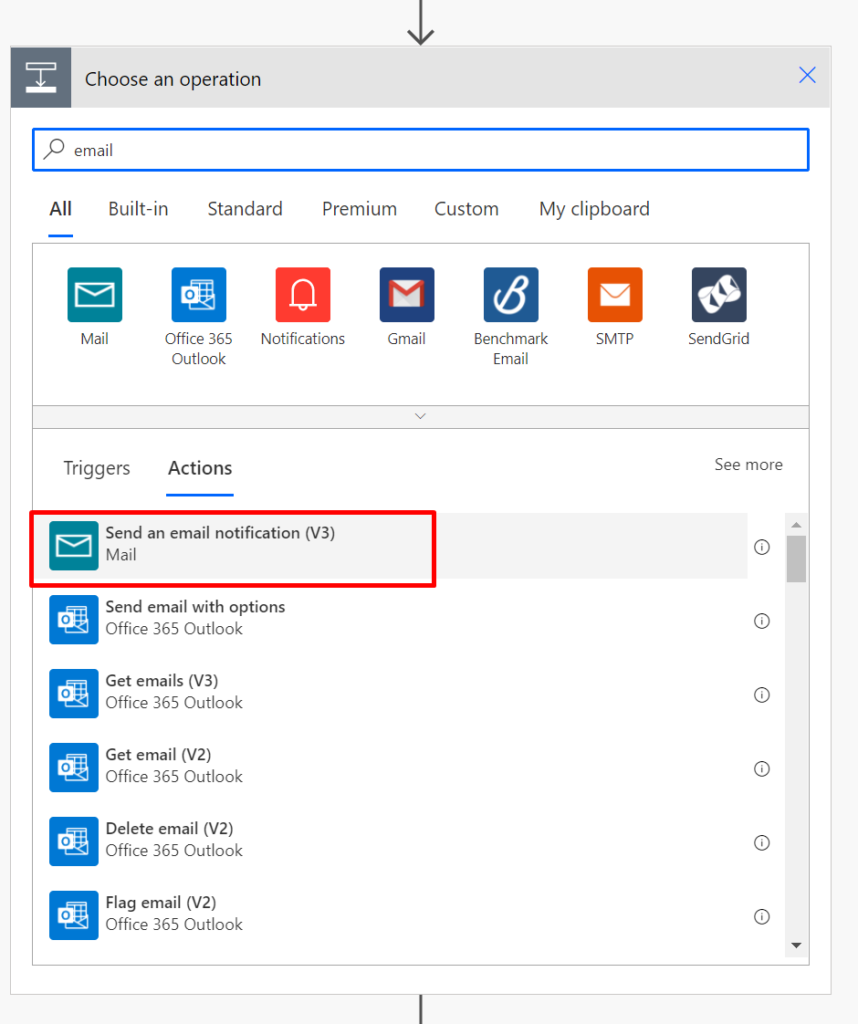
Make sure to click the “code”-icon to be able to write HTML to format the email. Add information about expire dates and actions to take if expire date is reached. Then make sure the text match your brands tone of voice.
Create Invitation
Then we’ll create an invitation related to that contact for the contact to redeem.
Add a step with the “Common Data Services (current environment)” (Soon to be “Dataverse”) connector with the “Create new row” action:

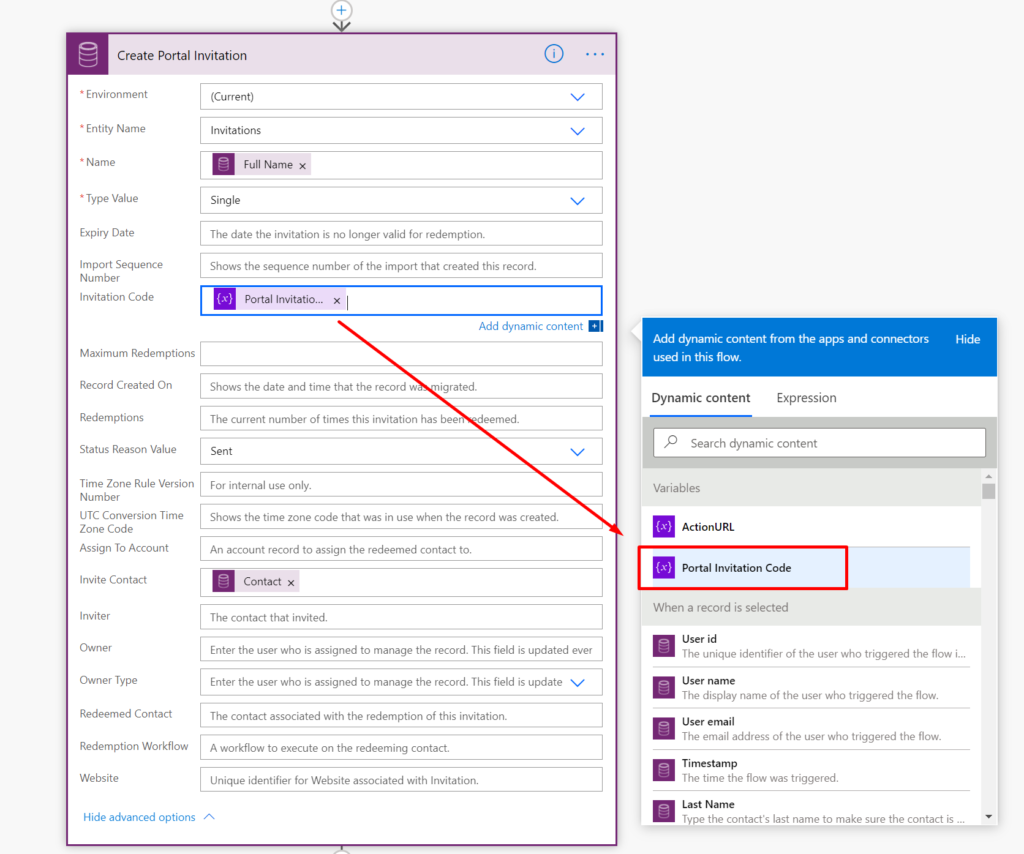
Choose “Invitations” table and select the contacts “Fullname” as name for the new invitation, Set Type to “single” and click “Show advanced options” to see all the columns for this table.

Set “Portal Invitation Code” to the variable we created with the GUID. Then relate “Invite Contact (Contacts)” to the selected contact. At the bottom set “Status Reason” to sent. You can extend this to include a special inviter, set expire date, workflows to trigger and account the contact should be related to on redemption.
Terminate
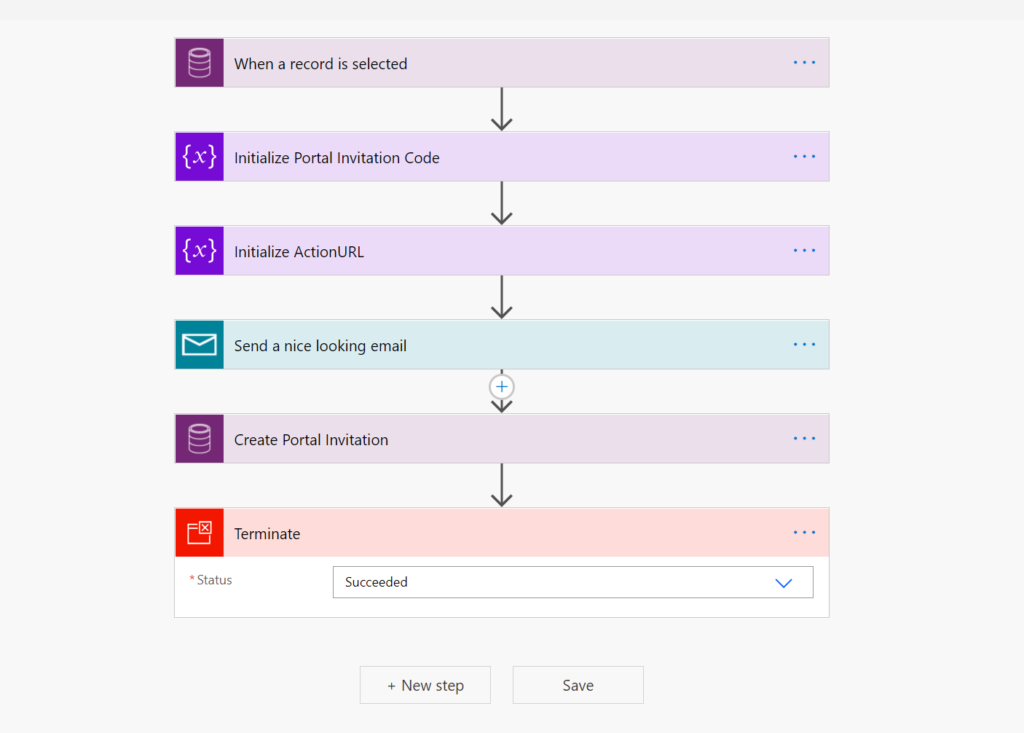
At the bottom we terminate the Flow as successful with the “terminate” step.

When you use this flow in production environments please make sure to add some conditional steps along the way to validate your data, i.e. that the contact has email.
Save the flow, make sure it’s activated (turned on) and try it out on a contact with an email you have access to to see that the whole process works.
You can always find the invitations in your Portal Management app and follow up on contacts web roles and external identities.
Deactivate the legacy Workflows
I guess it’s a good idea to deactivate the legacy workflows, so you don’t end up with duplicate invitation emails.
You find the old workflows by logging into make.powerapps.com, open “Solutions”.
For the old data model (not enhanced) open the solution called
“Dyanmics 365 Portals – Portal Base Workflows” and then open “Processes”.

Open this workflow by selecting the workflow and choosing “Turn off” from the context menu bar.
Make sure to “Publish all Customizations” when you have turned the workflow off.
Customize login, register and redeem pages
Next step is to customize the login, registration and redeem pages. The pages are not available for editing – but I have found a way to get to them – check out this blog post:
https://ulrikke.akerbak.com/2020/02/16/customize-the-sign-in-and-registration-page-in-power-app-portals/
Have fun and please comment on this post or reach out to me if you have questions.
Featured image by Diana Akhmetianova on Unsplash
Hi
Thank you for this article. I am having an issue in the create portal invitation step. In the I am getting the following error : Resource not found for the segment ‘9ff17642-59a2-eb11-b1ac-000d3a3b75fa’.
I think this when I set the Invite Contact property.
Hello. Yes, you need to update the Flow connection and make sure you are connecting to your own Contacts base. Your error means that the Flow cannot find a record/row with the GUID as Id. Please reach out to me on social media with screenshots displaying your difficulty if you require further assistance.
Hi Ulrikke, thanks for the article. I created the workflow following all the steps you have mentioned I am getting the requested email invite but when trying to redeem the code I am getting the error “Redeemtion Code is invalid”. Can you please let me know whats the issue. Thanks in advance.
Hello Priyanka Thakur. It’s not easy to know exactly what is wrong without more information. But, there are some things you can try. Please make sure the URL for your portal is correct. Try to create an invitation manually from the Portal Management Studio and use the automatically generated invitation code in the URL – if that works then maybe something is off with the URL? Please provide more information for me to help you further. Good luck.
Hi, this will not work. I am getting same error as Priyanka mentioned ““Redemption Code is invalid”. This is because Portal invitation code cannot be created from power automate it is created by some plugin and the logic to create invitation is not like you have mentioned
Hello Jay. You are right! Out of the box it is a custom Portals workflow action that create the invitation code. When we use Power Automate for the invitations instead of the workflow we need to create our own code. It’s important to disable (deactivate) the old workflow so that it doesn’t interfere and still try to create a code in the background. Hope this clear the confusion. It’s helpful to send test emails to yourself and match the code created by the flow to the one stored on the contact. Is it a match? Good luck!
HI Thanks for the Guide. Is it possible to trigger the workflow on contact creation with a if condition for a specific field like a workflow?
Because I have got the requirement to create a contact via portal and trigger the invitation process, thus I established a field with contactorigin. If contactorigin=portal I would like to trigger the flow.
Hello Mario. Yes, absolutely! That’s a great way to allow for selv-service on a portal! Documentation for the Dataverse trigger in Power Automate will allow you to select the columns that need to change in order for the flow to trigger: https://docs.microsoft.com/en-us/power-automate/dataverse/create-update-delete-trigger#filtering-columns. Hope it helps 🙂
Hello, good? could you help me, I need to create a flow that sends an email notification when the user clicks the submit button on the advanced form of the power apps portal, so when the user submits the form, me or my team receive a notification in the email stating that the form has been finalized/sent.
Hello Luan. This is a great question – and something we do all the time. If your form create a new row in a table in dataverse you can create a Power Automate Cloud Flow that trigger when a new row is added to that table. Check out this new Dataverse connector in the Microsoft documentation: https://docs.microsoft.com/en-us/power-automate/dataverse/create-update-delete-trigger. Hope it helps! 🙂
[…] Portals Navigate between records in Power Apps Portals Map to Configuring Power App Portals Send Portal Invitation to Contact with Power Automate Flow Lock Portal behind […]
Hi Ulrikke, Thank you for your wonderful work. In following your process, I have noticed that the ” when a record is selected” trigger has been deprecated, and I dont have acces to it, do you have an update, or workaround for this process?
Hi Torien. Thank you so much for reaching out. Yes, you search for the Dataverse Connector and the trigger is called “When a row is added, modified or deleted”. Hope it helped.
Hi, The new trigger now changes the whole flow. It’s expected from this flow that the user manually sends the invitation. Not automatically being sent out to all new users. Do you know what else to use instead of “When a row is added, modified or deleted”, I want it to be similar to “when a record is selected”
Hi. Yes, you can use the legacy “When a record is selected (Legacy Dataverse Connector)” trigger if you create an “Instant” type Flow from inside a solution. This flow you can run from a Model Driven App when selecting one or multiple contacts.
Hi ULRIKKE , I have creates my own flow that sends invitation code to the user whom i am adding in our contacts. But i noticed that there is some unknown flow is also triggering that also sends invitation code to the user. Please advise how can we deactivate this flow.
Email body is something like this.
Hi,
use this link to accept the invitation….so on…
Hi. It’s probably not a flow, but one of the old workflows that handles this out of the box. You will need to go in and turn this off. I added a section at the bottom of the blog post that describes how you can turn the old workflow off. https://ulrikke.akerbak.com/2021/02/15/send-portal-invitation-to-contact-with-flow/#workflows
Hope it works. Best of luck!