Last updated on 31/05/2022
Let me show you how to customize the sign-in and registration page in Power App Portals.
There is no obvious way to customize the sign-in and registration page in Power App Portals. The pages don’t exist in the Web Pages directory, and there is no Web Template. Even if you are logged into the portal as an administrator the Portal Content Editor Toolbar doesn’t appear on these pages. There is no way – essentially – to edit the look and feel of these pages.
Well, there is. And you might think it is a dirty hack – but I have used it in production for 2 years without any hiccups. The fix is the same for both the sign-in page and the registration page – and for any other page, you cannot reach the normal way. I will demonstrate using the sign-in page.
Short cut
For those of you who know your way around Portals, this is a shortcut. Copy this code
<script>
  $("#content-container").addClass("signinpage");
</script>Code language: HTML, XML (xml)
and paste it into the value of the Content Snippet “Account/SignIn/PageCopy”

This will give you a CSS class at the top level div element on the sign-in page. Now you’ll be to add custom styles using the class “signinpage” as the top CSS selector.
The longer story
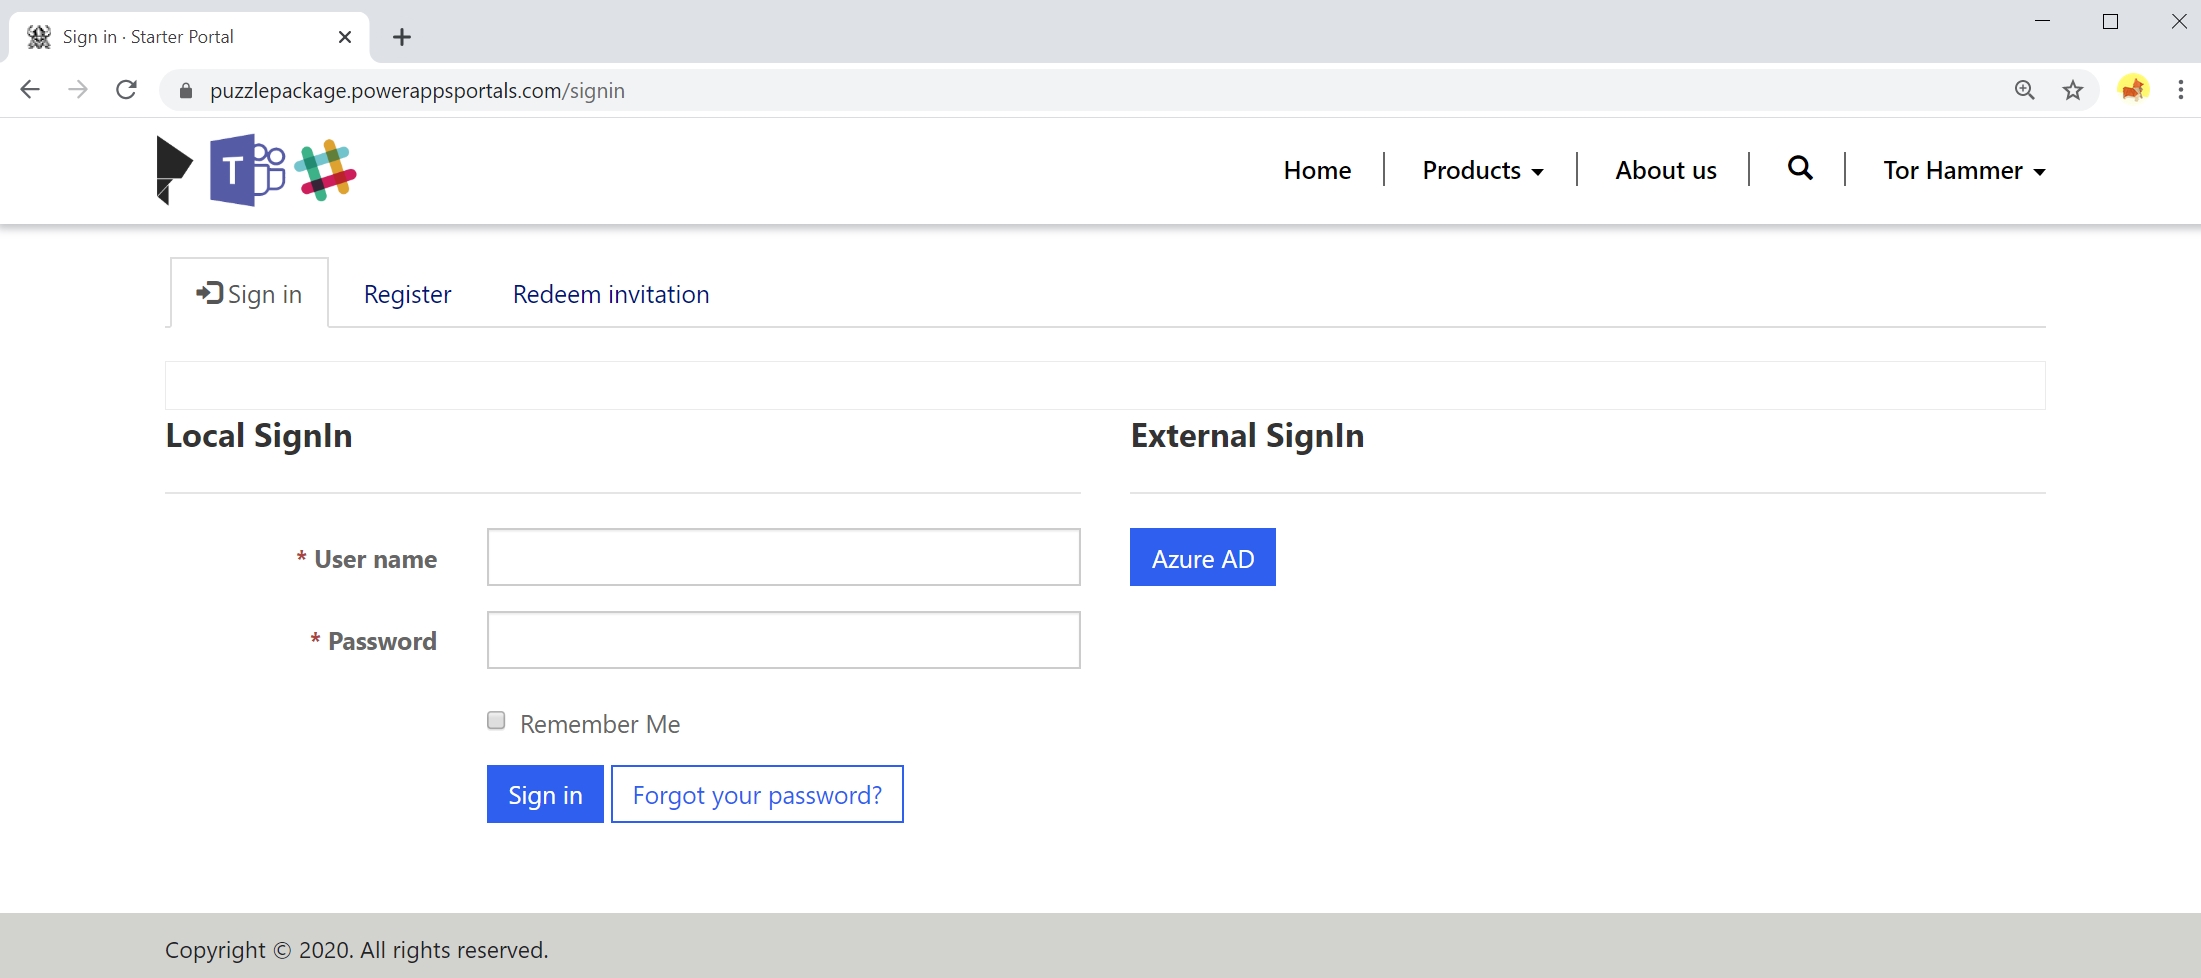
Out of the box, the sign-in page and the registration page look about the same.
The HTML structure of the content look something like this:
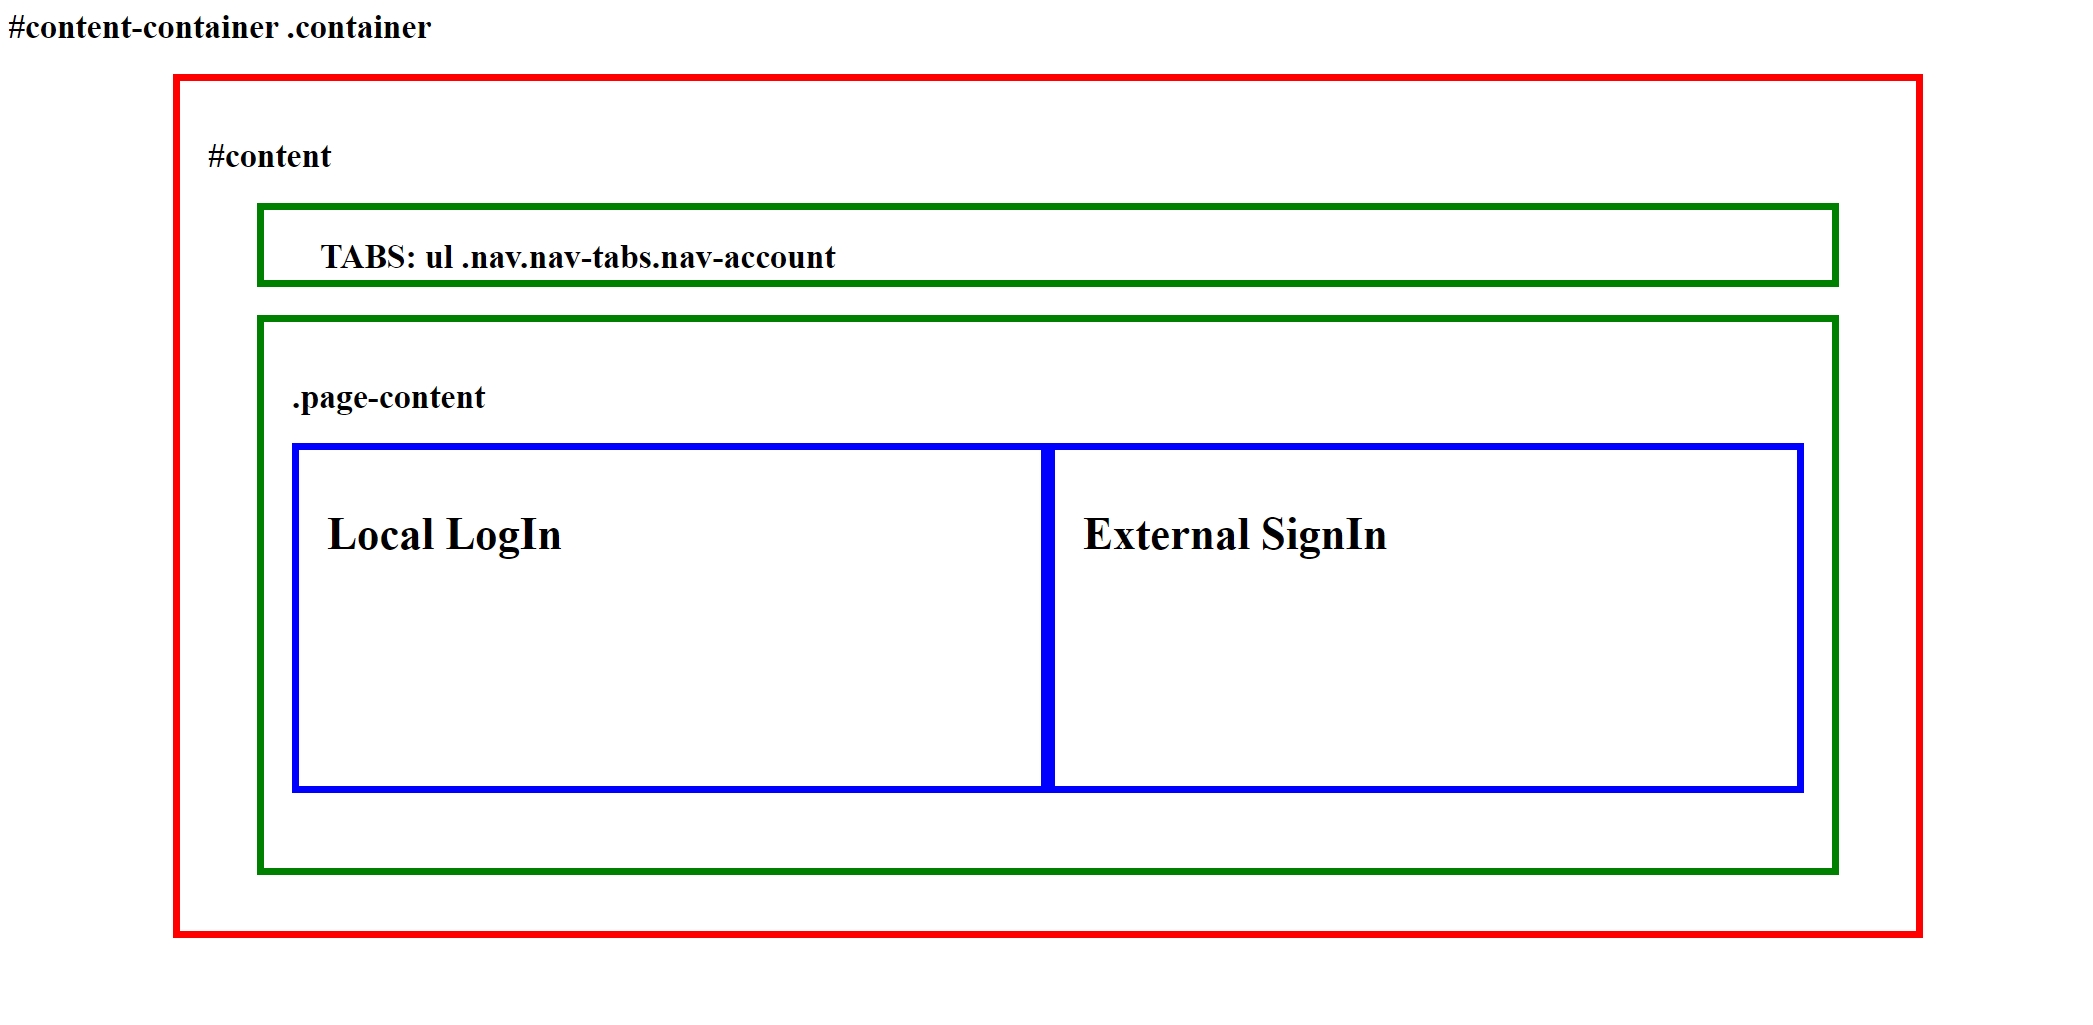
All the CSS selectors on this page are the same as any other page in your portal. Styling this page with CSS will style all other pages the same way. Challenge is to identify a CSS selector that let us limit the styling to this page only.
Long story short – there is no such CSS selector. Trust me – I looked.
Now, then, what do we do? We create one.
Because we cannot get to the web page, the page template or the web template we need to work with the smaller parts, the Content Snippets. In this case the Page Copy.
We get this done from the backend. Open the Portal Management App from make.powerapps.com. Not sure what the Portal Management App is? Look at my blog post Map to Configuring Power Apps Portals
Content Snippet “Account/SignIn/PageCopy”
More about Content Snippets from Microsoft Portals Documentation
Navigate to “Content Snippets” and locate “Account/SignIn/PageCopy”
Copy the following code
<script>
  $("#content-container").addClass("signinpage");
</script>Code language: HTML, XML (xml)
and paste it into the value of the content snippet. It will look like this when you got it right
Save it and – REFRESH the cache – and refresh your sign-in page.
The sign-in page
URL for the sign-in page is always
https://www.[portaldomain]/signin
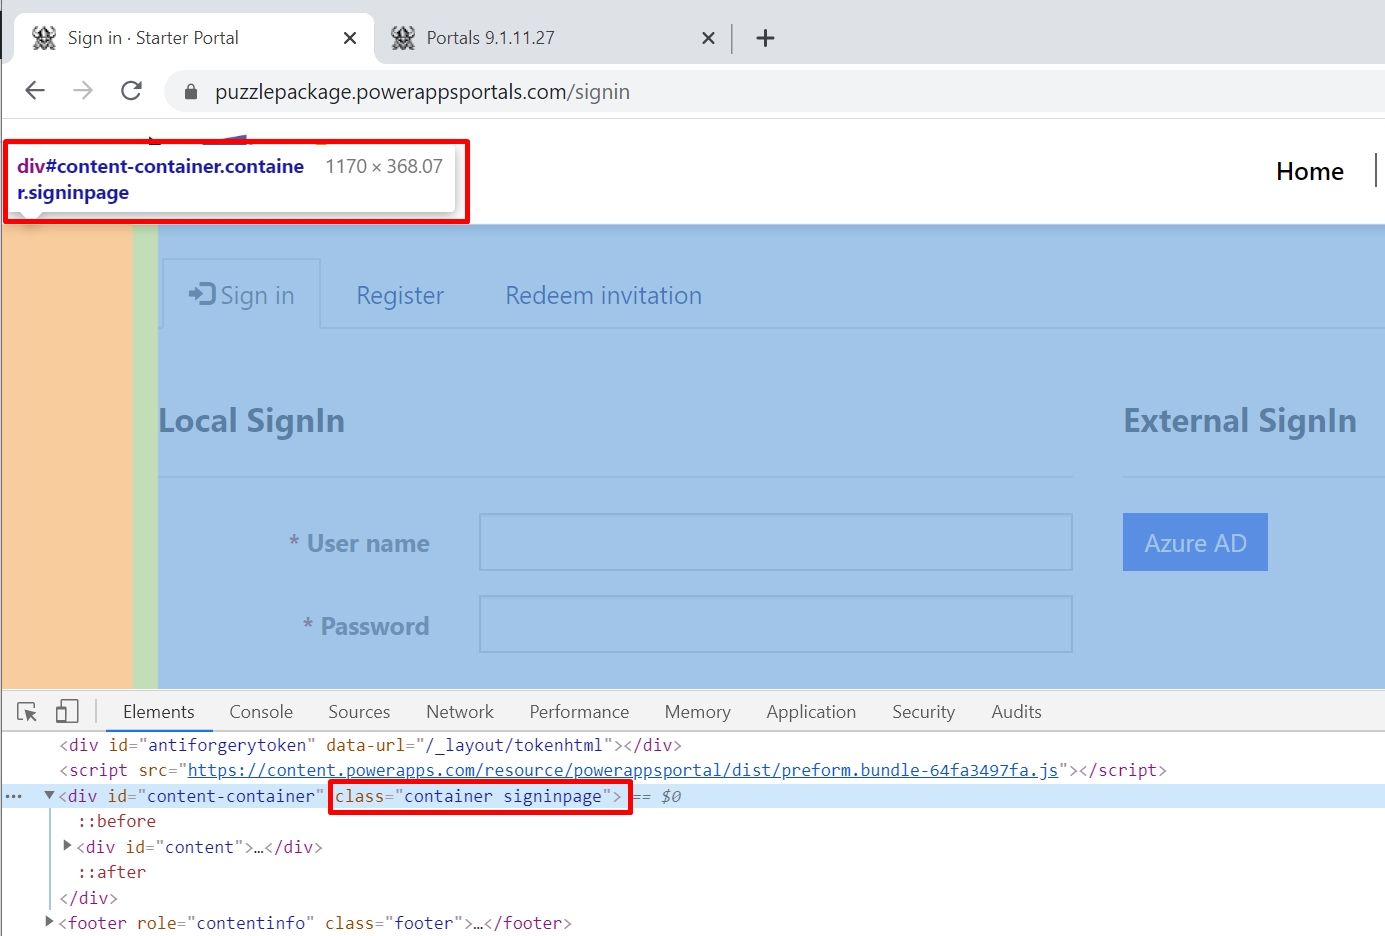
There will be no apparent change – but if you look closely at the HTML structure through the browser developer tool you’ll see that there is a new Class “signinpage” on the div with id = content-container.
As all makeovers with some self-respect we have before and after pictures, look:
Before

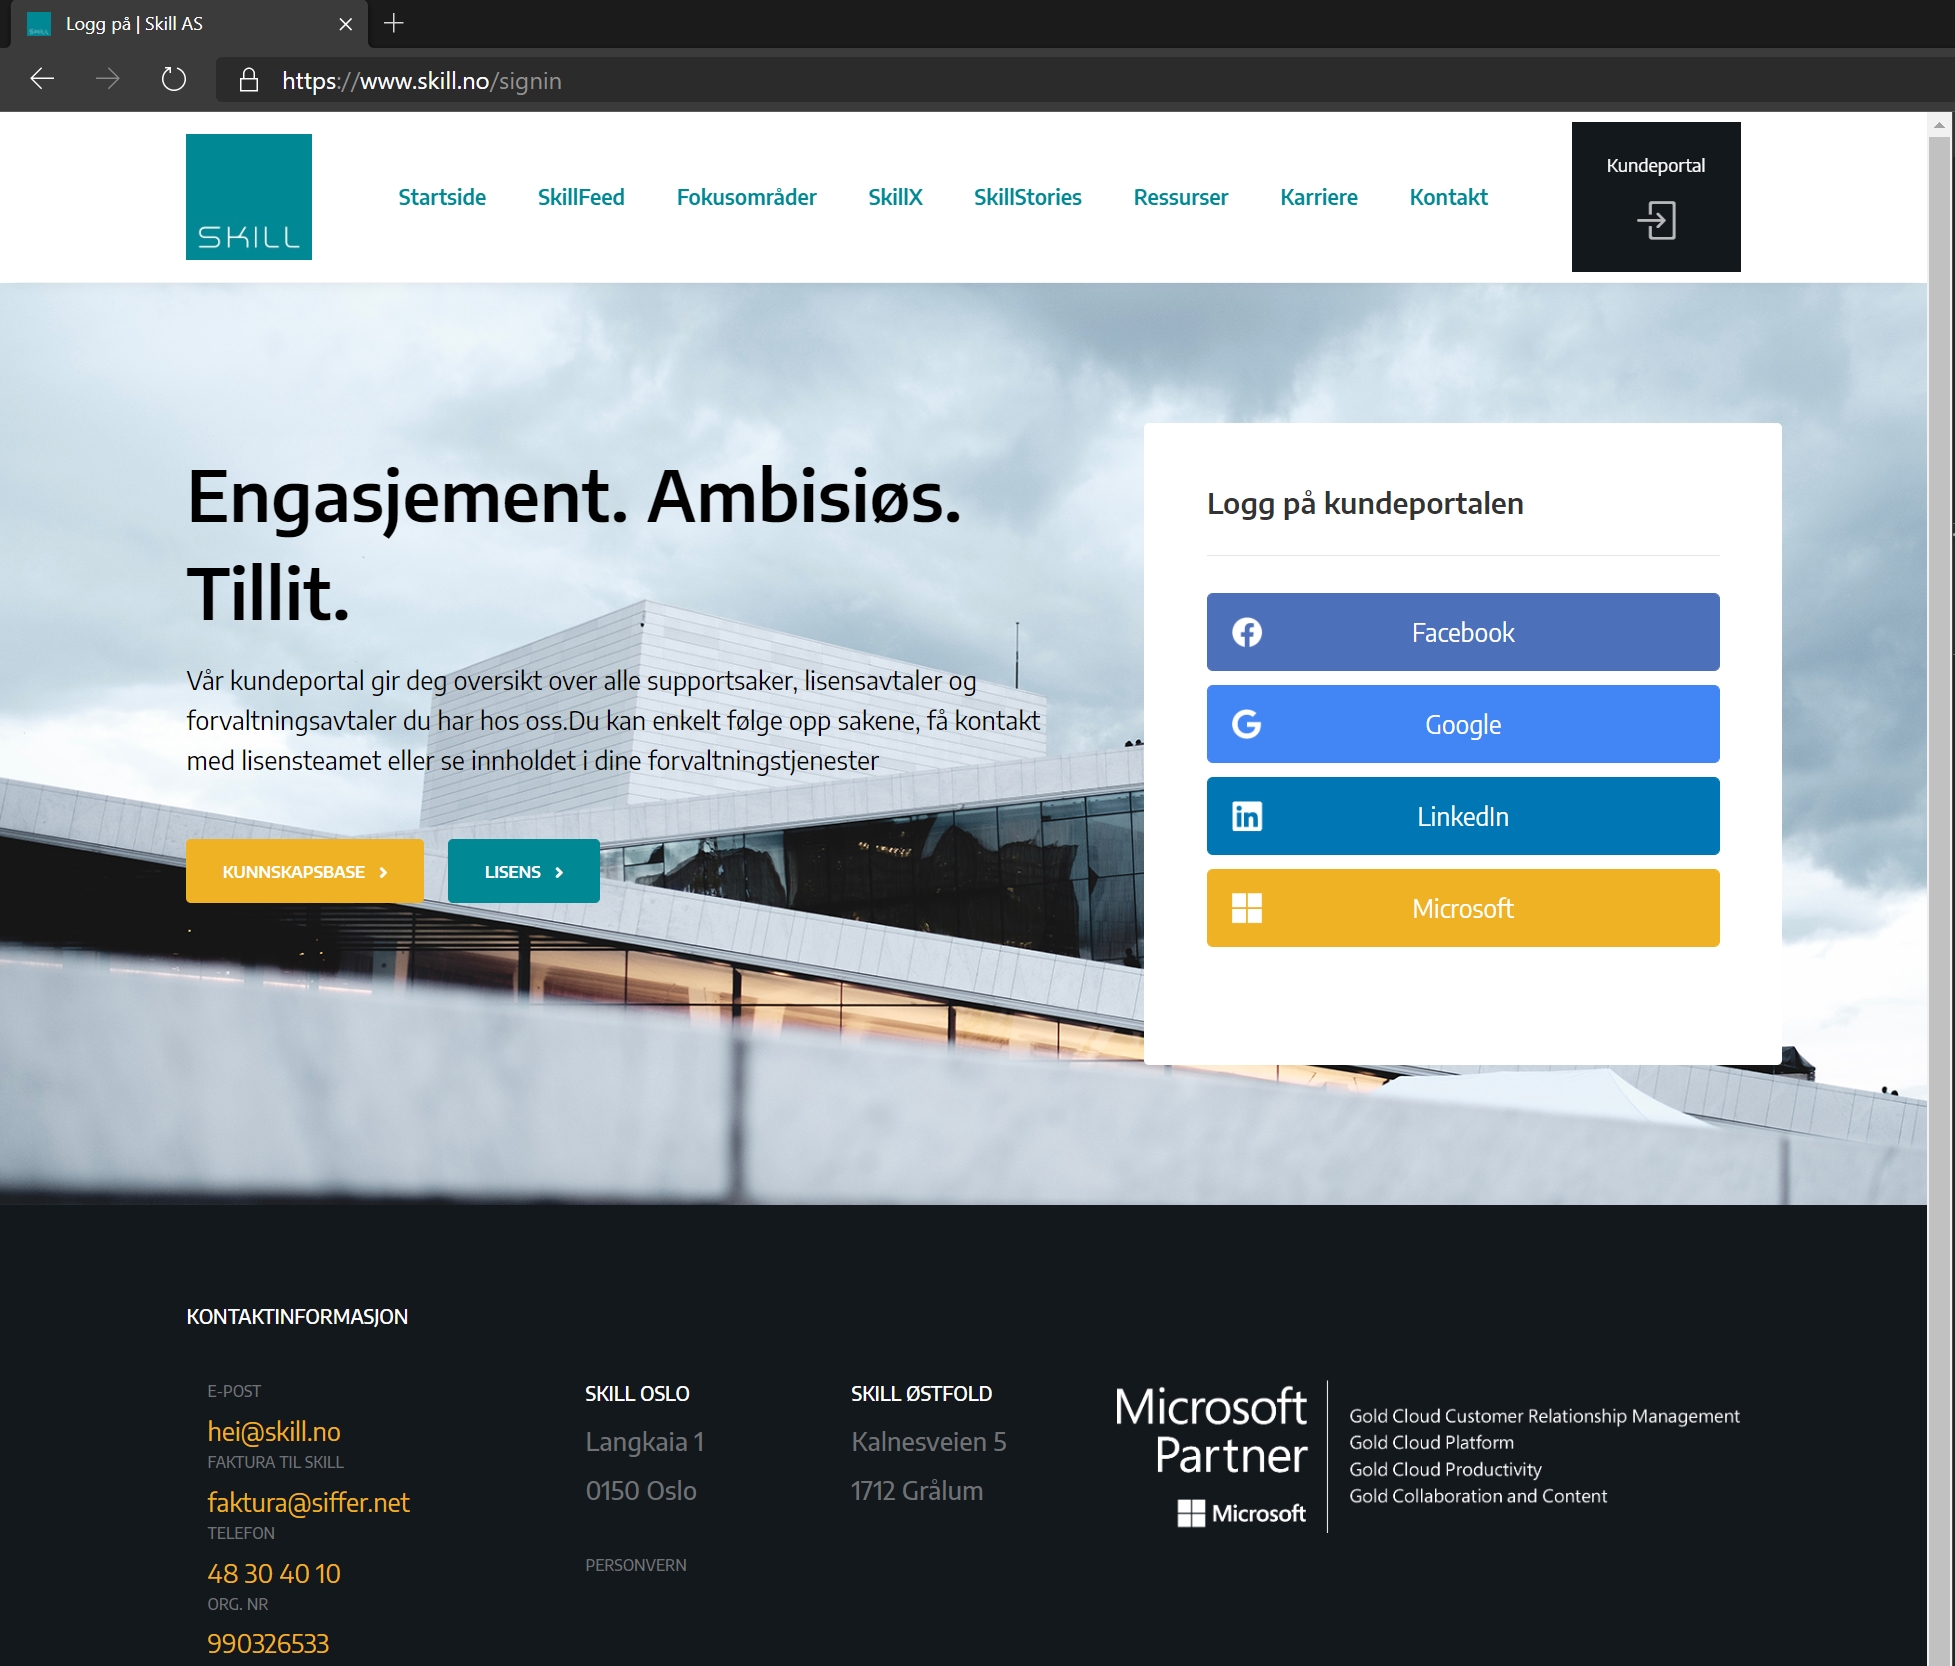
After
Spectacular – right?
Though it might not look like much it enables me to make the page look like this:
My Code
My code on the sign-in-page look like this:
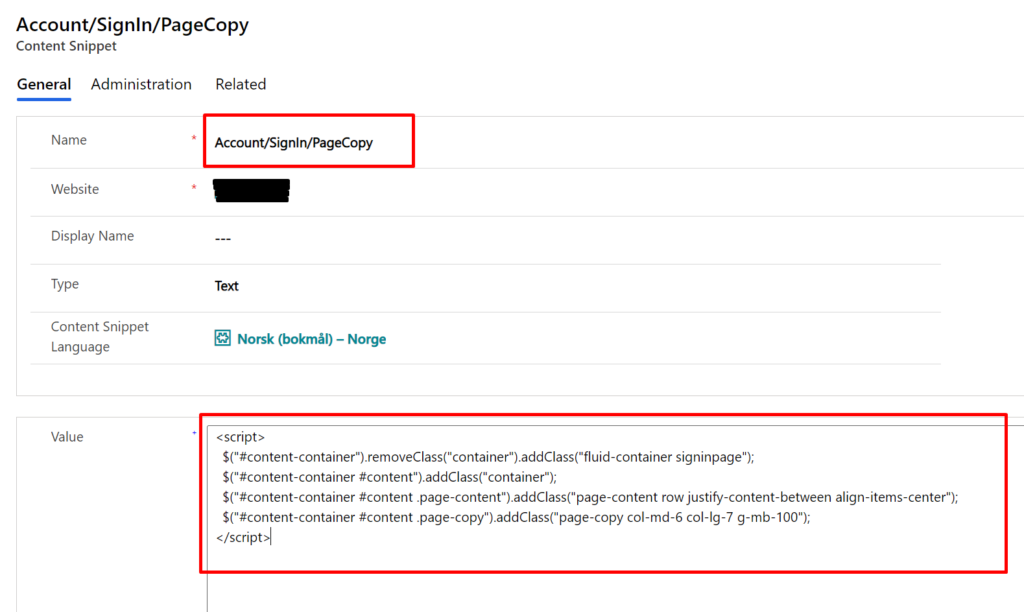
<script>
  $("#content-container").removeClass("container").addClass("fluid-container signinpage");
  $("#content-container #content").addClass("container");
  $("#content-container #content .page-content").addClass("page-content row justify-content-between align-items-center");
  $("#content-container #content .page-copy").addClass("page-copy col-md-6 col-lg-7 g-mb-100");
</script>Code language: HTML, XML (xml)
My CSS
This will not make any sense on your Portal unless you have some of the same basic styles as I do. You can try to just copy this code into your own portal CSS and see what happens. Then take it into your own hands to adjust the CSS to fit your needs. Hopefully, this gives you somewhere to start.
/*********		SIGN IN 		*******/

#content-container.signinpage {background-image: url([...]/signinbg.jpg); background-size: cover; background-repeat: no-repeat; background-position-y: 23%; margin-top: -18px;}
#content-container.signinpage #content .nav.nav-tabs {display:none!important;}
/* Sign In form */
	#content-container.signinpage .page-content.row .row {background: #ffffff; border-radius: .25rem !important; margin-top: 100px; margin-bottom: 100px;
			padding-left: 2.14rem !important; padding-right: 2.14rem !important; padding-top: 2.85rem !important; padding-bottom: 2.85rem !important;
			flex-direction: column; justify-content: space-between;}
	@media (min-width: 992px){
		#content-container.signinpage .page-content.row .row { -ms-flex: 0 0 40%; flex: 0 0 40%; max-width: 40%;}
	}
	@media (max-width: 992px){
		#content-container.signinpage .page-content {flex-direction: column-reverse;}
		#content-container.signinpage .page-content.row .row {background: #fff;}
	}
	#content-container.signinpage .page-content.row .row .col-md-6 {-ms-flex: 0 0 100%; flex: 0 0 100%; max-width: 100%;}
	#content-container.signinpage .page-content.row .row .col-md-6:first-child {margin-bottom: 40px;}

	#content-container.signinpage .page-content.row .row .col-md-6 .form-group .label,
	#content-container.signinpage .page-content.row .row .col-md-6 .form-group .col-sm-8 {-ms-flex: 0 1 auto; flex: 0 1 auto; max-width: 100%; }
	#content-container.signinpage .page-content.row .row .col-md-6 .form-group .form-control {padding: 1em;}

	#content-container.signinpage .page-content #submit-signin-local {padding: .5rem 1rem; font-size: 1.25rem; line-height: 1.5; border-radius: .3rem; display: block; width: 100%;}

	#content-container.signinpage .page-content.row .row .col-md-6 form fieldset {position: relative;}
	#content-container.signinpage .page-content.row .row .col-md-6 button.btn[name='provider']
		{margin: 5px auto!important; width: 100%; padding: 1rem 1rem; font-size: 1.25rem; line-height: 1.5; border-radius: .3rem; flex: 0 0 auto;}

	#content-container.signinpage .page-content.row .row .col-md-6 button.btn[title*="Facebook"]	{border-color: #4c70ba; background: #4c70ba url('[...]/facebook.png') no-repeat 5% center;	background-size: auto 40%;}
	#content-container.signinpage .page-content.row .row .col-md-6 button.btn[title*="Google"]		{border-color: #4285F4; background: #4285F4 url('[...]/google.png') no-repeat 5% center;		background-size: auto 40%;}
    #content-container.signinpage .page-content.row .row .col-md-6 button.btn[title*="LinkedIn"]	{border-color: #0077B5; background: #0077B5 url('[...]/linkedin.png') no-repeat 5% center;	background-size: auto 40%;}
    #content-container.signinpage .page-content.row .row .col-md-6 button.btn[title*="Azure AD-kontoen"] {border-color: #00a4ef; background: #00a4ef url('[...]/signinwithmicrosoft.jpg') no-repeat 5% center;	background-size: 100% auto; color: transparent!important;}
	#content-container.signinpage .page-content.row .row .col-md-6 button.btn:hover {background-color: #efb225;}

	#content-container.signinpage .page-content.row .row .col-md-6 button.btn[title*="Skill-interne"] {border-color: transparent; background-color: transparent; background: tranparent; color: #333; position: absolute; bottom: -64px; left: 0;}
	#content-container.signinpage .page-content.row .row .col-md-6 button.btn[title*="Skill-interne"]:hover {background: rgba(0,0,0,0.1); border-color: #efb225;}

/* Redeem Invotation Code Page */
	 #content-container.signinpage.redeem{ z-index: 1;}
	 #content-container.signinpage.redeem #content .page-content form {
	    background: #ffffff; border-radius: .25rem !important; margin-top: 100px; margin-bottom: 100px;
		padding-left: 2.14rem !important; padding-right: 2.14rem !important; padding-top: 2.85rem !important; padding-bottom: 2.85rem !important;
		flex-direction: column; justify-content: space-between;
		}
		@media (min-width: 992px){
			#content-container.signinpage.redeem #content .page-content form { -ms-flex: 0 0 40%; flex: 0 0 40%; max-width: 40%;}
		}
	#content-container.signinpage.redeem #content .page-content form legend span {padding: 0px 10px;}
	input#InvitationCode, label[for*="InvitationCode"] {width: 100%; display: block; word-break: normal; -ms-flex: 0 0 100%; flex: 0 0 100%; max-width: 100%; display:none;}
	#content-container.signinpage.redeem .col-sm-offset-2.col-sm-10 .checkbox {display:none;}
	button#submit-redeem-invitation {margin: 5px auto!important; width: 100%; padding: 1rem 1rem; font-size: 1.25rem; line-height: 1.5; border-radius: .3rem;}
	button#submit-redeem-invitation:hover {background: #008895;}

/* Register */
#ContentContainer_MainContent_PageCopy_PageCopy {margin: 0px;}
#Register {width: 100%;}
#ContentContainer_MainContent_MainContent_SecureRegister .alert{display:none;}
#Register #ContentContainer_MainContent_MainContent_SecureRegister .row {margin: 0 auto; margin-bottom: 50px;}
#Register #ContentContainer_MainContent_MainContent_SecureRegister .row .col-md-6 button.btn[title*="Skill-interne"] {display:none;}
Code language: CSS (css)
The background image is just a big full-size photo of the city. The other images are logos for the login buttons.
Where do I place my CSS?
I have had this question a couple of times in the comments for this blog post, and felt it was time to add the answer here too.

If you don't have a CSS file uploaded to your portal already you can upload you own .css-file in the Theme section in the Portals Design Studio.

Follow Step 1 in the blog post "Power Apps Portals branding - VS Code, CLI and SCSS" to learn how you upload your own CSS file:
https://ulrikke.akerbak.com/2022/05/11/power-apps-portals-branding/
Other pages
There are more pages that work this way, the Registration page, the Change Password page, etc. We use the same approach for them all.
If you cannot find the page copy content snippet for the page you are working with – try to create it. There are a lot of site settings and content snippets that work with portals that are not a part of a base portal. They are documented here: https://community.adxstudio.com/products/adxstudio-portals/documentation/end-users-guide/content-management/content-snippets/content-snippets/
Most of the pages will include a Page Copy if one exists. Use the same script – but give the page another class to separate the styles.
Some important pages to remember:
- Account/RedeemInvitation/PageCopy
- Account/Register/PageCopy
My code for Account/RedeemInvitation/PageCopy
The main difference between this code and the sign in-code is that the class “redeem” is added for the “container” element:
<div>
  <h2>Complete Registration</h2>
  <p>In this step we verify your invitation code.
    <br>In the next step you’ll be asked to log in.
    <br>
    <br>Please click “Continue” to verify invitation code and continue to login registration.
</p>
</div>
<script>
  $(document).ready(function(){
    $("#content-container").removeClass("container").addClass("fluid-container signinpage redeem");
    $("#content-container #content").addClass("container");
    $("#content-container #content .page-content").addClass("page-content row justify-content-between align-items-center");
    $("#content-container #content .page-copy").addClass("page-copy col-md-6 col-lg-7 g-mb-100");
    $("#submit-redeem-invitation").text("Continue");
  });
</script>
Code language: HTML, XML (xml)
Account/Register/PageCopy
In the “Register”-code we add the class “register” instead of the “redeem” class
<script>
  $("#content-container").removeClass("container").addClass("fluid-container signinpage register");
  $("#content-container #content").addClass("container");
  $("#content-container #content .page-content").addClass("page-content row justify-content-between align-items-center");
  $("#content-container #content .page-copy").addClass("page-copy col-md-6 col-lg-7 g-mb-100");
</script>Code language: HTML, XML (xml)
You are now able to customize the sign-in and registration page in Power App Portals.
Go bananas and keep it simple. Have fun.
thanks for this guide. it is really great.
though my challenge is that the new portal management is that it doesn’t have now the Account/Signin/PageCopy. I’m a little bit lost.
Hello again Kenneth. Portal doesn’t have all possible site settings or content snippets out of the box. There are many we can add ourselves as we need them. If it doesn’t exist – just create it. And make sure you create snippets for each language on your portal. Documentation on site settings: https://docs.microsoft.com/en-us/powerapps/maker/portals/configure/configure-site-settings
I think I got it figured out. Additional question, did you add an HTML through Javascript to achieve that look or did you just do this purely in CSS? Thanks
Hello Kenneth. Good to know you figured it out. Please send an image or link to the finished page if possible.
I did not add any HTML trough JavaScript. this is purely CSS. But your could add some HTML to the Page Copy element if you wanted. Cheers!
How to create custom sign-in page (The sign-in page creating to one new page and add a image in background).
[…] Tip! Give your portal login page a personal touch. This blog post will show you how to Customize the Sign in and Registration page in Power Apps Portals […]
I am working on a Self-service portal. I have been trying to make it look like a modern website. You seem to be an expert in this subject. Do you do any consulting work?
Hello Alvin. Yes, I do consulting work. In fact that’s what I do the most these days. What do you struggle with the most? Planning a blog series on the topic, so any insight into what you find most challenging is much appreciated. Thank you 🙂 And – keep at it! It get’s easier..
… [Trackback]
[…] Informations on that Topic: ulrikke.akerbak.com/2020/02/16/customize-the-sign-in-and-registration-page-in-power-app-portals/ […]
Hi,
Is it possible to make the SignIn page the Home or landing page?
Regards.
Hello Kevin. Yes, absolutely. If you follow these instructions all users will be automatically redirected to the sign in page from whatever page they try to access. Once they have successfully logged in they will be redirected to the original page they tried to access. Hope it helps.
[…] Next step is to customize the login, registration and redeem pages. The pages are not available for editing – but I have found a way to get to them – check out this blog post: https://ulrikke.akerbak.com/2020/02/16/customize-the-sign-in-and-registration-page-in-power-app-port… […]
Hi, After adding the content snippet and adding the class, how do I customize the sign in page? I mean for example, in my Sign in page I have a span where “Remember me” text is added. I want to move this text to somewhere else. How do I achieve that?
Hello Derek.
You can customize the page with CSS and Javascript/jQuery. Moving elements around is best with jQuery and editing the styling is best with CSS. I will add the CSS I have used on my site as an example on this blog article for you to take inspiration from. Hope it helps. Cheers!
keep us up to date like this.Thanks for sharing.
[…] How to customize the sign-in and registration page in Power App Portals — Read on ulrikke.akerbak.com/2020/02/16/customize-the-sign-in-and-registration-page-in-power-app-portals/ […]
[…] Customize the sign-in and registration page in Power App … […]
[…] Customize the sign-in and registration page in Power App … […]
[…] Customize the sign-in and registration page in Power App … […]
[…] Customize the sign-in and registration page in Power App … […]
[…] Customize the sign-in and registration page in Power App … […]
[…] Customize the sign-in and registration page in Power App … […]
[…] Customize the sign-in and registration page in Power App … […]
[…] Customize the sign-in and registration page in Power […]
Wow! This is a life saver and a real way to impress!!
Thank you soo much.
Hello! Where exactly did you input the CSS to edit the sign in page? Did you do it in the value of the Account/SIgnIn/PageCopy value? Or some place else? Thank you for this guide by the way. It is exactly what we are looking for!
Hello Eric. Thank you for commenting. I put the CSS with styling in the .css-file that I uploaded in the Theme section in Portals Design Studio. Follow step 1 in this blog post for more information: https://ulrikke.akerbak.com/2022/05/11/power-apps-portals-branding/
Hope it helps 🙂 Good luck
[…] Customize the sign-in and registration page in Power App Portals […]
Hi, Where did you upload the background image?
Hello Shyam. Thank you for leaving a comment and sorry that it took me so long to answer. I have a blog post that shows you how to upload new files to “Web Files”. You can apply the same approach for uploading images. The new Power Pages design workspace also has a great feature that allows you to upload pictures and place them directly on a page that you can use to upload images. https://ulrikke.akerbak.com/2022/09/23/browser-icon-favicon-power-pages/
HI,
How do you add exta elements, like text, boxes… I can`t see these actions in your css, how do you add them?
Hello Robert.
The boxes and other elements are added as HTML in the same Content Snippet taht hold the script. Then I add CSS styling to these elements. How to create HTML elements and style using CSS you can learn from other resources, like https://www.w3schools.com/.
Would you like to see more on how to write HTML and CSS on my blog?
Hi!
It seems to me that if you want to do a minor change on, for example the register page, and want to add the css directly to it, you could skip the
$(“#content-container”).addClass(“signinpage”);
I would not in general recommend it for large sites where we for sure would use custom css file(s)) though.
Instead just style the content snippet where you would put the . tag.
This example works great as far I can tell (the real test here is that the style to .col-md-6 does not mess with other parts of the site, nor on the same page, but stick to the register area). This is put in the value field in the content snippet Account/Register/PageCopy:
#ContentContainer_MainContent_MainContent_LocalLogin {
width: 50%!important;
background-color: floralwhite;
margin-bottom: 30px;
}
.col-md-6 {
width: 100%!important;
}
#ContentContainer_MainContent_MainContent_RegisterLocalFormHeading .xrm-attribute-value {
display: none;
}
#ContentContainer_MainContent_MainContent_RegisterLocalFormHeading::after {
content: ‘Opprett lokal brukerkonto’;
}
#ContentContainer_MainContent_MainContent_RegisterExternalLabel .xrm-attribute-value {
display: none;
}
#ContentContainer_MainContent_MainContent_RegisterExternalLabel::after {
content: ‘Logg inn med ekstern konto’;
}
Any thoughts Ulrikke? Anything dangerous with this approach other than the good habits of using custom css files for styling?
Hi Ole Einar. You are absolutely right, this would also work if you don’t have a custom CSS file on your site – or if you simply wanted to make sure that the changes you make only apply to this page. Thank you for sharing your ideas.
Hi, I just wanted to know is it possible to create a custom sign – in page and if so how to do that. Actually we have q requirement from our client where they want to create two different custom sign in pages for two different type of users.
Any help would be appreciated.
Hello Abhishek. Great question. I would always recommend to use Azure AD B2C as the default authentication service with Power Pages – and then you set up the different identity providers directly in Azure AD B2C. This way all your users click the same “sign in” button on the top right corner and get to a modal box that is familiar and let them log in with the identity provider they prefer.
Another way to go is to set up different identity providers directly in Power Pages. You can customize the sign in page and make sure the users understand the different links to use to log in; for instance “Employee login” and “Partner login”. This way you can also send two different links to the employees and the partner dependent on what service you want them to use.
Hope that helped 🙂