Last updated on 02/10/2023
This blog post will show you how to do Low Code Power Pages ALM by moving a power pages site with power platform pipelines.
We need two things to make this work:
- Environments that are enabled as managed environments
- Power Pages sites that use the enhanced data model (Preview)
Note! Power Pages Enhanced Datamodel is still (at the writing of this blog post at least), in Preview.
It is very close to bein GA, and I have no reservation using it in customer projects.
Follow the release plans to learn more and keep up to date:
https://releaseplans.microsoft.com/en-us/?app=Power+Pages&status=planned
Quick and easy, this is what you need to do:
- Create all environments you need
- Enable all environments as managed environments
- Set up pipelines
- Enable enhanced data model in all environments
- Create a portal in the Dev environment
- Add site to a solution
- Run pipeline from Dev to Prod
- Activate the new portal in Production
Didn’t follow? Let me give you some more context into what we are doing.
ALM: Application Lifecycle Management
“In summary, Application Lifecycle Management is a comprehensive approach to managing software development projects from inception to retirement. It emphasizes collaboration, quality assurance, and the systematic management of changes and improvements throughout the application’s lifecycle. Effective ALM practices contribute to the successful delivery of high-quality software products”
OpenAI. (2023). ChatGPT (August 3 Version) [Large language model]. https://chat.openai.com
Power Platform Pipelines allow low coders to move solutions from one environment to another. This is an essential part of ALM; Application Lifecycle Management best practices. In traditional development projects, this is a well-established best practice. We usually have three environments;
Development
DEV environment: This is where developers work and develop the solution.
Testing
Quality Assurance (QA) environment: Functionality is ready for testing and quality assurance is pushed through to testing. Testers will have access to this environment.
Production
Prod environment: The live product with actual data that is the end product.
In addition, for Power Platform Pipelines, we will have a fourth environment called “Host”
Host
Production environment. Doesn’t need to be managed) where we install the Pipelines configuration app, set up the pipelines, and store the pipeline run logs.
Following this cycle allows developers to work and create in peace, away from actual data. They don’t have to worry about breaking the product the end user is looking at.
Testing is where testers make sure the functionality is ready for production. They can identify bugs and areas of improvement and get them mitigated before it’s visible to the end user.
Production is the live product that is in use by end users. When new functionality is tested and ready it is pushed to production at times when the product is in less use to avoid disturbing the end users too much.
I will present on this topic at the Microsoft Power Platform Conference in Las Vegas.
Tuesday, October 3rd at 2:25 p.m. in Room 2. Session code: PPC28.
More details here: powerplatformconf.com/#!/session/title/5928
Hope to see you there!
Power Platform Pipelines for Low Coders
In late 2022 Microsoft announced that we would get a tool that enables low coders to follow ALM best practices as well. Sure, we have been able to do this in the past. I have spent many Saturday nights exporting solutions and portal content from one environment to another. It took hours each time, the portal was unavailable the whole time, something always went wrong and it was a hot mess. For us, this meant that we only had DEV and PROD to reduce the workload and we only released new features once a month.
Prerequisites
Before we start there are some key points that are important to notice (copied directly from the documentation):
- Four environments are recommended, but you can use as few as three Power Platform environments to create a pipeline.
- All environments used in pipelines must have a Microsoft Dataverse database.
- Microsoft Dataverse for Teams environments isn’t currently supported for use with pipelines.
- You must have a Power Platform administrator or Dataverse system administrator role.
- All development and target environments used in a pipeline must be enabled as Managed Environments.
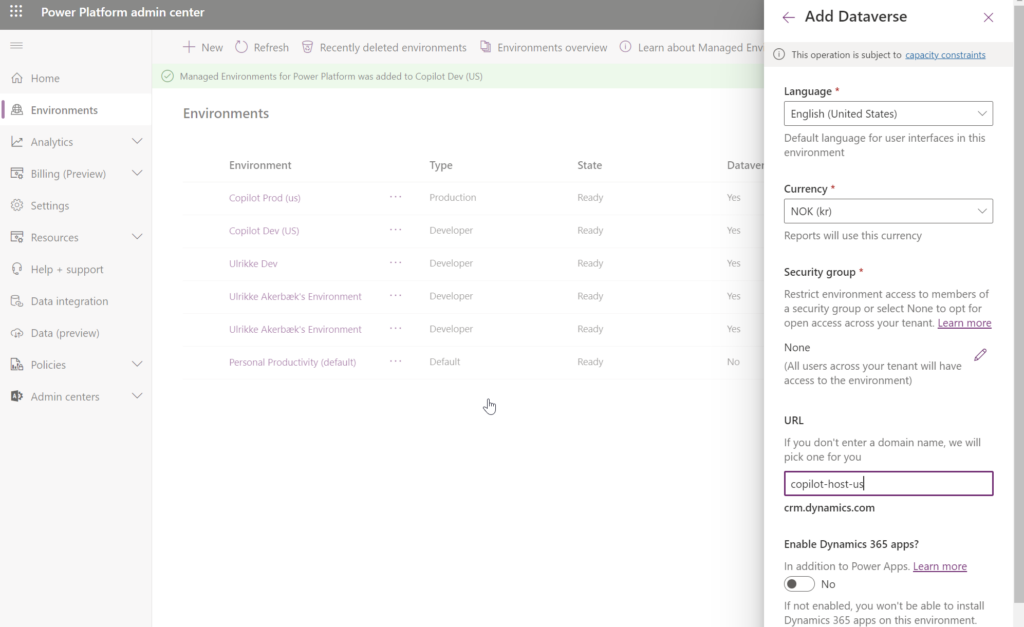
1. Create environments
Make sure you follow the steps for creating the environments you need: https://learn.microsoft.com/en-us/power-platform/alm/set-up-pipelines
Host
Make sure all environments are in the same region. I chose the United States to get as much preview feature juice as possible.
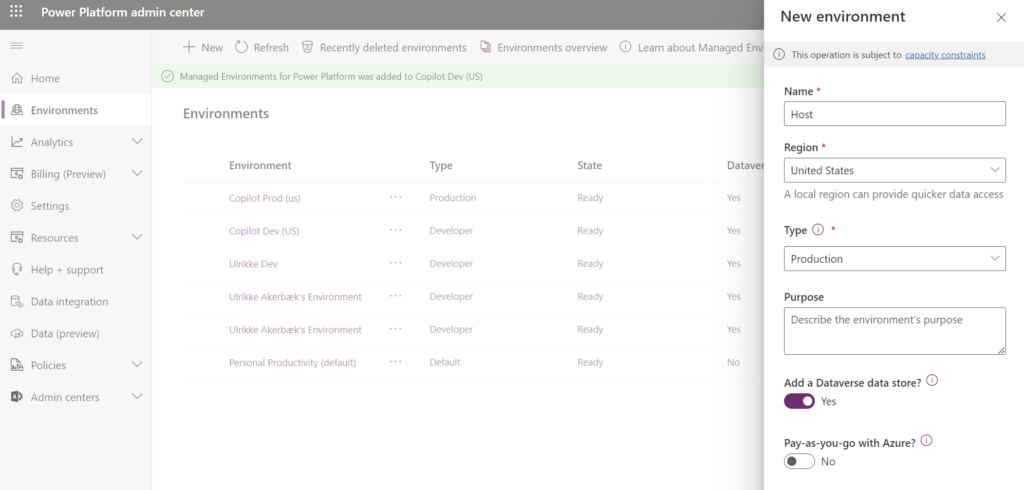
All environments in the pipeline need Dataverse. This is simply to have solutions with components to move.
Dev and Prod
I bet you already started working on a Power Pages site in an environment, Then you need to make sure that the environment is managed and the Power Pages site uses the new enhanced data model. If not – then my advice is to start fresh with new environments and new power pages sites, get the pipeline working first – and then implement whatever you had on your original portal piece by piece.
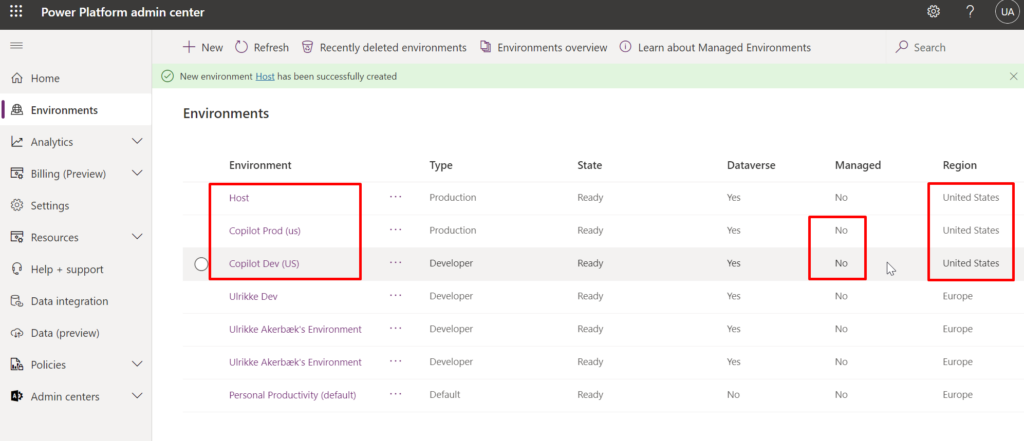
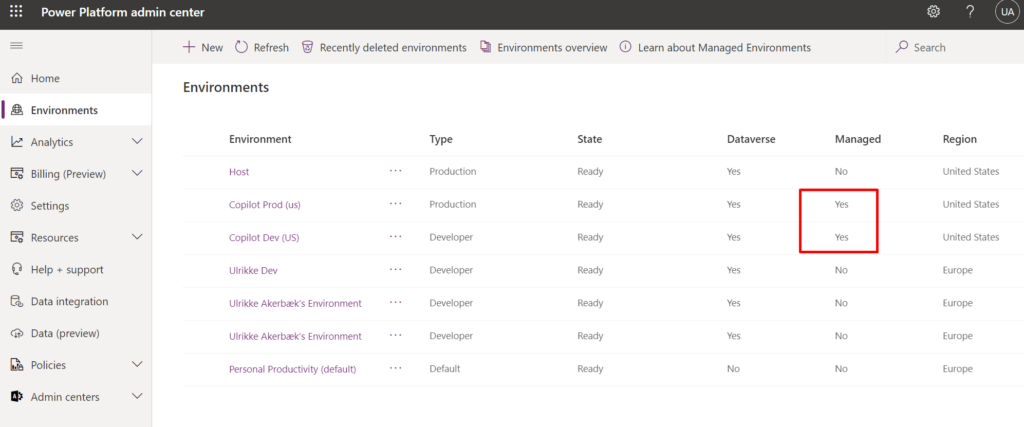
These are the environments that you have ready when you are done setting this up. Make sure that they are all in the same region.
You cannot use them like this. For them to work in pipelines, they need to be managed.
2. Enable managed environments
Select the environment in your environment overview and select “Enable Managed Environments”. Do this for all environments, except the Host.
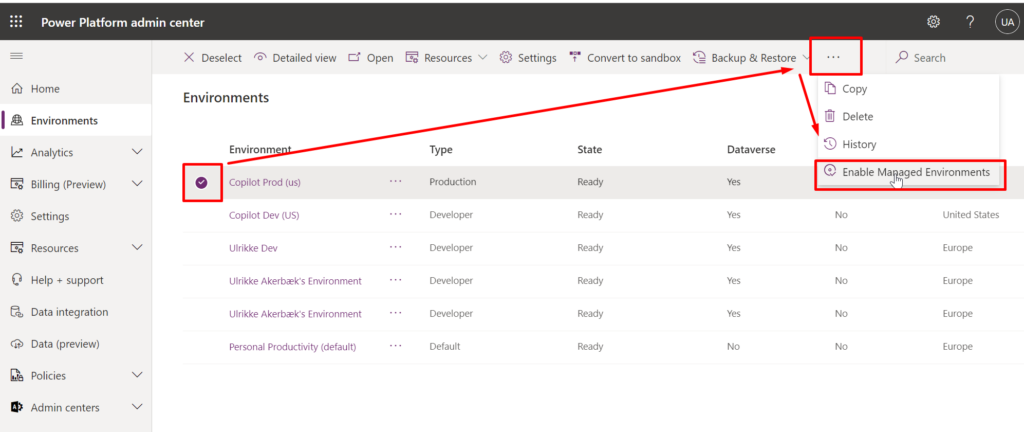
If you cannot see this option it is because you don’t have the right permissions. You need to be a Power Platform administrator or Dataverse system administrator.
Managed environment settings
When you click “Enable Managed Environments” this side panel appears.

Configure these settings to comply with the policies and best practices. More information about these settings is found here: https://learn.microsoft.com/en-us/power-platform/admin/managed-environment-enable#enable-or-edit-managed-environments-in-the-admin-center
When you have enabled both Dev and Prod as managed environments (Host doesn’t need to be) you are ready for setup.
3. Pipeline setup
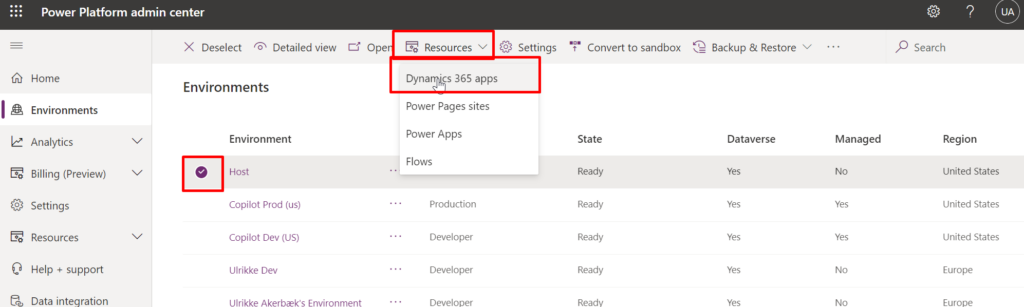
We start by installing the pipeline solutions in the Host environment. You find the detailed step-by-step here:
Select the Host environment from the environment list. Click “Resources” from the top menu and select “Dynamics 365 apps”.
Click “Install app” on the top menu bar
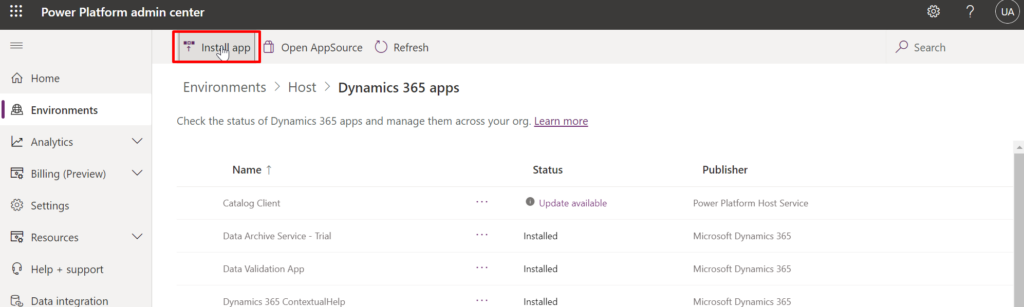
Identity “Power Platform Pipelines” in the list and select it.
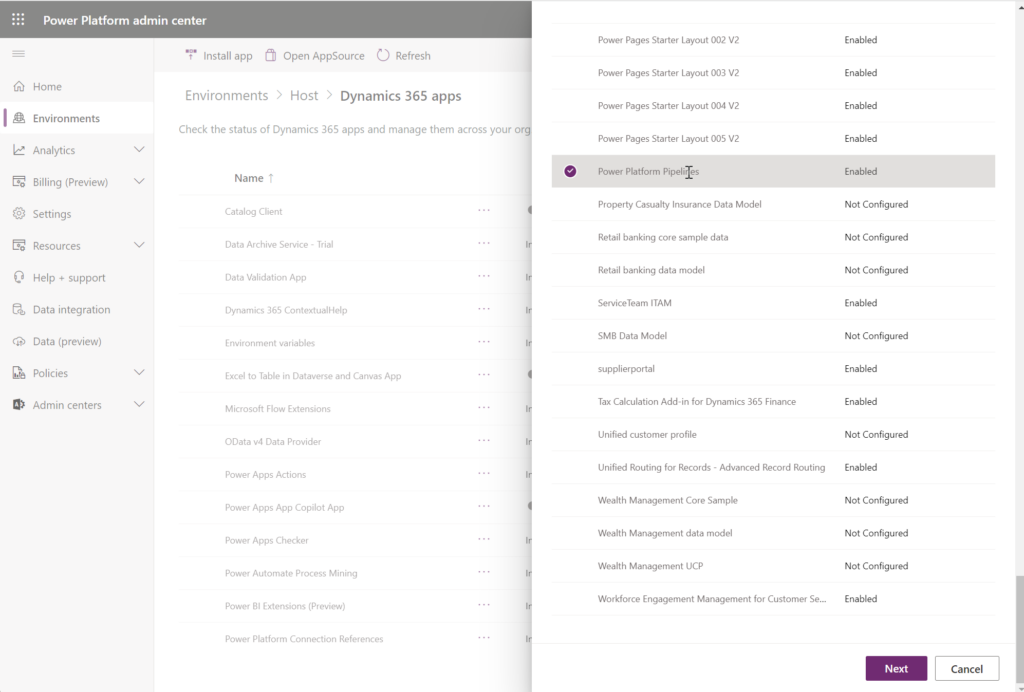
Click “Next”
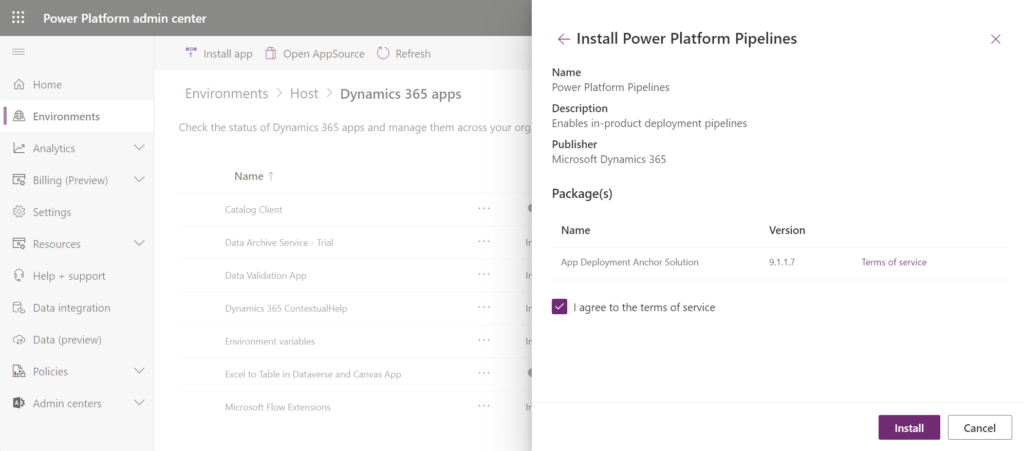
Read the terms of service.
Check the box “I agree to the terms of service” and hit “Install”.
Now it’s time to create the pipeline itself.
Set up the pipeline
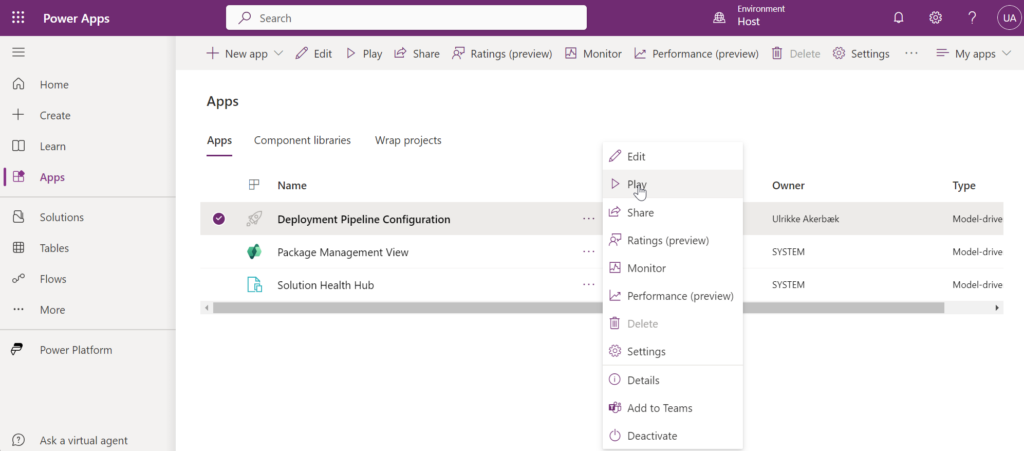
Open make.powerapps.com in a new browser tab and select the Host environment.
Open “Apps” and play the “Deployment Pipeline Configuration” app.
Open “Environments” from the left side navigation, and click the “New” button from the top.
Now, you will need the Environment ID. You go to the admin browser tab, open the environments one by one, and collect the Environment ID. More information about collecting the IDs is here:

You paste the ID into the form for creating a new pipeline environment.
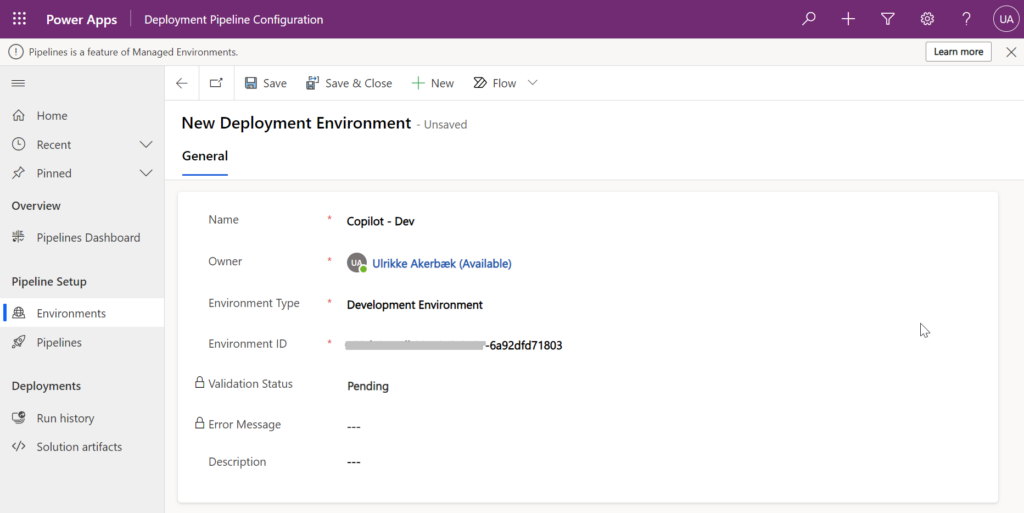
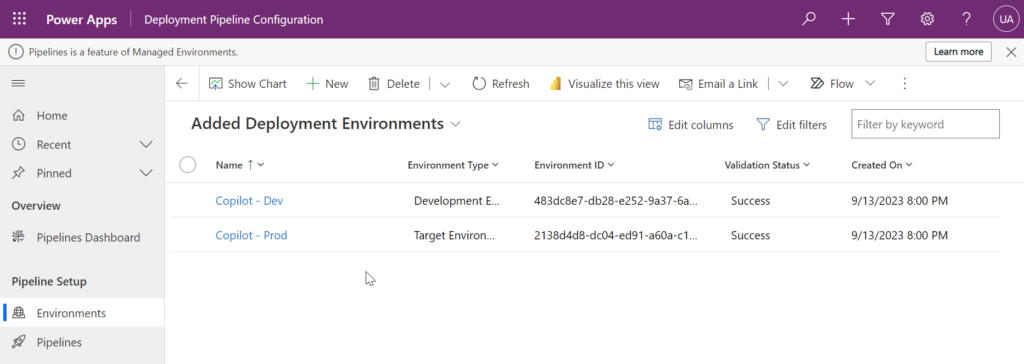
You create both Dev and Prod pipeline environments this way, where you set Dev to “Development Environment” and Prod to “Target environment”.
Navigate to “Pipelines” in the left side menu in the app and click “New” to create a new pipeline.
Give it a name and a description. Save, and scroll down to the “Linked Development Environment” subgrid. Find and click “Add Existing Deployment Environment”.
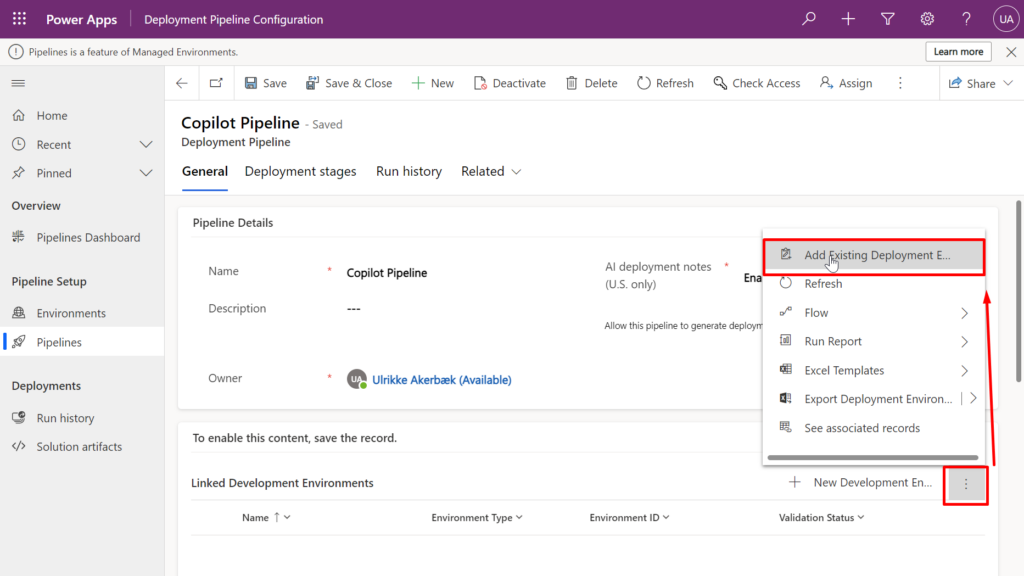
In the right side panel add the Dev environment that you just created.
On the “Linked Developer Environments” you create a new record and enter details as below:
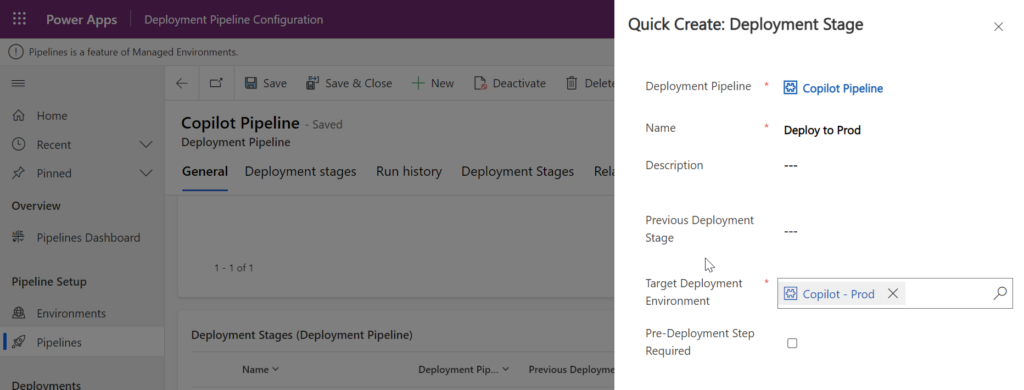
Note! You must have at leat one dev environment and one stage. You can have up to seven stages.
When implementing this for other makers you need to consider permissions and user roles. This is very well documented, and you find all the details here:
Run for fun
I always like to test often and the smallest of steps. I would recommend you create a new Publisher, a new solution, and add a component to it, just to run the pipeline and see if it works.
4. Enable enhanced data model
All environments that hold Power Pages sites must be enabled for enhanced data model in order to be able to add them to solutions.
Do these steps for Dev and Prod:
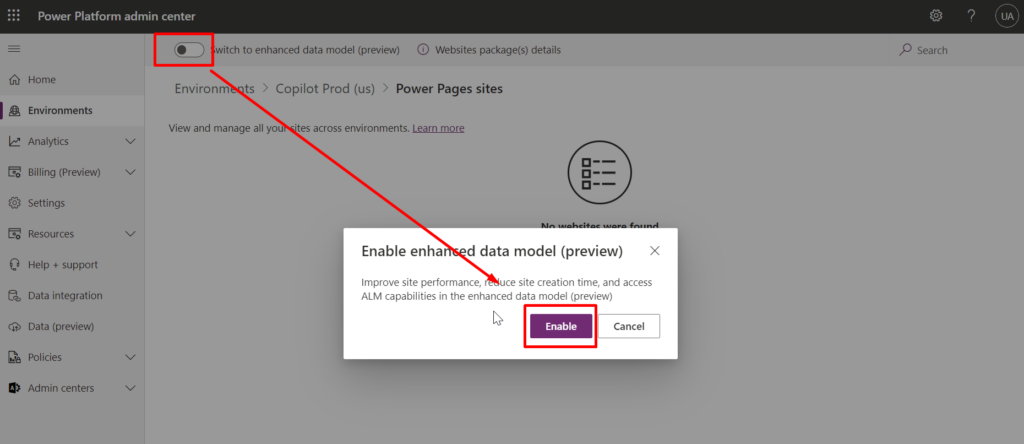
- Open environment in admin.powerplatform.com
- Choose “Resources” and select “Power Pages sites”
- Click the toggle “Switch to enhanced data model” on the menu bar
This will start the installation of the Portal Package with all the necessary tables and data needed for the portal.

5. Create the portal
Once the packages are installed in all your environments you are ready to create the portal. You will only create one portal – once – in the Dev environment and move it to Prod.
Previously, when we moved power pages sites from one environment to another, we had to create power pages sites in each environment manually. This would install all the required solutions. IT was important that you created the sites from the same template, used the same language, etc. This is not longer an issue. Every managed environment with Dataverse comes with solutions for Power Pages out of the box. This makes it possible to run the pipeline without first creating power pages sites in all environments.
At the time when I write this blog post, these are the templates that use the new enhanced data model:
- Starter layout 1-5
- Application processing
- Blank page
- Program Registration
- Schedule meetings
Check back here to see if there are more templates available at a later date:
Create the power page site
- Open make.powerpages.microsoft.com
- Choose the Dev environment
- Click the “Create site” button on the Power Pages home page
- Find the template you want to use and click “Choose this template”
If you are pushed through the “first experience” wizard just go with the flow and click “next” until you can choose your template.
These are the details for my site:

Setting up your site will take minutes – not hours like it used to. When your site is ready you need to add it to your solution so that it will be included when running the pipeline.
Learn more about how to style Power Pages here:
6. Add site to solution
Open “Solutions” from Power Pages Home.
If you cannot get out of the “first run” experience and need to get back to “Power Pages Home”, check out this blog article for a hack:
From “Solutions” create a new solution or choose one where you already have other configurations and components related to this Power Pages site.
There are lots of different strategies regarding solutions, and I can name a few people in the community with strong feelings on the matter. (Yes, Thomas, I'm looking at you). MY advice would be; to put only components that are dependent on each other in one solution. Always put Power Automate flows in their own solution. This way, you don't have to transfer all components to test and production all at once - you can choose to only transfer the smaller parts where changes has been made. It's just my personal preference. You'll figure out what works best for your project. The answer is, as always; it depends.

More information about Solution Concepts here:
https://learn.microsoft.com/en-us/power-platform/alm/solution-concepts-alm
I created a new solution that will contain my power pages site.
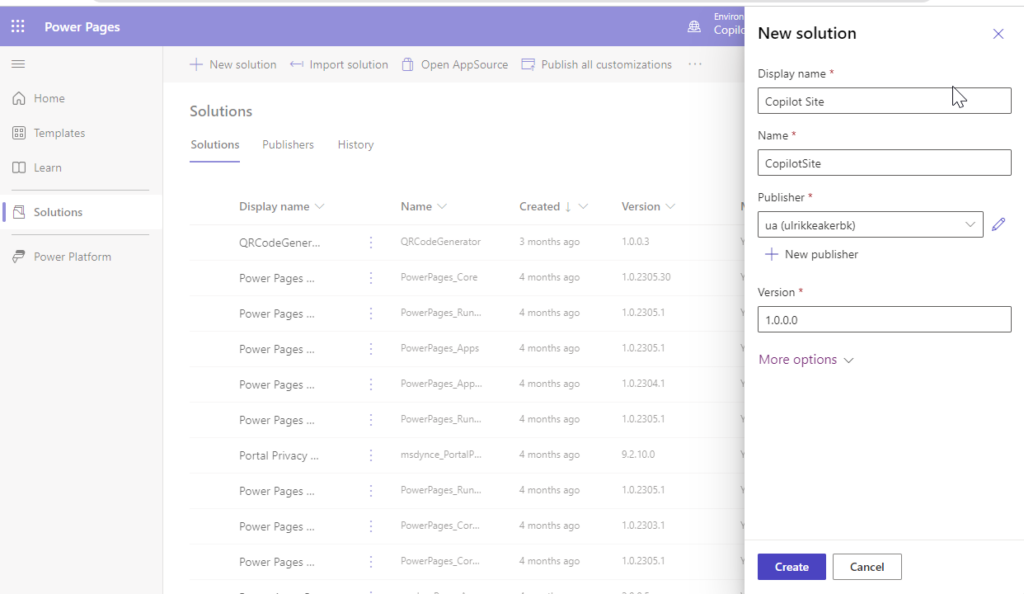
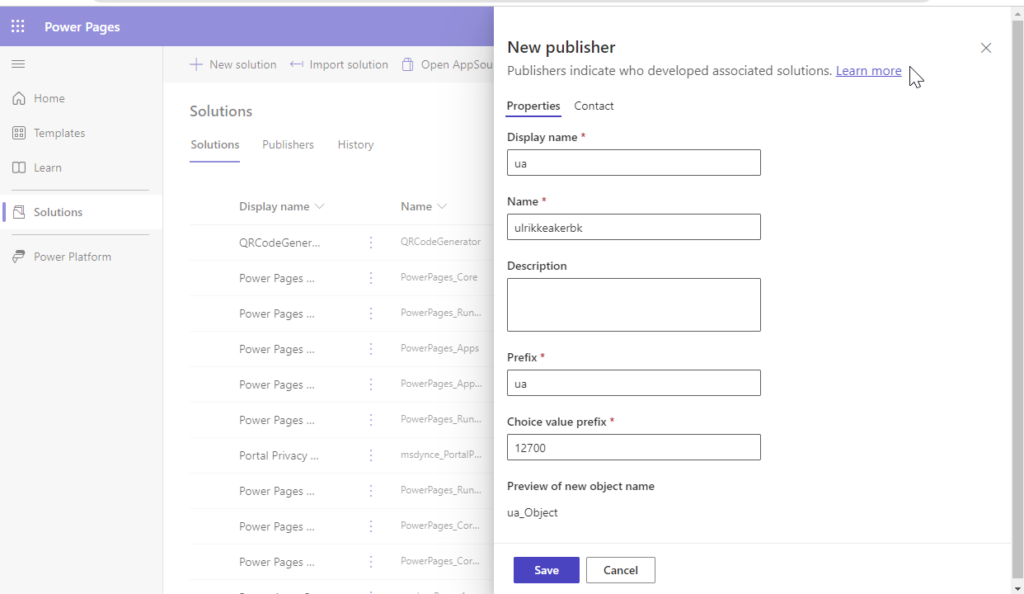
I always create a new publisher to easily separate the work that I do from whatever comes from the system or other sources. From the panel above I hit “New publisher” and added my new custom publisher. In a real project, you would put your company or team’s name here.
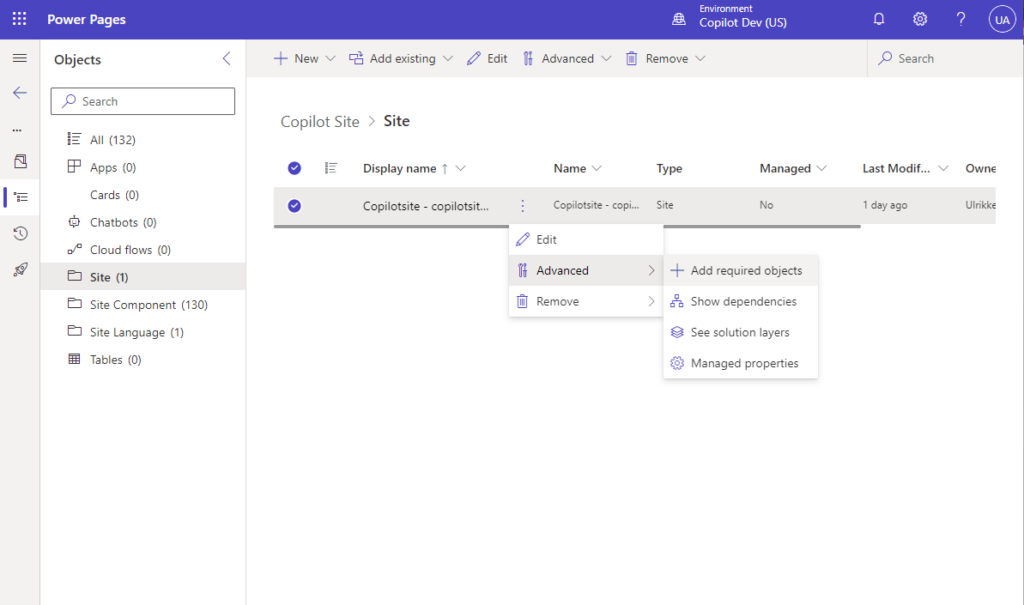
In the new solution, click “Add existing” from the top and choose “Site”,
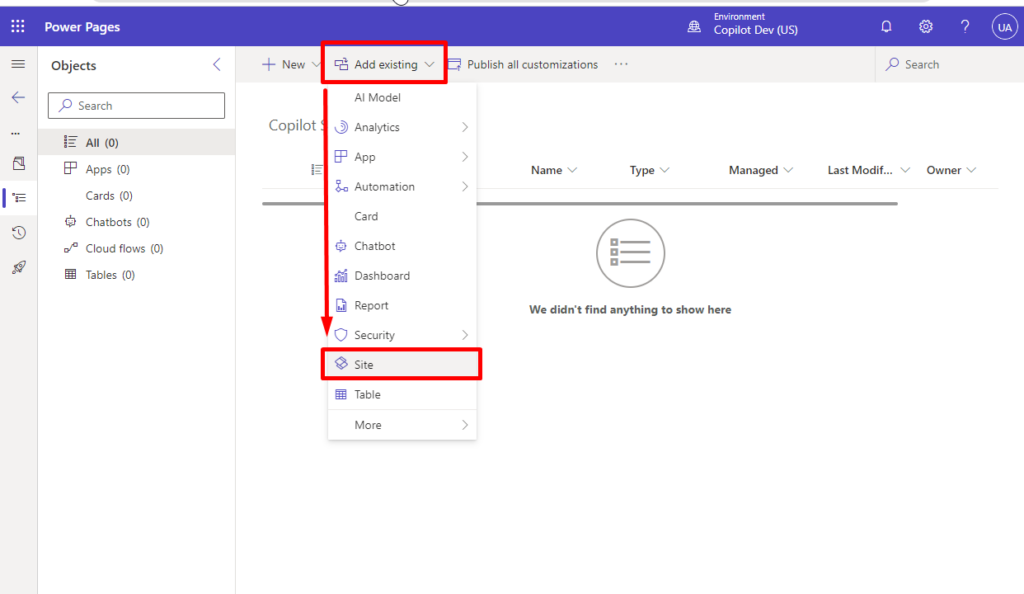
I chose the site I wanted to add from the list and clicked “Add”
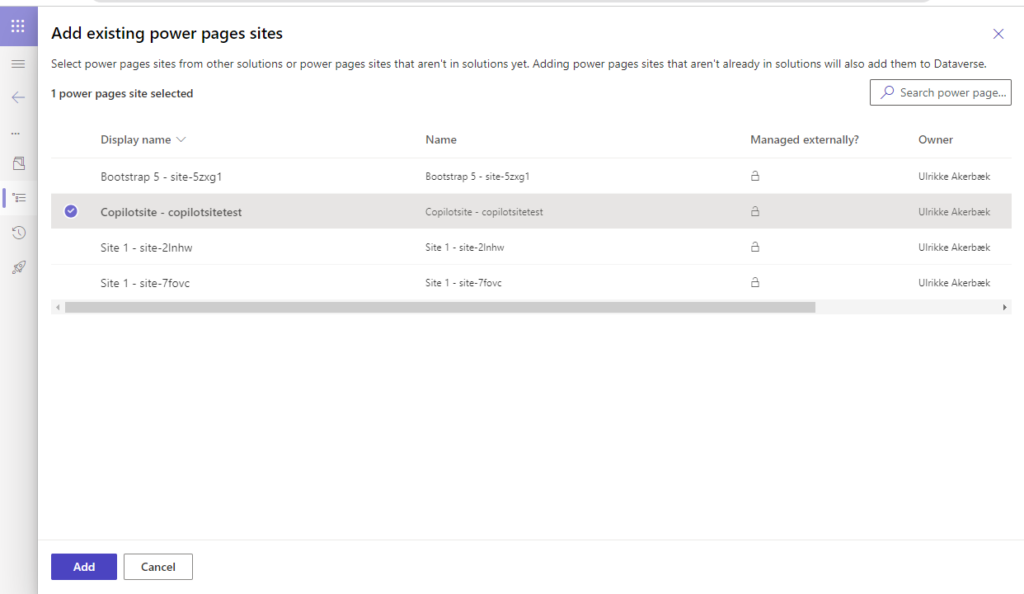
This action adds all required site components to the solution. You can see the list of “Site components” grow as these are added. I came to a total of 103 site components for my Blank Page template.
Add new components! Whenever you make changes to the site and add new components you will need to add those components to the solution manually!
In your solution, open “Site”, locate your site, click the three dots, and select “Advanced” and “Add required objects” to add only the objects related to this site.
Now it’s time to run the pipeline!
7. Run pipeline
Stop! Don’t move! My instinct at this point is always to open the Host environment. But that’s not where we run pipelines. We run the pipeline from the solution we just created right here in the dev environment.
Notice that in the left side menu, you have a spaceship icon. That is where you run pipelines.
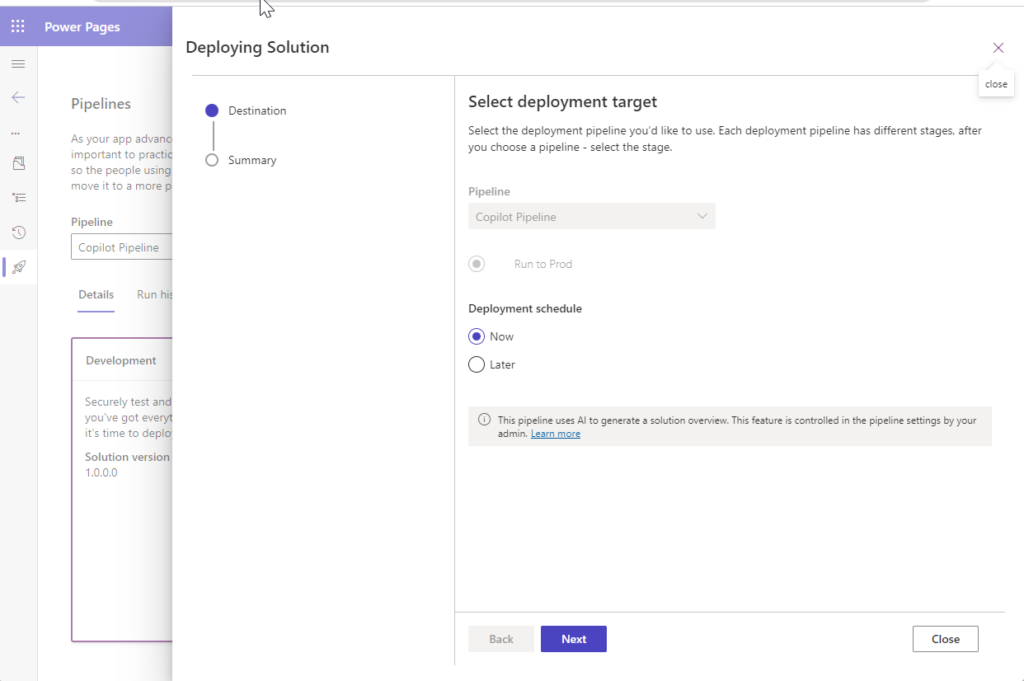
Open the pipeline page, choose the new pipeline we created earlier, and click “Deploy here” at the bottom:

You can choose to deploy it right away or schedule it for later.
Also – a preview feature that I have high hopes for in the future is “AI suggested solution overview”. This is what it suggests:
This solution, Copilot Site, provides a comprehensive set of tools to help enterprises manage their data and related processes.
The components included are:
AI suggested solution overview
- Model-Driven App – a tool to create custom business apps and processes with access control and custom roles
- Site Map – a navigation of the model driven app, with areas, sub-areas and navigation to tables, dashboards etc.
- Dataverse – a data platform to store and manage data, with security and privacy controls
I don’t think it is based upon the actual contents of my solution, so I replace it with my own description. Then I deploy.
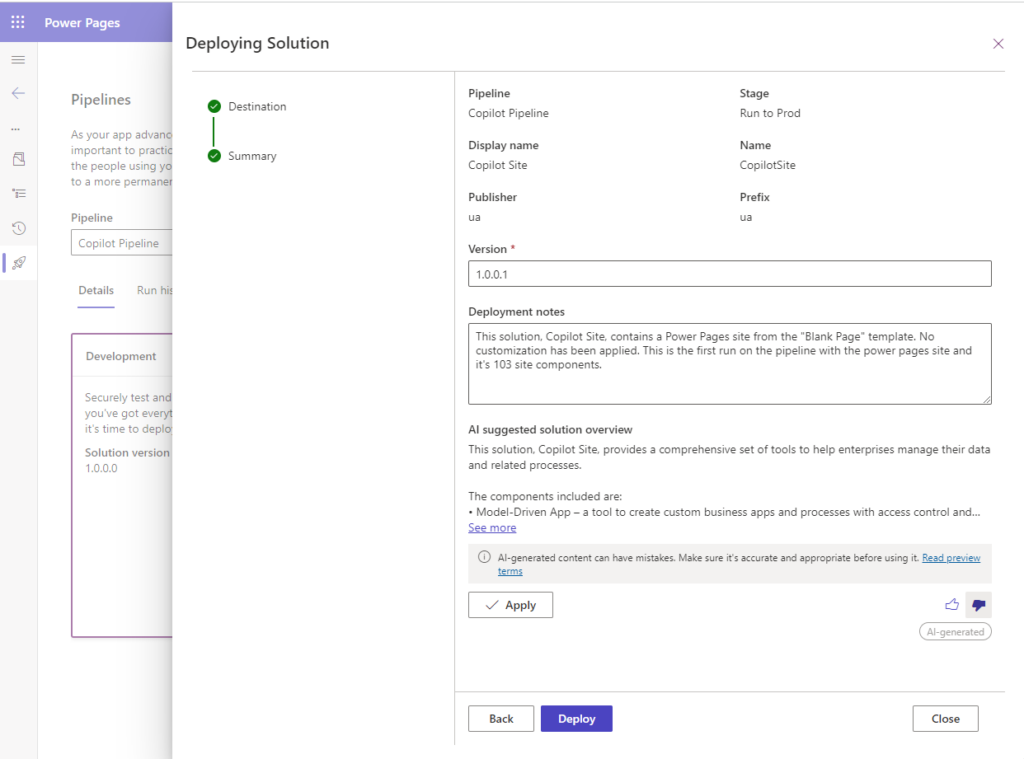
The deployment process has now started.
What is really happening behind the scenes?
- The solution is being published
- The solution checker runs
- The solution is exported as a managed solution
- The solution is imported into the target environment
- The solution checker runs
Among other background operations that I don’t know about. These are just the manual steps that i used to have to take – while having a glass of wine on a late Saturday evening when there is low traffic on the site… 😉
8. Activate the site in the new environment
It feels like this should be the end of it, but there is more.
The site will show up in our new environment but as a deactivated site. We will need to activate it. Also, we will need to bind the record for an enhanced data model website to the new site.
When the pipeline has finished running, open make.powerpages.microsoft.com in another browser tab and choose the target environment.
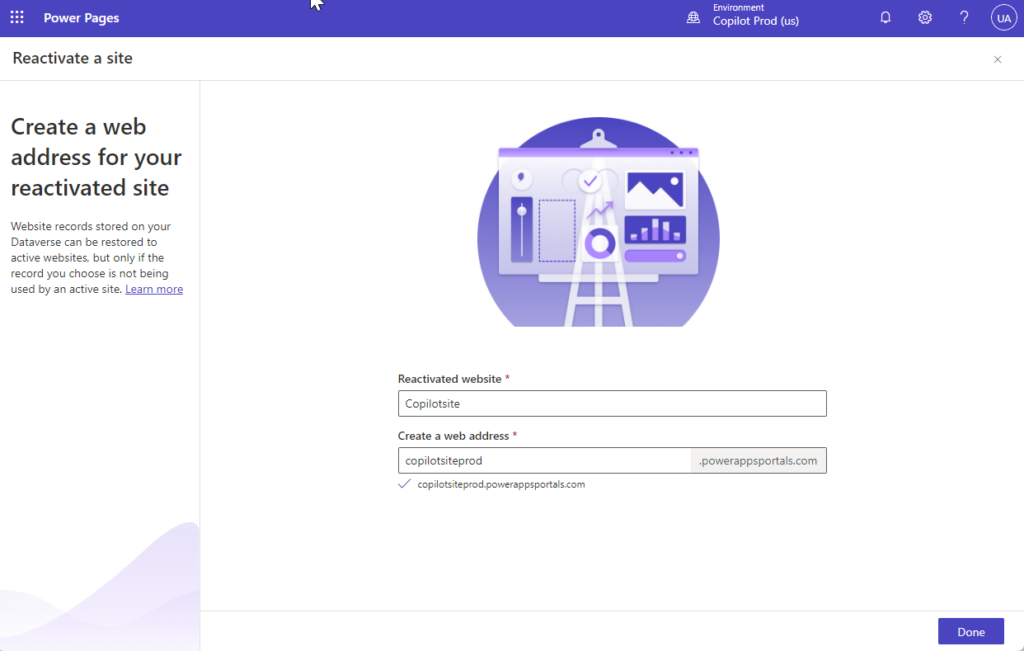
Reactivate the site
Open Power Pages Home in your target environment and open “Inactive sites”. You’ll find your site here, and you can click “Reactivate”.
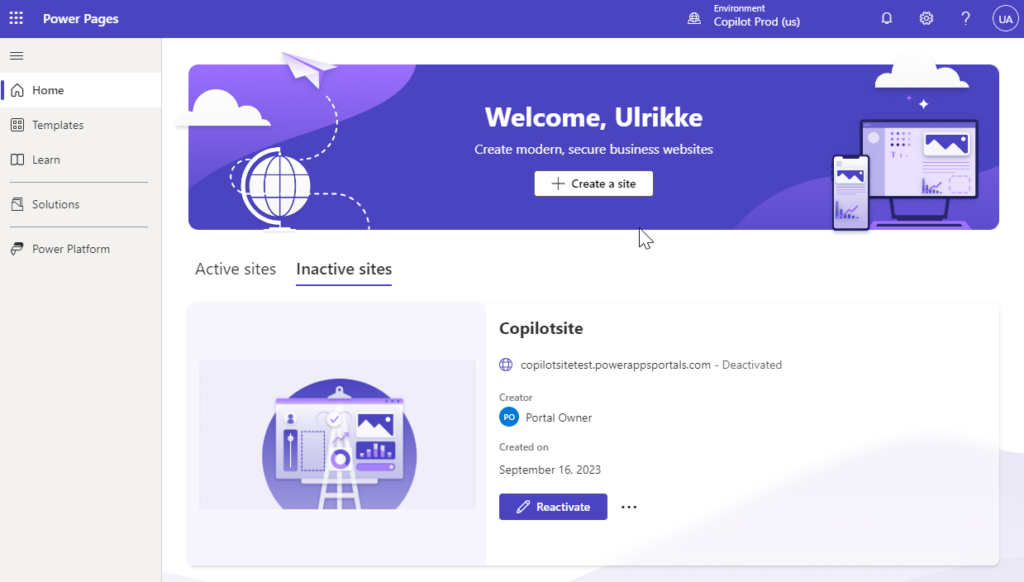
You can specify the site name and address, just like when you create a new site and select “Done”.
Bind the site
The new site is not bound to the enhanced data model in the target environment. We connect the two by binding the website record to the target environment.
Open admin.powerplatform.com, open environments and, click your target environment (prod). Click “Resource” from the top menu and select “Power Pages sites”.
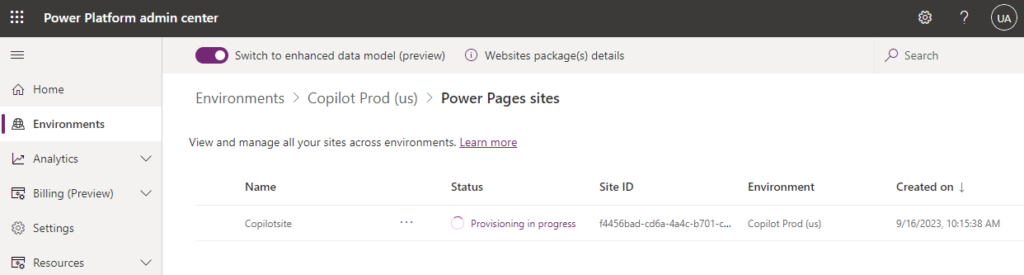
Wait until the site provisioning is finished. Select the new site and, click the ellipsis (…), and then “Manage” to open the site details.
To be honest, it took a long time for the pipeline to complete, and it took even longer for the site to show up in my production environment. It took a lot of hard refreshes, moving between the different interfaces, and a lot of patience before it showed up. This is to be expected the first time, and the next runs should be faster.
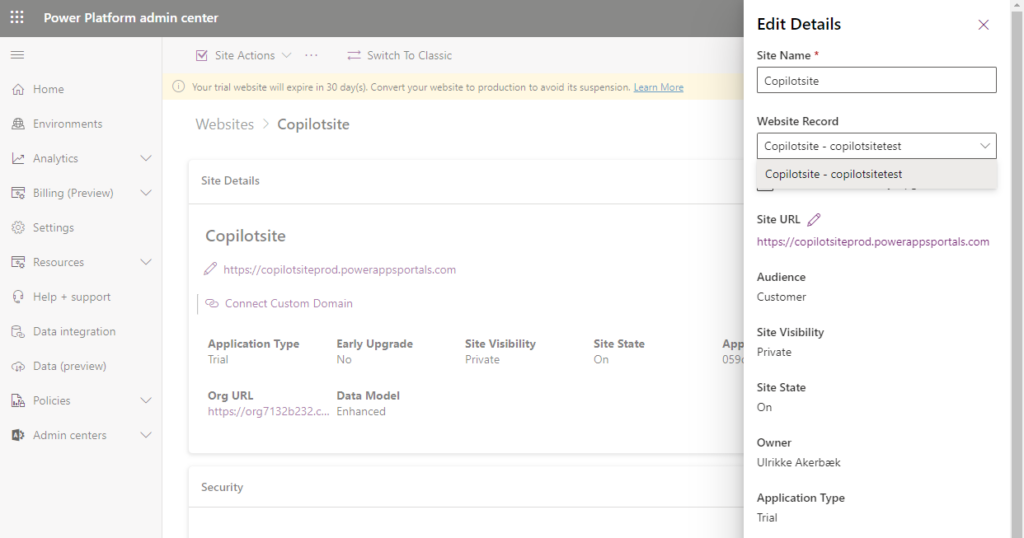
Click “Edit” on the right side of the “Site Details” box. A panel opens on the right side where you can edit the site details. On the “Website record” dropdown menu, choose the new site. I didn’t have any other sites in my environment, so this new site was already selected for me.
Save.
Click “Site Actions” from the top menu and select “Restart site”. This will render your site unavailable for a few minutes, and then bring it back online.
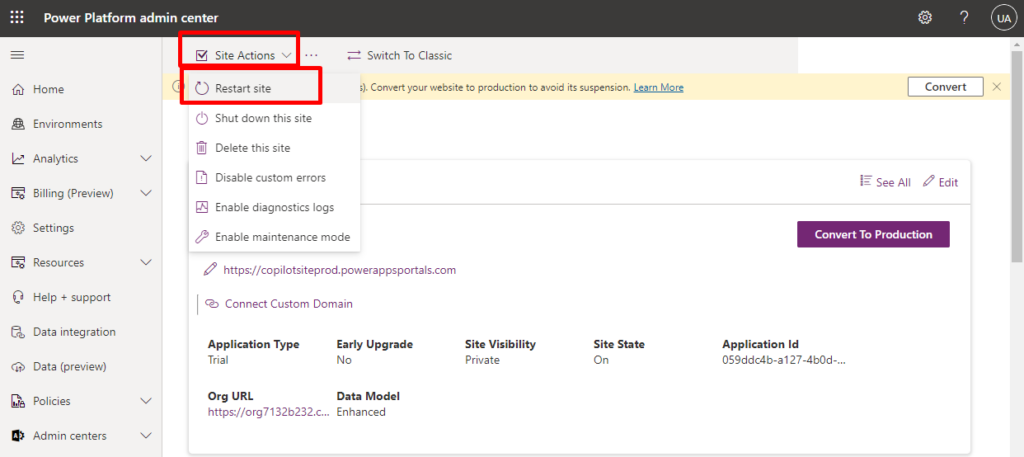
All Power Pages sites start their lifecycle as trial sites, and that applies to this new site too – so don’t forget to convert it to production.
And that’s a wrap!
You are now good to go, and can make changes in your Power Pages site in your dev environment – remember to add new site components to the solution – and run the pipeline to test and/or production when you are ready.
So, what’s next? Well – source control! Even if you now have a low code pipeline in place – you still don’t have any source control in place, and no backup if anything goes wrong.
Read more on how to combine Microsoft Power Platform CLI to download the metadata and use Azure Pipelines or GitHub actions to commit metadata to your source control. You can build and deploy solutions this way too, if you know how. More information on how to extend pipelines in Power Platform is here:
https://learn.microsoft.com/en-us/power-platform/alm/extend-pipelines?source=recommendations
Hope you learned something new from this blog post. Have fun!
Happy portal’ing!
Feature Photo by Rodion Kutsaiev on Unsplash
[…] Low Code Power Pages ALM with Power Platform Pipelines […]