Last updated on 16/03/2024
This blog post will look into how to style Power Pages – from the simplest theming to the most advanced custom styling with SCSS using VS Code and Portals CLI.
What we’ll cover
In addition to this I will let you know about all the small, but essential, and free, fabulous tools that I use all the time in my styling work.
I presented this topic at Nordic Summit 2022 in Stockholm. You can see all the blog post related to this session here with the tag:
https://ulrikke.akerbak.com/tag/nordic-summit-2022
While putting this blog post together I came across one of the LEARN Learning Path Modules for Power Apps Portals that walk you through “Advanced CSS”:
https://learn.microsoft.com/en-us/training/modules/extend-power-app-portals/4-portal-css
Most of what you find on this page applies to Power Pages as well. The code that makes up Power Pages is the same as Power Apps Portals; it’s mostly marketing and the new Designer Workspace is different.
Prerequisites
One step that is not mentioned in the Microsoft Documentation steps for planning your portals project, is the design. It’s a good idea to plan your portal design before your start implementing it.
Usually, the portal belongs to a company or organisation that already has a brand; logo, colours, icons, image styles and fonts that make up its visual identity. Talk to someone who knows the brand to access the files you need to make the portal adhere to the brand.
To follow the steps in this blog post you will need:
- Logo (image file)
- Colour profile (at least one primary colour with HEX code or RGB values)
- Font (name of the font they want to use or files)
- Icon set (file or name of the library)
- Brand guide / Brand book / Design Principals / Design Patterns / Visual identity guide
If you don’t have any of these and just want to play; google the name of your favourite brand, download the logo and make a note of the primary colours, and make the rest up as you go along.
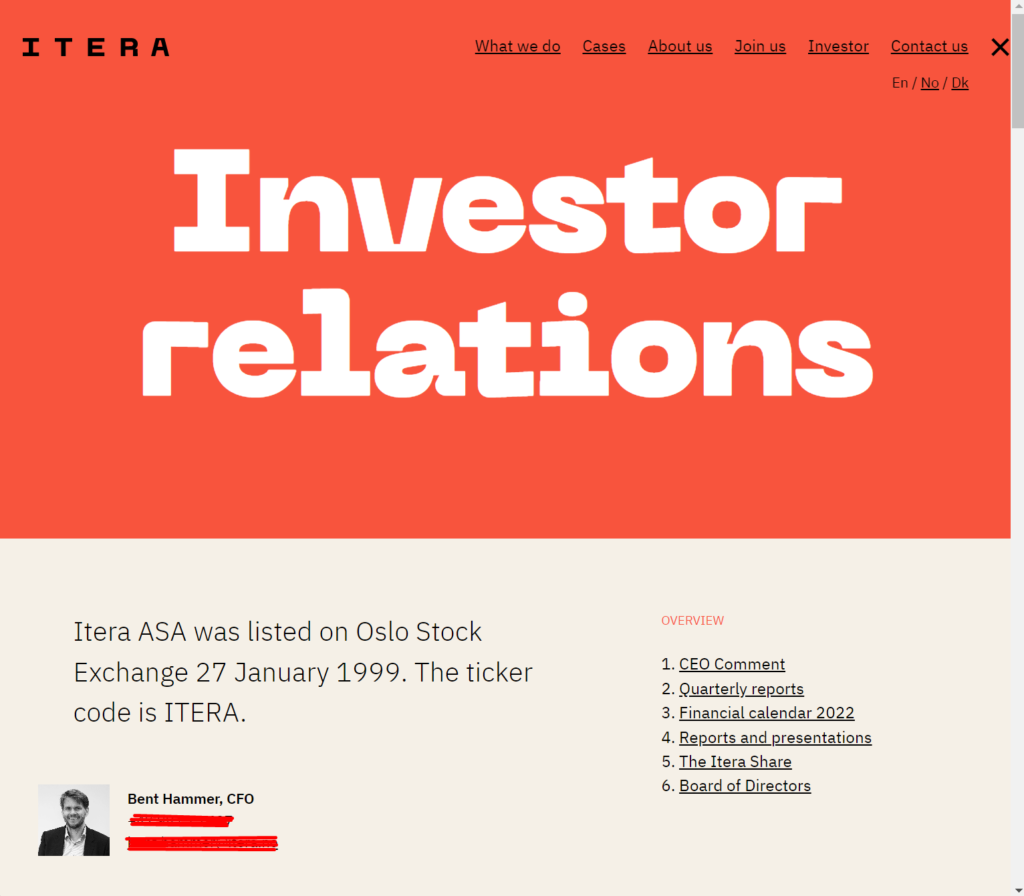
In this blog post, I will attempt to create a portal that is similar to my employer’s website: https://www.itera.com/
TOOL TIP!
Let me introduce you to a brilliant tool; ColorZilla! This browser extension allow you to pick colors from any website. Get ColorZilla in your browser here:
https://www.colorzilla.com/
1. Template
First, before you create your portal, you’ll need to choose your template. In order to choose the right template, consider the main purpose of the portal. It’s wise to look at the full potential of the use case for the portal, and not only what the main requirements are right now.
Before you start styling your Power Page you plan the whole project by looking at the purpose of the portal and map out some important details. There is some excellent guidance from Microsoft Documentation that is worth looking at:
https://docs.microsoft.com/en-us/power-pages/configure/planning-power-pages-project?source=recommendations
You can learn more about the different templates on my blog post about templates from Scottish Summit in June 2022: https://ulrikke.akerbak.com/2022/06/11/power-pages-templates/
Once you have selected a template that serves the purpose of the Portal you want to build and have created the portal, you are ready for styling.
Keep in mind that the different portal templates come with different default stylesheets. If you are new to CSS and HTML you can take inspiration and copy elements and styles that are similar to what you need and alter them to fit your requirements.
2. Logo and favicon
Logo
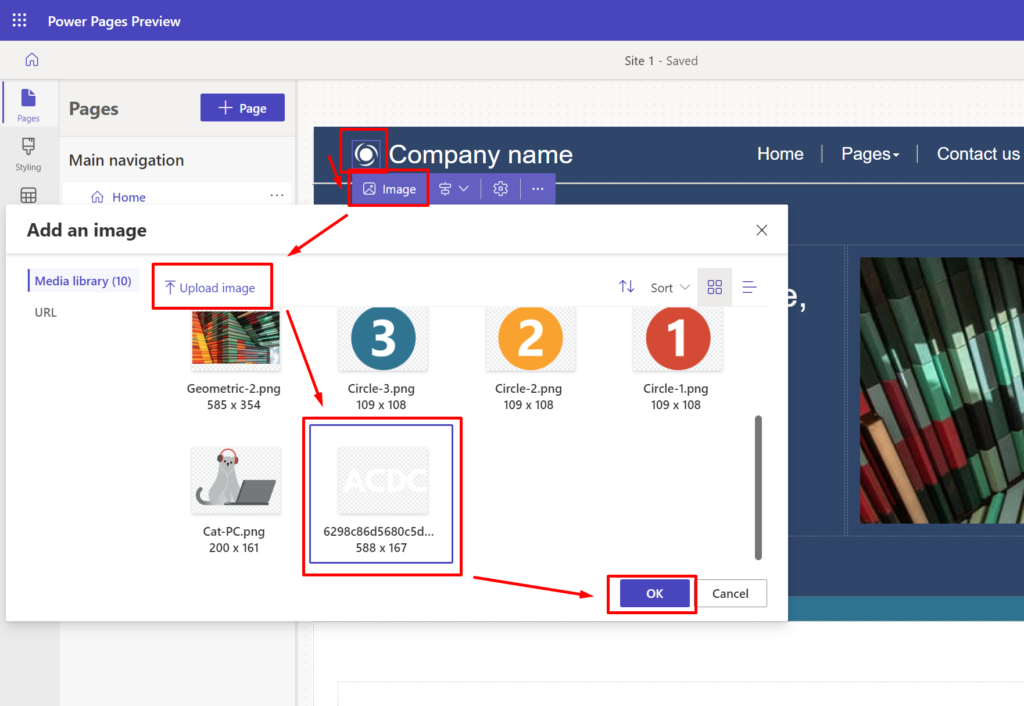
The new Designer makes it very easy to upload new images and place them on the portal page. To replace the default logo:
- Open the Power Page in edit mode
- Select the Pages workspace
- Click the logo image to the left of the company name
- Click “Image” in the local toolbar
- Upload your new logo to the media library
- Select the new logo
- Click OK
The logo will be replaced by your image, but what about that little browser icon? How do you update that? The little browser icon is called a “favicon”. All browsers look for favicon files among the web files on any website, and the only thing we need to do in order to change the favicon is simply to upload a file that has the file type “.ico” into the media library. How to create the file?
Favicon
It’s time for another small, smart and fabulous free tool that I use in every project.
Meet https://www.favicon.cc/ – This tool allows you to upload an image file and turns it into a favicon. Create a web file in Portal Management App and upload that favicon to the web file, and the browser will do the rest. Magic!
If I lost you completely in my description of how to create the favicon and create a web file you can follow the step-by-step process in this blog post:
3. Theme
There are multiple themes available out of the box that can work as a starting point for your styling. Choose the one that is the closest to what you want to achieve.

Once you have chosen a theme you can customize the colours, fonts and appearances of different core components. Hover over one of the colour blobs and click the small pen icon to open the editor modal.
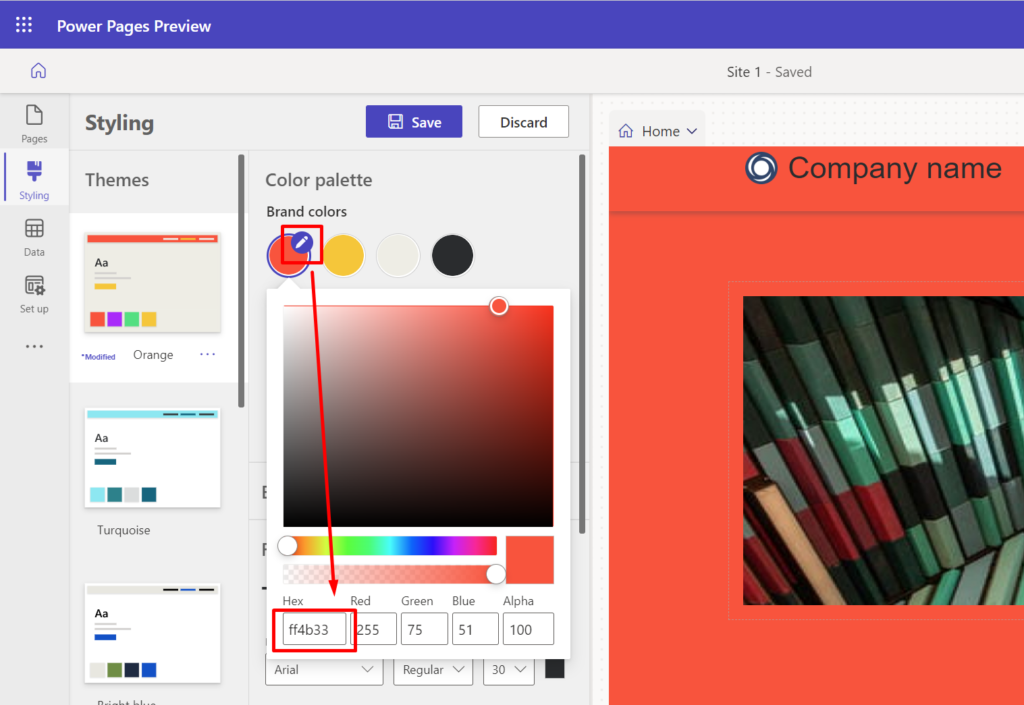
You can choose multiple ways to choose the colour:
- Enter a HEX colour code
- Enter the RGB values
- Alter the “Alpha” value to change the opacity
- Choose a colour on intuition by sliding the colour range slider and selecting a colour from the colour map.
As you change the colours in the theme you will see the changes in your portal live. Still, you will need to save the template once you have set all the properties.
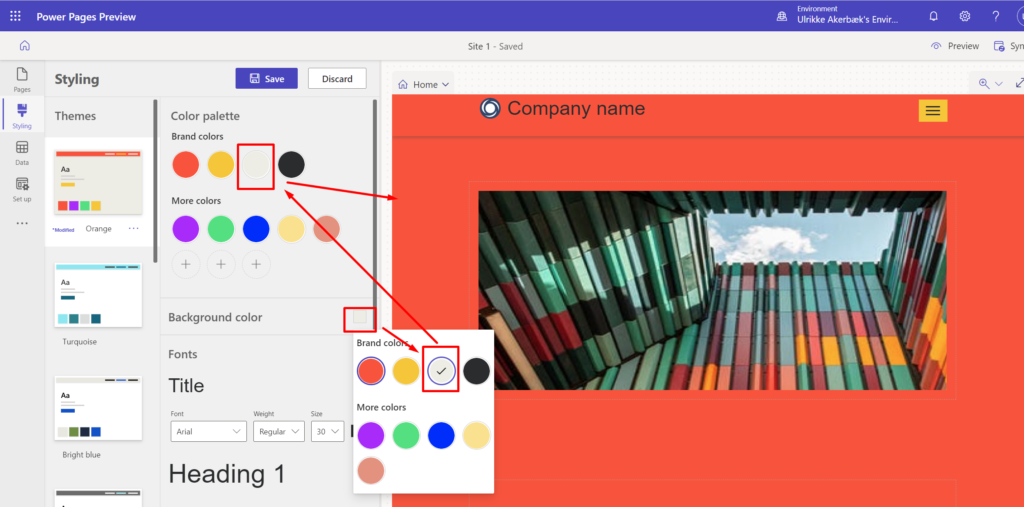
As far as I can tell the different brand colours impact the portals differently from one template to another. In the case of the Default Template, I can’t seem to change the background colour of the portal. No matter what colour I choose as “Background colour” it will use the first brand colour as the background colour:
This is where we need to add our custom CSS.
There are other blog posts related to this topic, and you find them all on this tag page: https://ulrikke.akerbak.com/tag/styling/
4. Custom CSS
Often I reach the limits of what theming can do, and it’s not enough to make the changes I need to the portal’s visual appearance. Then it’s time to upload a Custom CSS.
I have created a blog post that demonstrates how to upload a custom CSS file to the Power Pages portal. What you put in your CSS file, on the other hand, you will have to figure it out for yourself.
One of the things that I will show you how to do is how to use a custom font on your portal.
5. Fonts
Changing the font on a website is one of the most impactful changes you can do to make your website stand out. The web is full of resources about why fonts are so important and do’s and don’t for choosing your font.
I use free Google Fonts for most of my portal implementations. Once you find a font you like, simply add the styles you need to your collection, and then copy the “<link>” code on the right-hand panel
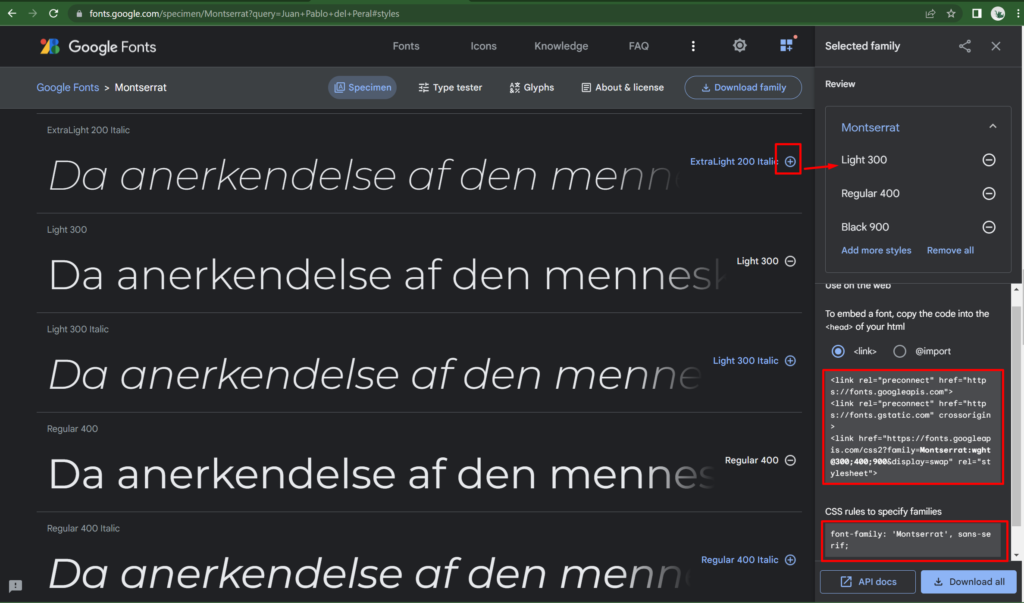
To enable this font we need to add the contents of the “<link>” into a content snippet. Then we need to create CSS that applies the font to the portal.
Head/Fonts content snippet
This content snippet will not exist by default, but we can create it.
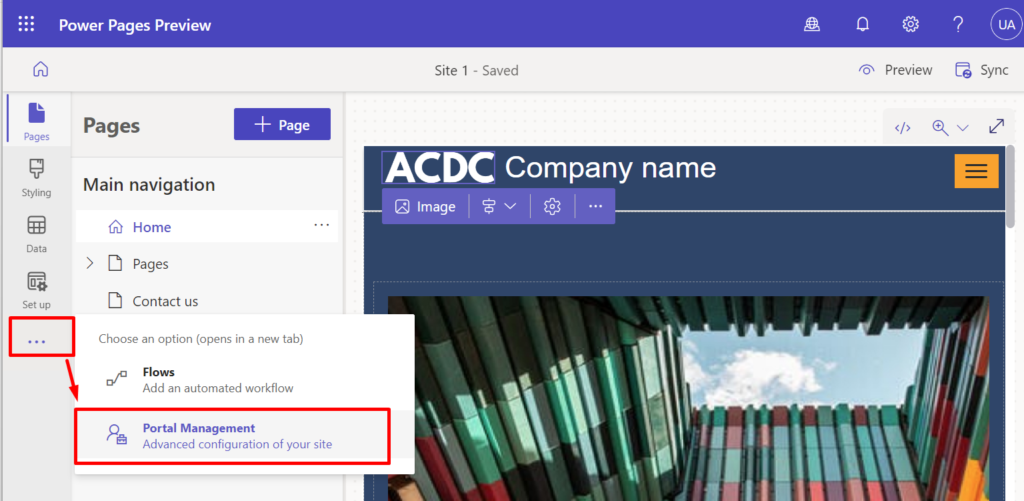
From Power Pages Studio, click the three dots at the bottom of the left-hand menu, and choose “Portal Management App”.
In the new tab that opens
- Find “Content Snippets” in the left menu.
- Click the “New” button
- Fill in the form.
- Name: “Head/Fonts”
- Website: [your website]
- Type: “HTML”
- Open the “HTML” tab in the value section and paste in your “<link>” code:
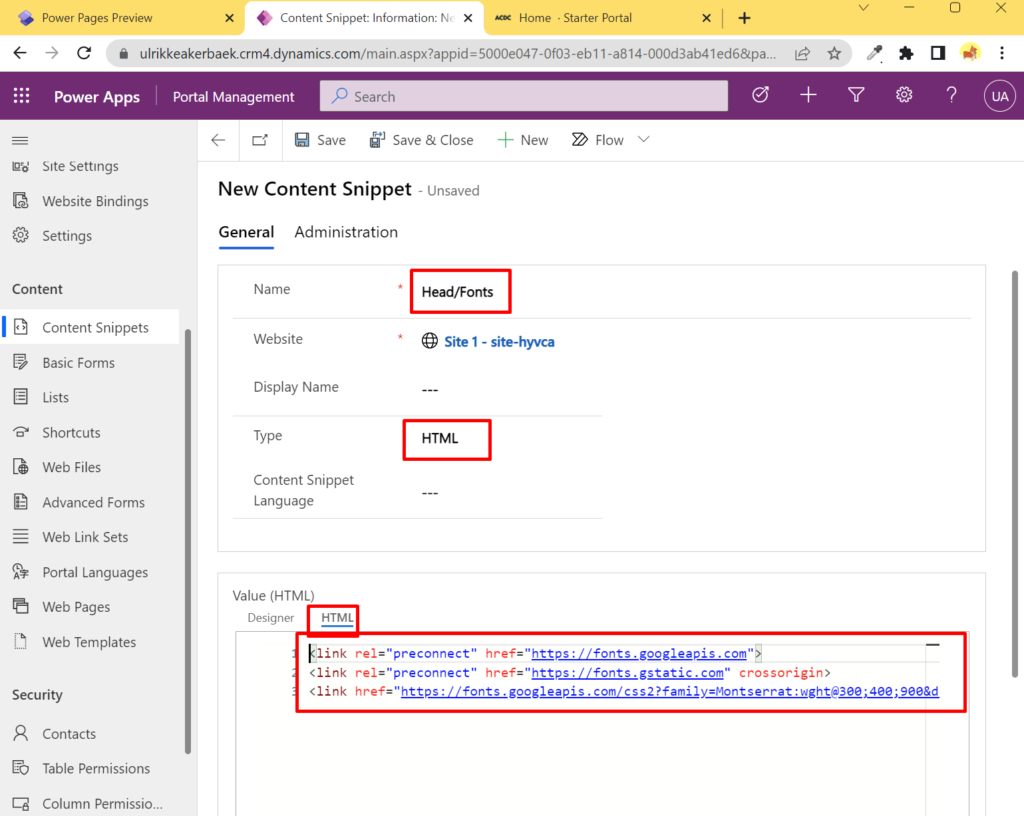
Save and refresh the cache for your browser.
Did you know that this is the exact same approach that we use to enable the use of Font Awesome icons in Power Pages?
Creating this content snippet alone will not result in any visual changes in the portal. We have enabled a new font, but remain to instruct the portal on how to render the font. That’s what we need to do in CSS.
Use font in CSS
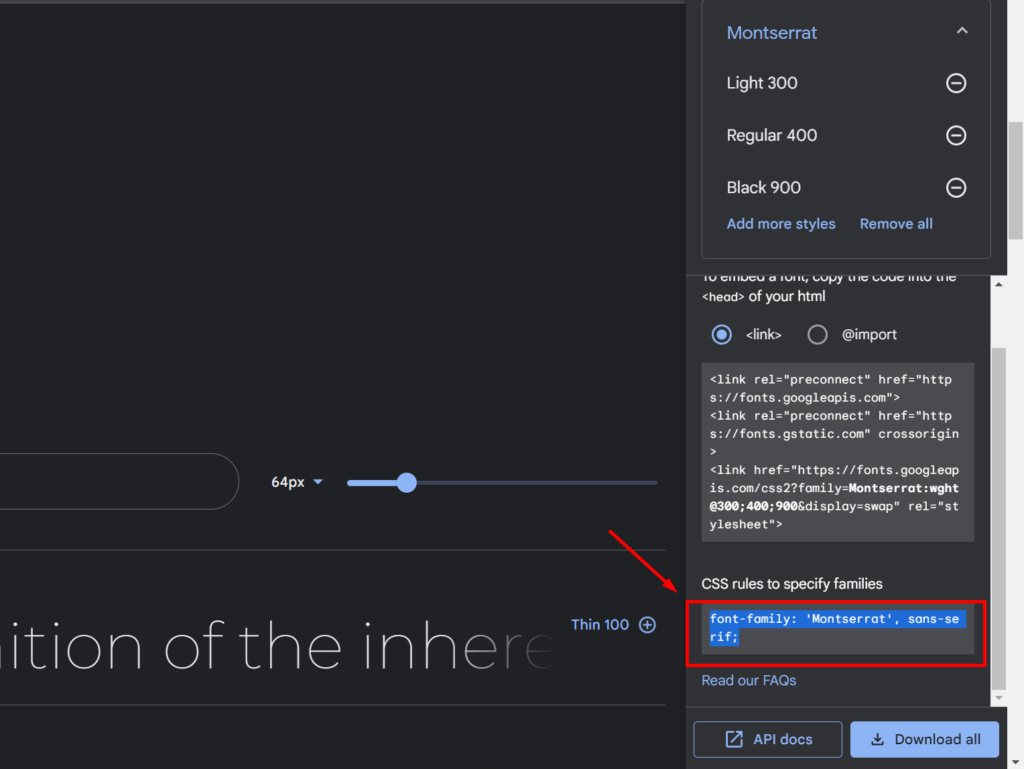
Open the CSS file that you uploaded to your portal in the Power Pages workspace and add this CSS styling:
body *
 {
    font-family: 'Montserrat', sans-serif!important;
}Code language: CSS (css)NOTE! It is NOT a best practice to add “!important” to styling like this. Unfortunately, the theming engine in Power Pages creates styling in the default CSS files that it takes some effort to replace. I will not go into details on how to do that now, so for demo purposes, let’s through the “!important” in there to override any other styling.
You can replace the font with the font that you selected by going back to the Google Fonts page and copying the second code string that was underneath the “<link>” code.
I saved the CSS file and previewed your portal to see the changes.
I can clearly see that the font has changed and that it applies to all text elements on the portal.
6. Portal CLI, VS Code and SCSS
You will be able to do lots of styling by updating the CSS file in the Power Pages workspace. If you ever find that the CSS file has become a large mess that only you can find your way around (much like a teenager’s bedroom) then it’s time to take it to the next level.
I cover this “Next level” in a blog post about “Power Apps Portals branding – VS Code, CLI, CSS and SCSS”. Because the Power Pages Portal and the Power Apps Portals have the same code underneath the hood, this way of working with branding also applies seamlessly på Power Pages Portals. Yey!
That’s it. I hope this was helpful and that you have learned something new.
Are you looking for my presentation from the Canadian Power Platform Conference 2024?
Here it is for you in PDF format to download:
Please reach out to me on social media or leave a comment at the bottom if you have any feedback.
Have fun! And happy Portal’ing!
Feature Photo by Taelynn Christopher on Unsplash
Hei Ulrikke
First of all, thank you for sharing this fantastic content of yours. I am to try this and replicate it on my end but I am experiencing some difficulties getting started with the power pages here in Norway, According to the Microsoft support agent who helped me, she said that its something to do with the power pages not being available in Norway yet. How do you create your environment, and what region did you choose?
Hello Roxanne. I cannot say that my experience matches the feedback from the Microsoft support agent. I have Norwegian customers with Norwegian tenants and environments using Power Pages without a problem. If I were setting up a trial environment today I would choose Europe.
If you are experiencing problems with trial tenants; maybe you should try to create a Developer Tenant that is designed for testing and trying.
This one is for Microsoft 365: https://developer.microsoft.com/en-us/microsoft-365/dev-program
Read more about Developer Tenants for Power Platform here: hhttps://learn.microsoft.com/en-us/power-apps/maker/developer-plan
[…] How to style Power Pages […]
[…] How to style Power Pages […]
[…] How to style Power Pages […]
Hi! Got issue with some icons not showing when using the selector body *star* .This because those are actually not images but fonts instead. For me it was fixed by using this selector instead.
body *:not(.glyphicon):not(.fa)
{
font-family: ‘Montserrat’, sans-serif!important;
}
It ignores those icons 🙂 Hopefully someone else finds this usefull as well.
Really helpful blog and appreciate your efforts !!!
This really helped us to start without first portal project.