Last updated on 07/05/2022
We use a theme framework that look lightly different from the OOTB (out of the box) experience. I need to add come classes and change the structure somewhat to make lists look like they should. I need a custom entity list. This is how:
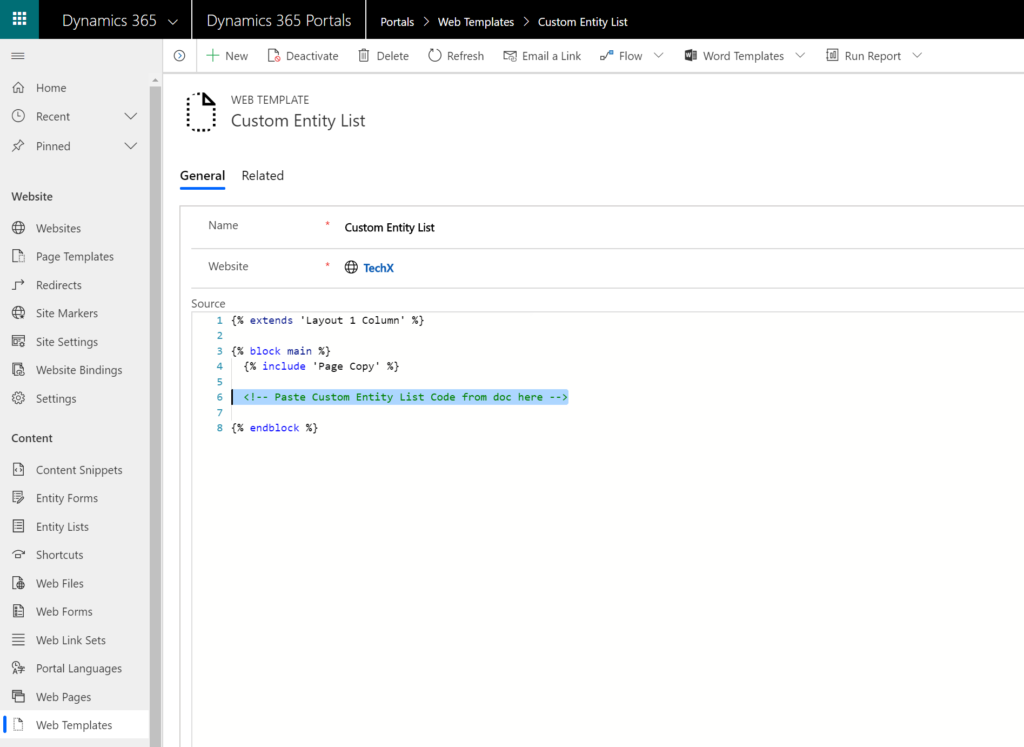
Custom Entity List Web Template
Start with creating a new blank Web Template. Call it “Custom Entity List” and paste in this code snippet:
{% extends 'Layout 1 Column' %}
{% block main %}  {% include 'Page Copy' %}
  <!-- Paste Custom Entity List Code from doc here -->
{% endblock %}
Get the custom entity form code from Microsoft Documentation here:
https://docs.microsoft.com/en-gb/powerapps/maker/portals/liquid/render-entity-list-current-page
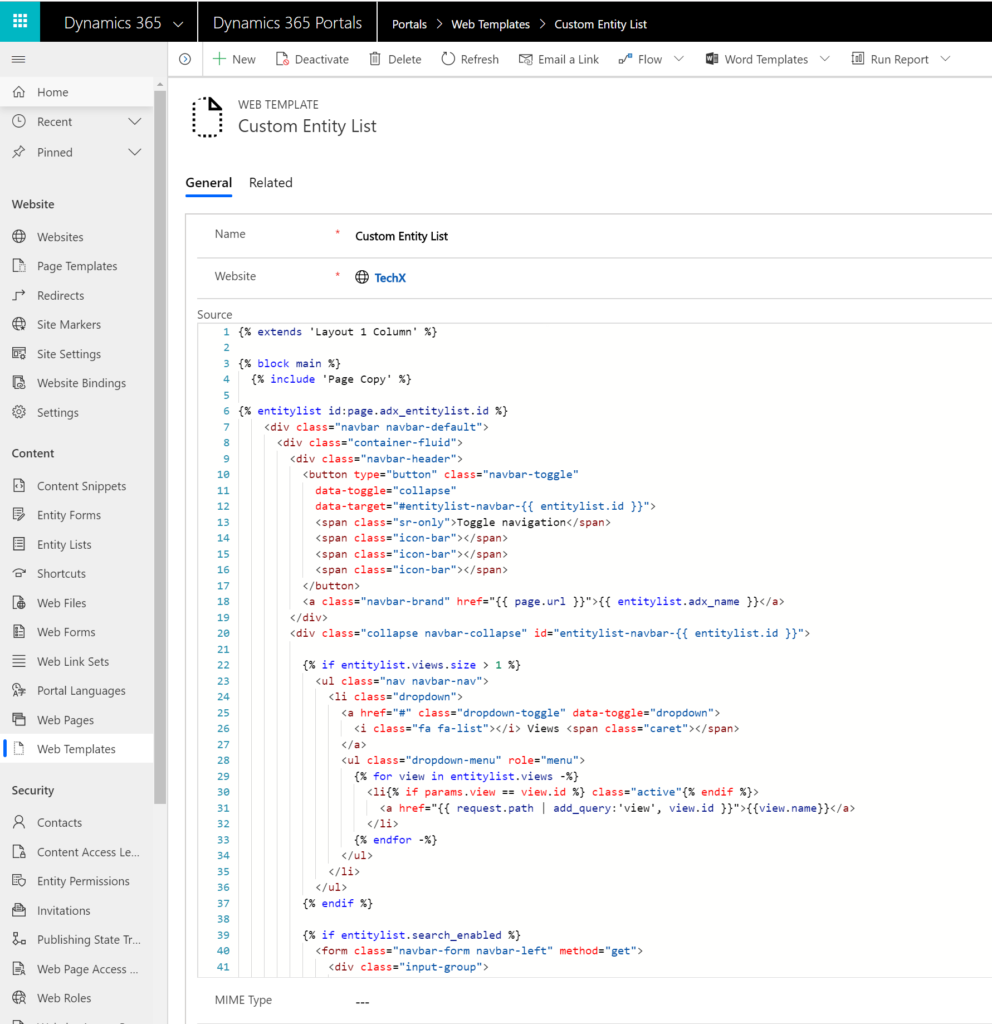
Update
The code in Microsoft Documentation is not working for rendering cases lists as I write this blog post. I added the code I have working in production here instead. Please copy the whole code here and paste it into a Web template.
{% extends 'Layout 1 Column' %}
{% block main %}
{% include 'Page Copy' %}
{% entitylist id:page.adx_entitylist.id %}
<div class="navbar navbar-default">
<div class="container-fluid">
<div class="navbar-header">
<button type="button" class="navbar-toggle"
data-toggle="collapse"
data-target="#entitylist-navbar-{{ entitylist.id }}">
<span class="sr-only">Toggle navigation</span>
<span class="icon-bar"></span>
<span class="icon-bar"></span>
<span class="icon-bar"></span>
</button>
<a class="navbar-brand" href="{{ page.url }}">{{ entitylist.adx_name }}</a>
</div>
<div class="collapse navbar-collapse" id="entitylist-navbar-{{ entitylist.id }}">
{% if entitylist.views.size > 1 %}
<ul class="nav navbar-nav">
<li class="dropdown">
<a href="#" class="dropdown-toggle" data-toggle="dropdown">
<i class="fa fa-list"></i> Views <span class="caret"></span>
</a>
<ul class="dropdown-menu" role="menu">
{% for view in entitylist.views -%}
<li{% if params.view == view.id %} class="active"{% endif %}>
<a href="{{ request.path | add_query:'view', view.id }}">{{view.name}}</a>
</li>
{% endfor -%}
</ul>
</li>
</ul>
{% endif %}
{% if entitylist.search_enabled %}
<form class="navbar-form navbar-left" method="get">
<div class="input-group">
{% if params.search.size > 0 %}
<div class="input-group-btn">
<a class="btn btn-default"
href="{{ request.path_and_query | remove_query:'search' }}">×</a>
</div>
{% endif %}
<input name="search" class="form-control"
value="{{ params.search }}"
placeholder="{{ entitylist.search_placeholder | default: 'Search' }}"
type="text" />
<div class="input-group-btn">
<button type="submit" class="btn btn-default"
title="{{ entitylist.search_tooltip }}">
<i class="fa fa-search"> </i>
</button>
</div>
</div>
</form>
{% endif %}
{% if entitylist.create_enabled %}
<ul class="nav navbar-nav navbar-right">
<li>
<a href="{{ entitylist.create_url }}">
<i class="fa fa-plus"></i> {{ entitylist.create_label | default: 'Create' }}
</a>
</li>
</ul>
{% endif %}
</div>
</div>
</div>
{% entityview id:params.view, search:params.search, order:params.order, page:params.page, pagesize:params.pagesize, metafilter:params.mf %}
{% assign order = params.order | default: entityview.sort_expression %}
<table class="table" data-order="{{ order }}">
<thead>
<tr>
{% for c in entityview.columns -%}
<th width="{{ c.width }}" data-logicalname="{{ c.logical_name }}">
{% if c.sort_enabled %}
{% assign current_sort = order | current_sort:c.logical_name %}
{% case current_sort %}
{% when 'ASC' %}
<a href="{{ request.path_and_query | add_query:'order', c.sort_descending }}">
{{ c.name }} <i class="fa fa-sort-asc"></i>
</a>
{% when 'DESC' %}
<a href="{{ request.path_and_query | add_query:'order', c.sort_ascending }}">
{{ c.name }} <i class="fa fa-sort-desc"></i>
</a>
{% else %}
<a href="{{ request.path_and_query | add_query:'order', c.sort_ascending }}">
{{ c.name }} <i class="fa fa-unsorted"></i>
</a>
{% endcase %}
{% else %}
{{ c.name }}
{% endif %}
</th>
{% endfor -%}
<th width="1"></th>
</tr>
</thead>
<tbody>
{% for e in entityview.records -%}
<tr>
{% for c in entityview.columns -%}
{% assign attr = e[c.logical_name] %}
{% assign attr_type = c.attribute_type | downcase %}
<td data-logicalname="{{ c.logical_name }}">
{% if attr.is_entity_reference -%}
{{ attr.name }}
{% elsif attr_type == 'datetime' %}
{% if attr %}
<time datetime="{{ attr | date_to_iso8601 }}">
{{ attr }}
</time>
{% endif %}
{% elsif attr_type == 'picklist' %}
{{ attr.label }}
{% else %}
{{ attr }}
{% endif -%}
</th>
{% endfor -%}
<td>
{% if entitylist.detail_enabled -%}
<a class="btn btn-default btn-xs"
href="{{ entitylist.detail_url}}?{{ entitylist.detail_id_parameter }}={{ e.id }}"
title="{{ entitylist.detail_label }}">
<i class="fa fa-external-link"></i>
</a>
{% endif -%}
</td>
<tr>
{% endfor -%}
</tbody>
</table>
{% if entityview.pages.size > 0 %}
{% assign first_page = entityview.first_page %}
{% assign last_page = entityview.last_page %}
{% assign page_offset = entityview.page | minus:1 | divided_by:10 | times:10 %}
{% assign page_slice_first_page = page_offset | plus:1 %}
{% assign page_slice_last_page = page_offset | plus:10 %}
<ul class="pagination">
<li {% unless first_page and entityview.page > 1 %}class="disabled"{% endunless %}>
<a
{% if first_page and entityview.page > 1 %}
href="{{ request.url | add_query:'page', first_page | path_and_query }}"
{% endif %}>
«
</a>
</li>
<li {% unless entityview.previous_page %}class="disabled"{% endunless %}>
<a
{% if entityview.previous_page %}
href="{{ request.url | add_query:'page', entityview.previous_page | path_and_query }}"
{% endif %}>
‹
</a>
</li>
{% if page_slice_first_page > 1 %}
{% assign previous_slice_last_page = page_slice_first_page | minus:1 %}
<li>
<a href="{{ request.url | add_query:'page', previous_slice_last_page | path_and_query }}">
…
</a>
</li>
{% endif %}
{% for page in entityview.pages offset:page_offset limit:10 -%}
<li{% if page == entityview.page %} class="active"{% endif %}>
<a href="{{ request.url | add_query:'page', page | path_and_query }}">
{{ page }}
</a>
</li>
{% endfor -%}
{% if page_slice_last_page < entityview.pages.size %}
{% assign next_slice_first_page = page_slice_last_page | plus:1 %}
<li>
<a href="{{ request.url | add_query:'page', next_slice_first_page | path_and_query }}">
…
</a>
</li>
{% endif %}
<li {% unless entityview.next_page %}class="disabled"{% endunless %}>
<a
{% if entityview.next_page %}
href="{{ request.url | add_query:'page', entityview.next_page | path_and_query }}"
{% endif %}>
›
</a>
</li>
<li {% unless last_page and entityview.page < last_page %}class="disabled"{% endunless %}>
<a
{% if last_page and entityview.page < last_page %}
href="{{ request.url | add_query:'page', last_page | path_and_query }}"
{% endif %}>
»
</a>
</li>
</ul>
{% endif %}
{% endentityview %}
{% endentitylist %}
{% endblock %}Copy the code and paste it directly into a new web template.
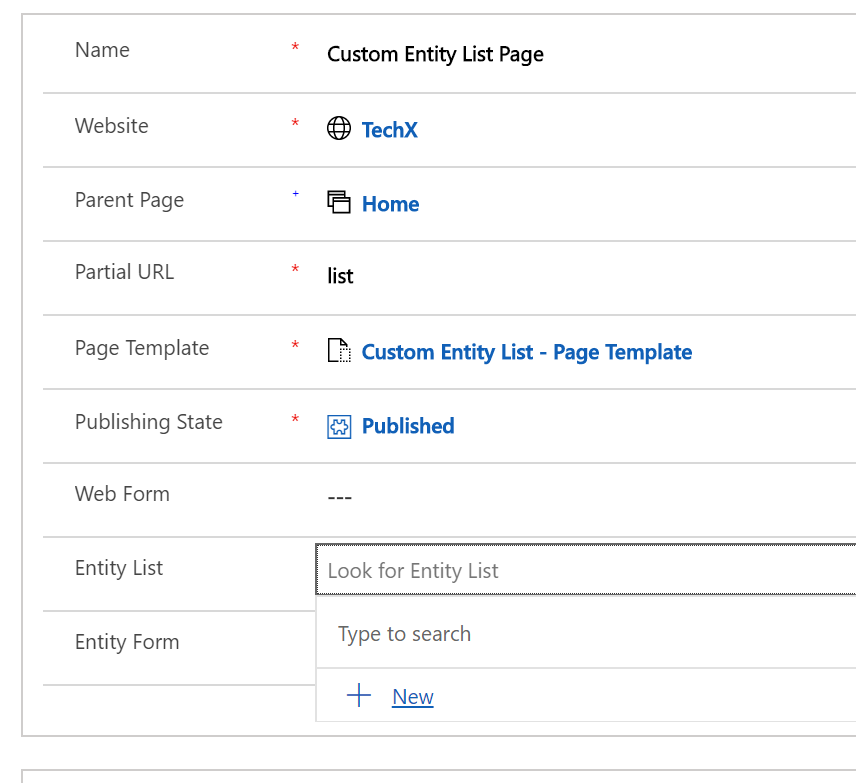
Page Template and Web Page
Create a new page template to hold this Custom Entity List web template.
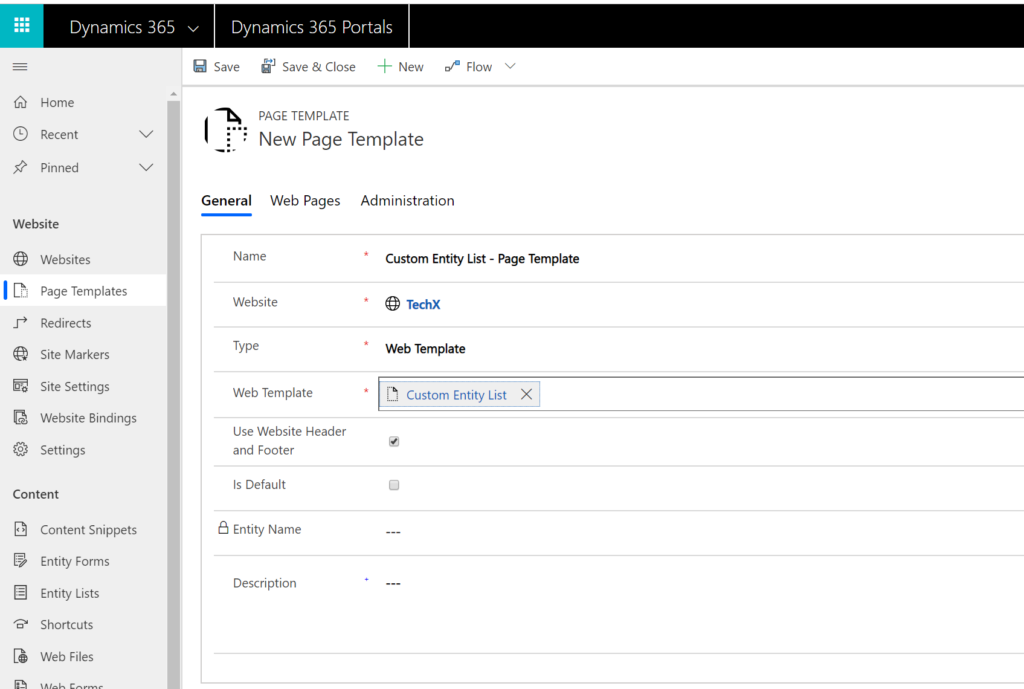
Crate a new page and add the page template we just created
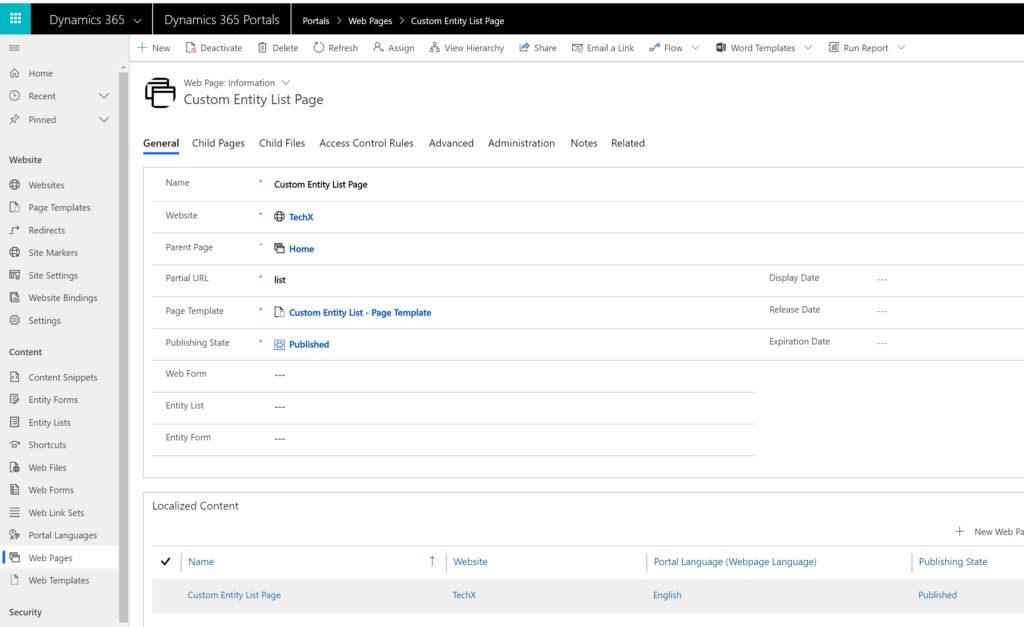
Save and click the Entity List and select “new”
Entity List
This shortcut send you directly to a form for creating new entity list. I choose to view cases (incidents) for this list.
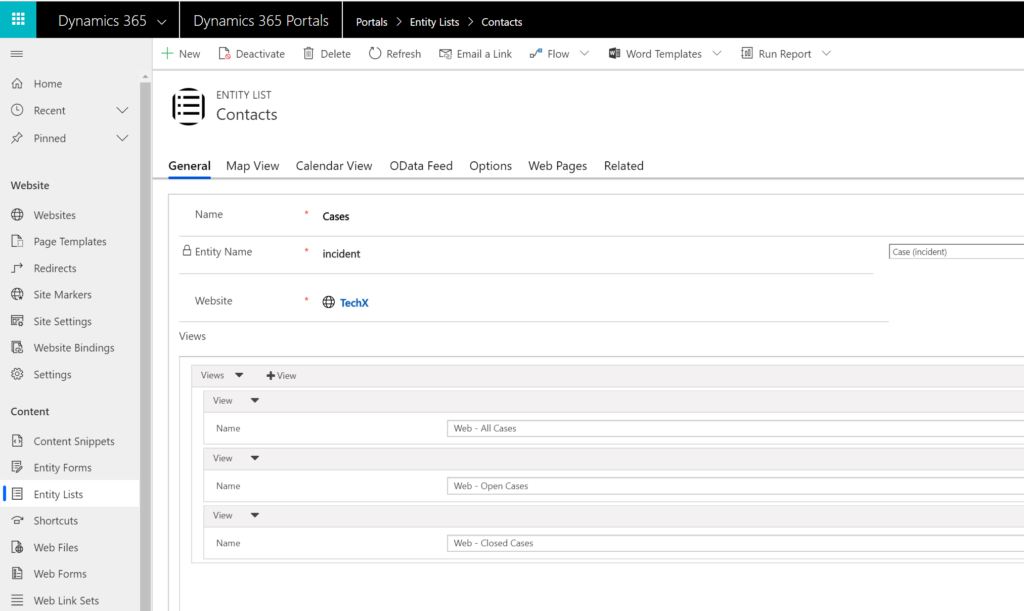
Now you can configure this list as you wish; add the views that you want, choose how many items to display, enable search, filtering and so on. Look to this doc for more on how to configure Entity Lists:
https://docs.microsoft.com/en-gb/powerapps/maker/portals/configure/entity-lists
Back to the Web Page we select the “Cases” Entity list:
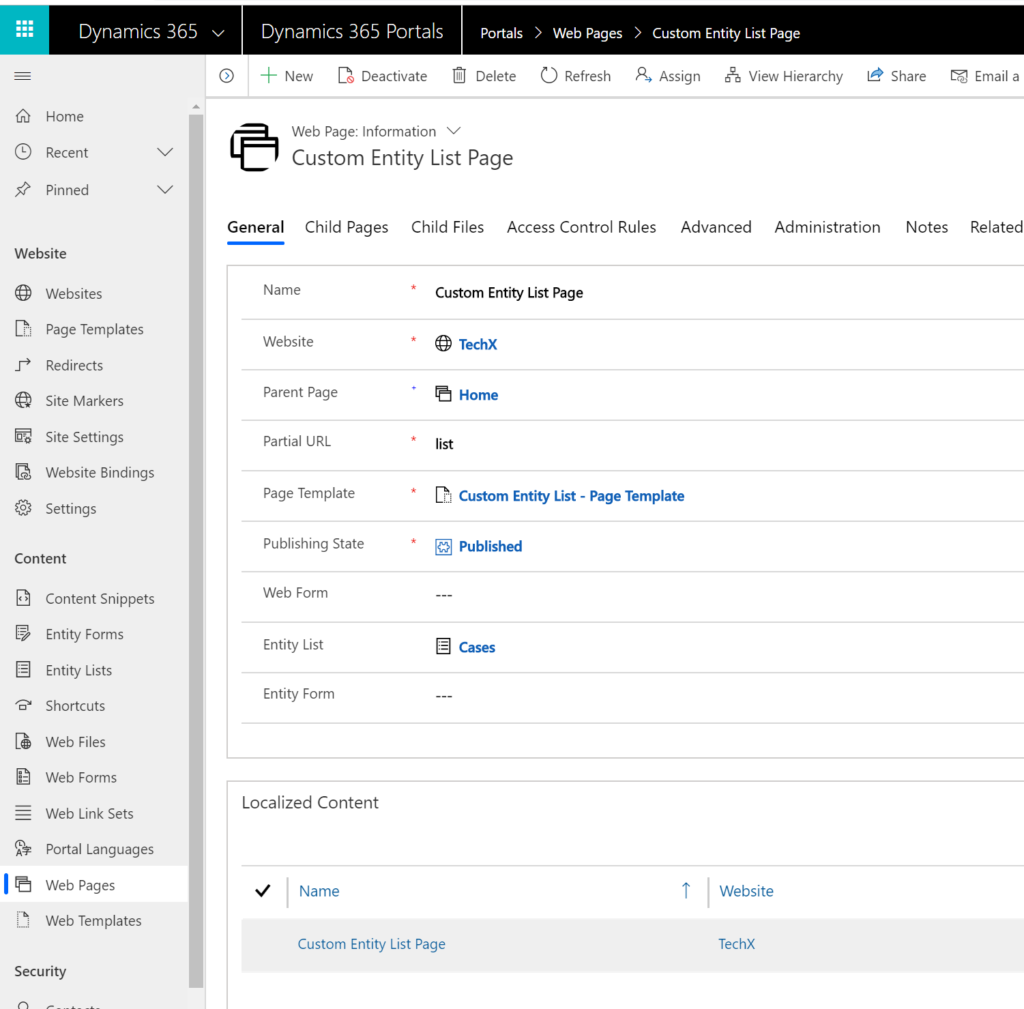
To make sure the local content page also has the right entity list make sure to click on the associated page in “Localized Content” and verify that it too has the right entity list selected.
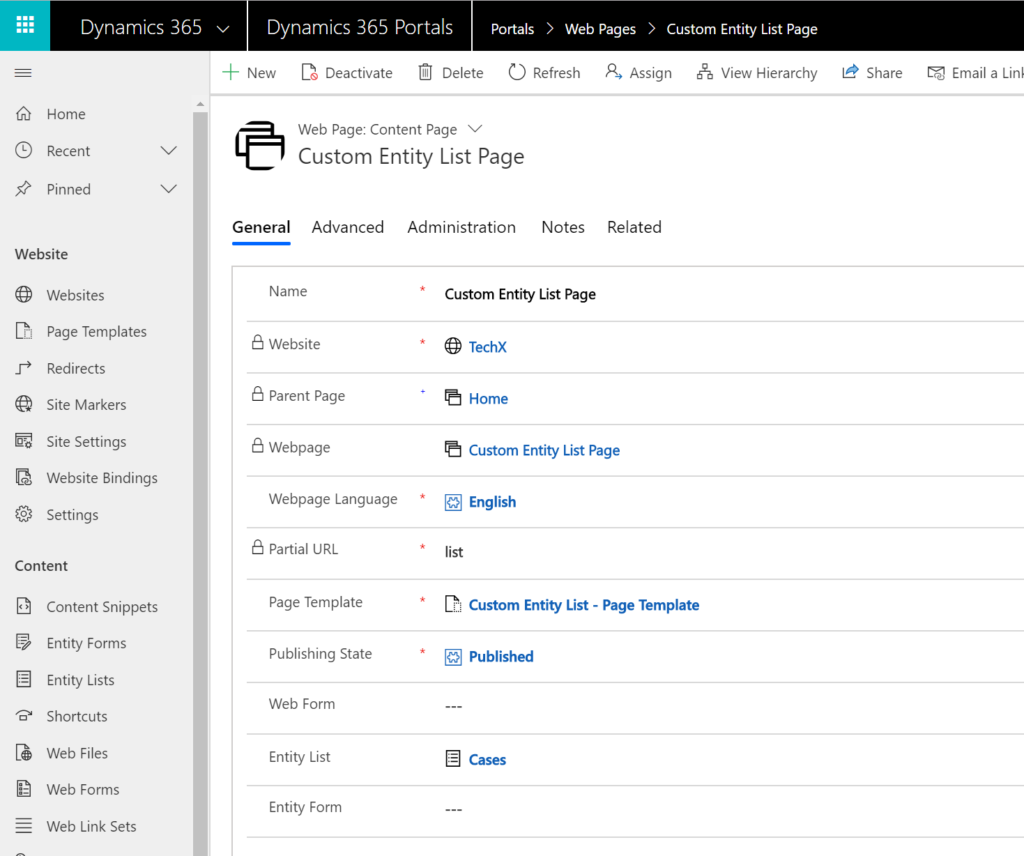
Save and open your new web page in the browser.
Result
My list look like this on a web site with some simple theming:
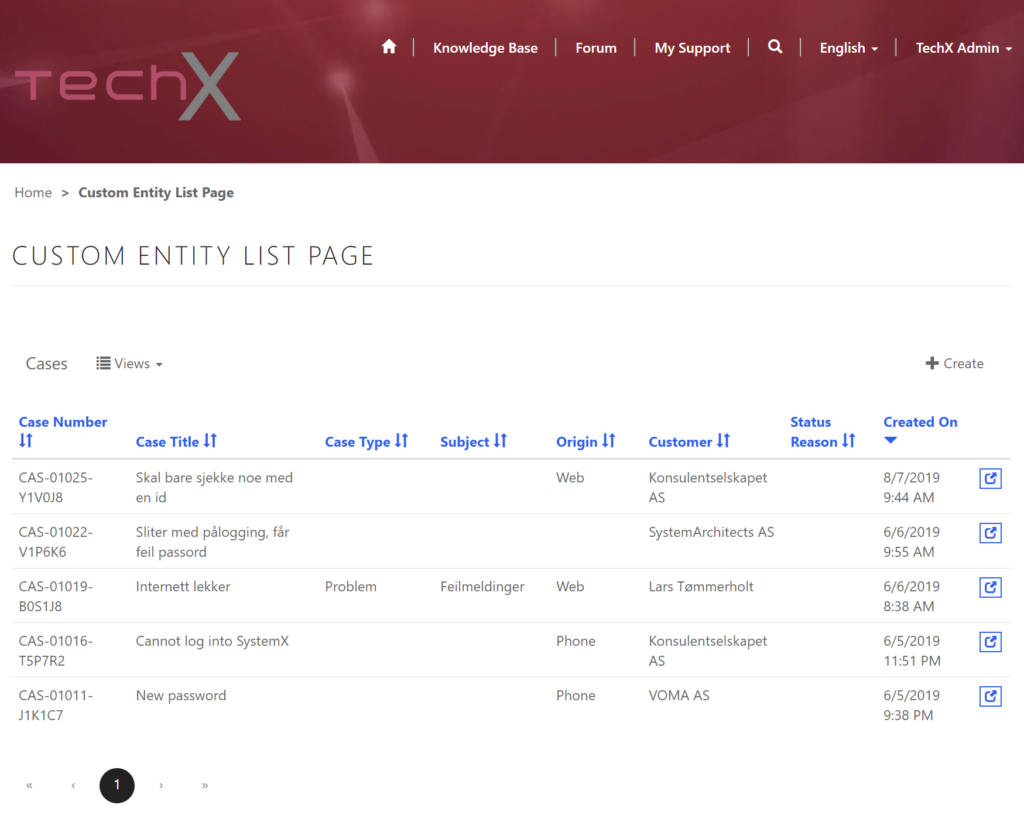
Now I need to go back into my Entity List and setup pages and forms for creating and editing. Use as much standard stuff as possible, but as soon as you need to change something make a copy and keep the original. You’ll need it when your copy breaks 😉
Add CSS classes and rearrange the HTML structure to make this list fit into the theme of your web site. We have used this custom entity form as the primary entity form rendering at the Customer Portal at www.skill.no and it looks like this after I cuddled and polished it a little:
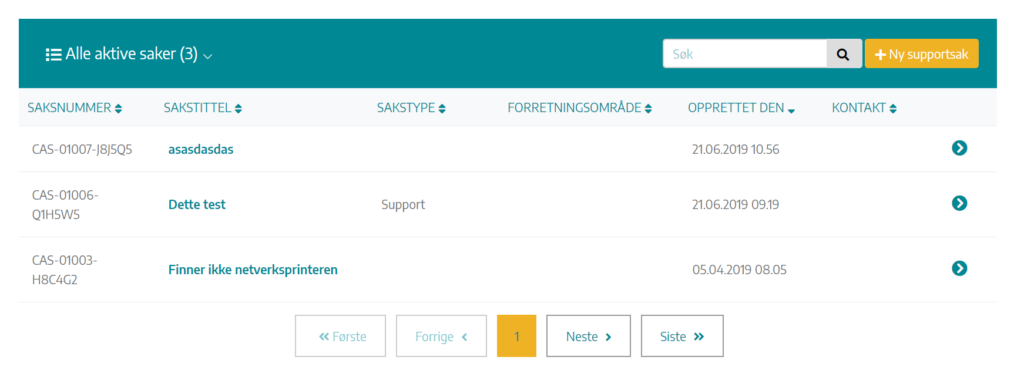
Notice the view selector at the top bar left side. In the original code from MS docs the name of the Entity List is set as the list header and then the drop-down button for choosing links always says “Views”. The result is that the end user has no way of seeing which view is currently selected. I fixed it in this customized version. Want to know how I did it? See this blog post: https://ulrikke.akerbak.com/2019/09/06/custom-entity-list-view-selector/
Summary
Use the code for custom entity list from Microsoft documentation to easily create your own entity list. This can come in handy when you need to add classes and elements for it to fit into a theme framework or you just want some more freedom.
Happy Portaling!
Best wishes, Ulrikke
Cover Photo by David Ballew on Unsplash
[…] Next Post Portals: Custom Entity List […]
[…] create an entity list that get all contacts. I render the list using liquid behind the scenes in a custom entity list web template. I also create an entity form to display the current contact, and connect entity list, entity form […]
I am trying to show child records in an entity list
The parent entities are shown in another entity list. The “view details” of the parent entity list takes to a page which shows the details of parent.
I want to add an entity list to the details of page parent. This entity list should only show child records. (the child entity holds a reference to parent.)
I am unable to filter the records of this child entity list.
It should be based on the id parameter but there is no configuration to filter on that.
Any suggestions ? Will i have to create a custom entity list for this ?
Hello Himanshu Dhillon. Hope I got this right. What you need is a subgrid on an entity form. It is not the most intuitive, but I use this technique all the time in my solutions. Created a blog post about it for you:
https://ulrikke.akerbak.com/2020/03/25/show-child-elements-in-power-apps-portals/ Hope it works out. If it doesn’t solve your problem please let me know and we will figure it out.
Hi Himanshu, I am looking for same spolution
I have 3 entities Entity A (1:N) to Entity B (1:N) to Entity C. I need three entity lists pages with filtered data. Is there any way can you help me how to create custom entity list with id param as filter. I have tried the different articles. Its not working.
Hello Chandra. I want to help you with this – but need some more information to be able to. If you want to display a football team (entity A) and the related football players (1:N) you should create a subgrid on the football team form that display the list of related football players. This article will show you how: https://ulrikke.akerbak.com/2020/03/25/show-child-elements-in-power-apps-portals/ Hope this helps.
Thanks Urlikke. Perhaps, I have 3 entities to show. Entity A >> Entity B >> Entity C.
I want different pages for entity lists, if possible
If user opens entity A List and select a record new page should open to see B Entity lists then same for C entity Lists.
Otherwise one page as you showed in the referred article. I havenot tried though, I will try.But my interest would be to have three pages.
Thanks for the reply.
But I wanted an entity list of child records. I had to show the details of child records and give the ability to add new records (possible only though entity list)
Subgrid does not have the option.
I finally created a custom entity list and added code to filter child records based on the request params. Then created relevant web template / page template / page.
In the page, I added the entity form to show the parent details and entity list had the filtered child records.
Great job finding the solution on your own. Will however point out that you have all the same possibilities to configure actions like New, Details, Edit, Delete, Associate, ect. for items in a subgrid on an entity form as you have on an entity list. You configure them on “Entity Form Metadata” for the subgrid. More information to be found here (web forms and entity forms work the same way): https://docs.microsoft.com/en-us/powerapps/maker/portals/configure/configure-web-form-subgrid. Thank you for reading the blog and commenting. Hope to hear from you soon.
HI Himanshu, could you help me how you did your things, I have same requirement.
[…] Follow simple steps to implement a custom Entity List appear on your webpage using code snippet from Microsoft docs. Handy to make lists fit your theme. — Read on ulrikke.akerbak.com/2019/09/28/portals-custom-entity-list/ […]
Hi Ulrike, I have done same what you have done above I get
Liquid error: Object of type ‘Adxstudio.Xrm.Web.Mvc.Liquid.OptionSetValue Drop’ cannot be converted to type ‘System.String’. for option sets. and also page number has same type of conversion issues.
I have not done anything extra, did same as mehtioned in article
Hello Chandra. You are absolutely right; the code renders errors when I try using it for a list of cases too. This code is copied directly from Microsoft Documentation, so I have submitted a feedback note about the issue. Thank you for bringing it to my attention. I have looked at my own Custom Entity Lists that are used for a list of Cases and found that it still works! I added the complete Web Template code to this blog post. Try it out! Hope it helps. Good luck. Ulrikke.
[…] Do you know you can create a web template that allows you to customize the entire entity list? Look at this blog post for more information and code examples: https://ulrikke.akerbak.com/2019/09/28/portals-custom-entity-list/ […]
[…] I have a blog post on how to control the HTML and build your own custom list: https://ulrikke.akerbak.com/2019/09/28/portals-custom-entity-list/ […]
[…] Another thing you can do – besides adding inline styling that hide the filter panel – is to use custom code to display your portal list. The code example you find in Microsoft Portals Documentation is not working properly – so I created my own version. Read this blog post to learn more: https://ulrikke.akerbak.com/2019/09/28/portals-custom-entity-list […]
Hello Ulrikke, great article, it really helped me a lot.
Congratulations for the quality of the blog and thanks for your contribution.
A doubt… could you tell me if it is possible to customize, or create a metadata filter, as we create the list/table? As is the article above?
Hello Henrique and thank you. Glad you like my article. I have a blog post on how to filter lists from URL parameters: https://ulrikke.akerbak.com/2022/03/15/filter-power-portal-list-with-url-parameter/ and another post on how to create a custom date range filter here: https://ulrikke.akerbak.com/2022/01/29/date-range-filer-for-lists-on-power-apps-portals/
Hope these articles are helpful. If you still need help please reach out in another comment or on social media. Happy to help 🙂
Hi, May I know How can I add Download Button on Custom Entity List?
Hi. I haven’t tried this myself so I really don’t know. Hope you found a solution and sorry for the late reply.
Hi, It is reloading whole page on Sorting, on Searching & on View selection. Can’t we just refresh the grid instead of refreshing whole page? Refreshing whole page is not a good User Experience.
Hi. If you want to be able to refresh the grid without refreshing the page then you can use the Web API to fetch the information and JS for sorting, filtering and searching client side. When we use liquid to fetch information like this we only get information from the server side as the page loads and it needs a refresh to get more info. If you make sure that the view you are connecting to contains all the data you need then I suppose you could handle sorting, searching and views client side – but then I would recommend using a vue.js or something like that, and not build it from scratch. Hope it answer your question.