This blog post will show you how to set metadata filters on a Power Portal list using URL parameters.
Metadata filters on portal lists enable your end-user to filter a list based on predefined properties. This can be a case list where you can filter the list to only show certain case types or only display cases from a certain date.
Do you need a crash course on how to use filters on portal lists? Look no further than this blog post: https://ulrikke.akerbak.com/2022/01/29/entity-list-filters-for-power-apps-portals
List filtering with url parameters
The setup
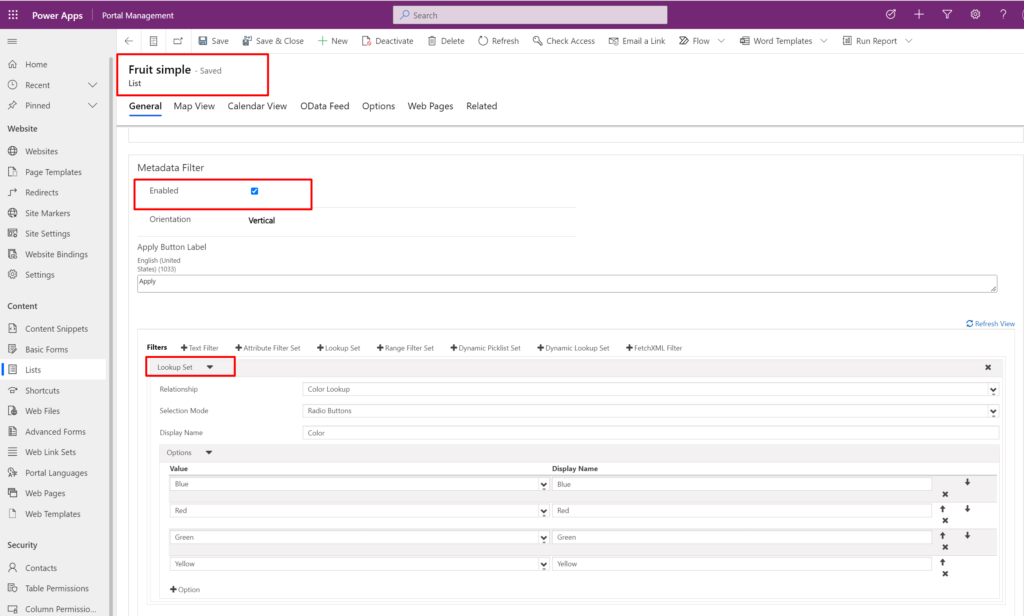
You need a portal list with metadata list enabled and at least one filter set up.
This is my “Fruits” list with a smile “Lookup” filter that will allow my user to filter the fruits by colour.
You also need a page where the list is displayed.
I created a web page called “Fruit” with the default page template “Full page” and the List “Fruit”
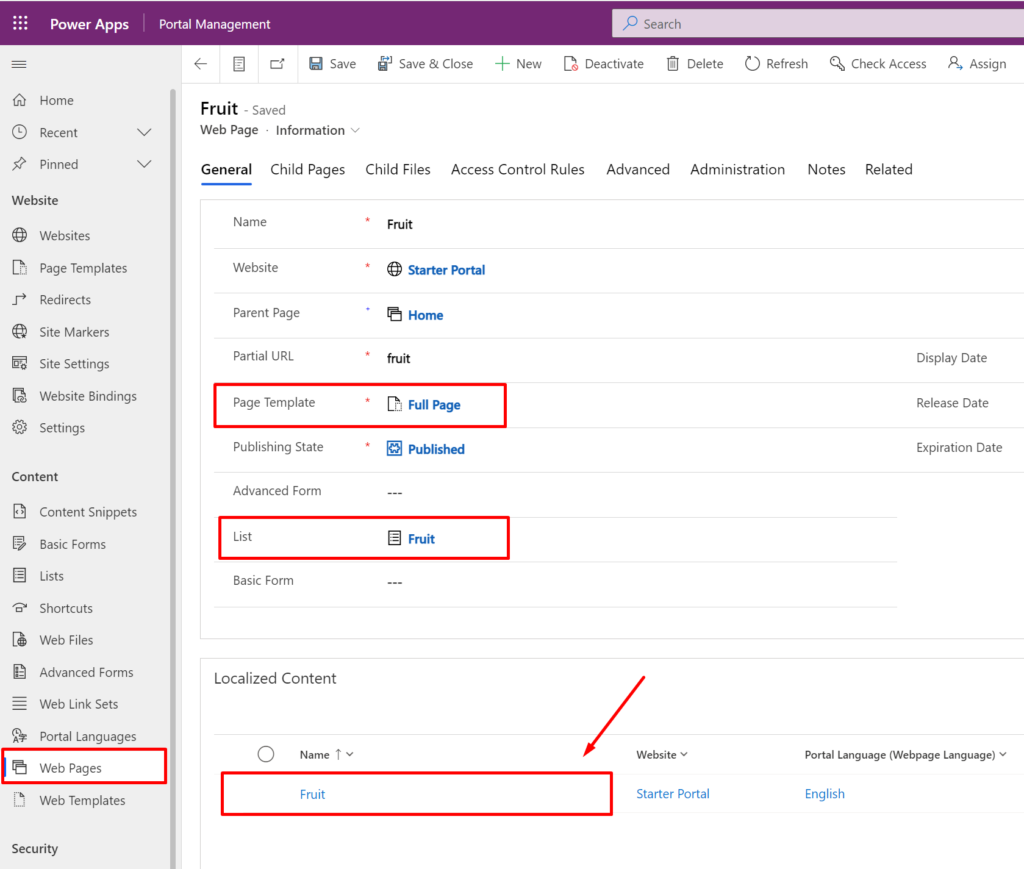
I open the local version of the web page to get to the page copy on my page.
This is where the magic happens! Scroll down to the Page Copy, open the HTML-editor:
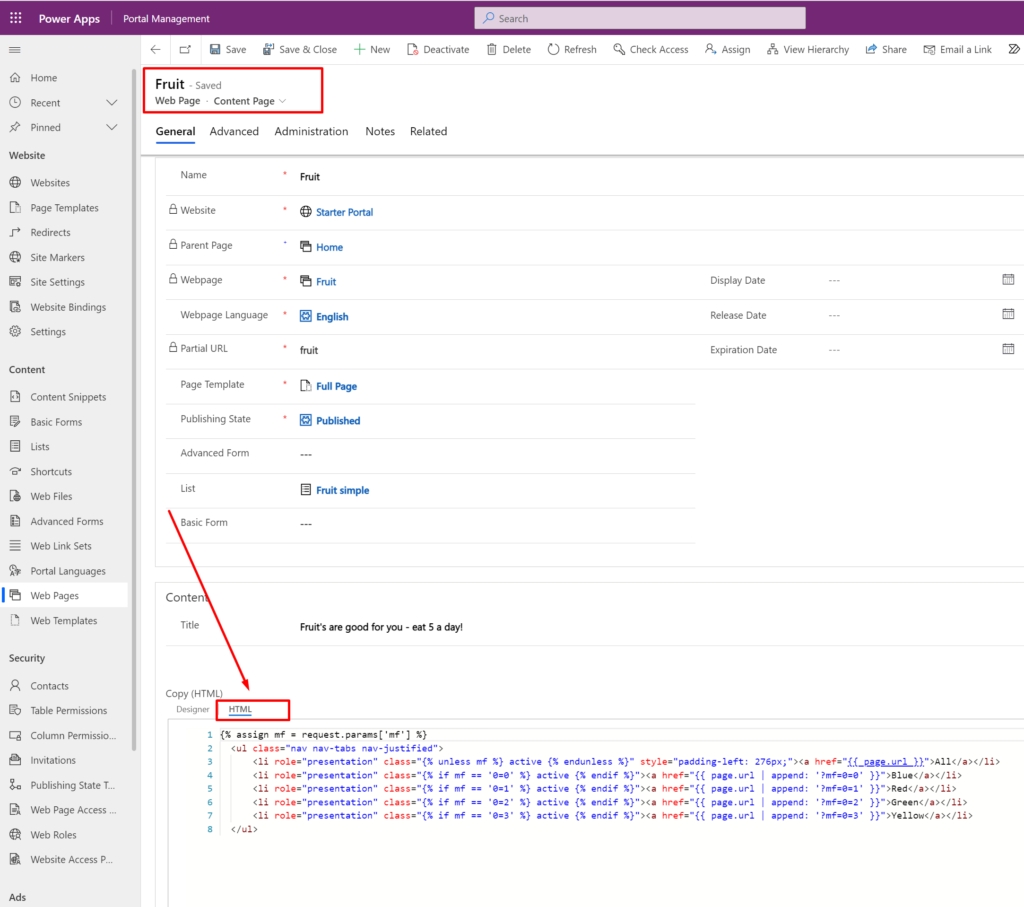
The code:
{% assign mf = request.params['mf'] %}
<ul class="nav nav-tabs nav-justified">
<li role="presentation" class="{% unless mf %} active {% endunless %}" style="padding-left: 276px;"><a href="{{ page.url }}">All</a></li>
<li role="presentation" class="{% if mf == '0=0' %} active {% endif %}"><a href="{{ page.url | append: '?mf=0=0' }}">Blue</a></li>
<li role="presentation" class="{% if mf == '0=1' %} active {% endif %}"><a href="{{ page.url | append: '?mf=0=1' }}">Red</a></li>
<li role="presentation" class="{% if mf == '0=2' %} active {% endif %}"><a href="{{ page.url | append: '?mf=0=2' }}">Green</a></li>
<li role="presentation" class="{% if mf == '0=3' %} active {% endif %}"><a href="{{ page.url | append: '?mf=0=3' }}">Yellow</a></li>
</ul>Code language: JavaScript (javascript)
This code creates a tab line with links that add the “mf=0” parameter to the URL with a value.
The parameter
The parameter “mf=0” simply refers to metadata filter = first (0) – the first metadata filter for the list. I only have one filter, so this refers to my fruit filter.
If we have more than one metadata filter we can also use “mf=1” to reach the second filter, “mf=2” to reach the third, etc. If you change the order of the metadata filters on the list it will refer to whatever filter is the first/second/last, etc.
The value
The value of the parameters refers to the filter options. In my filter this will be the lookup set options for the different colours; the first option is value 0, the second is value 1, the third is value 2, etc.
The tab links
In the HTML code, I simply create a list of links that go to the same page that we are on by using the liquid syntax “{{page.url}}” – and append the parameter and value for the filter and the options I want to use.
So, for the link “Blue” – the first filter’s first option – I append “mf=0=0”
for the link “Red” – the first filter’s second option – I append “mf=0=1”
for the link “Green” – the first filter’s third option – I append “mf=0=2”
and the link “Yellow” – the first filter’s fourth option – I append “mf=0=3”
For example:
<a href="{{ page.url | append: '?mf=0=0' }}">Blue</a>Code language: HTML, XML (xml)There are a lot of fun things you can do with strings in liquid. Check out Microsoft Power Portals Documentation: https://docs.microsoft.com/en-us/powerapps/maker/portals/liquid/liquid-filters#url-filters
The active tab
It’s important to always show the user which tab is active at all times – what filter is active. I get the parameter value of “mf” from the page URL, and assign it to the variable “mf” at the top of the code.
{% assign mf = request.params['mf'] %}Code language: JavaScript (javascript)Then for each tab link, I check if the variable equals the tab links metadata filter value, and if it does then I add the class “active” to it. On the other tab links there will be no match, and the class will not be added.
class="{% if mf == '0=3' %} active {% endif %}"Code language: JavaScript (javascript)The result
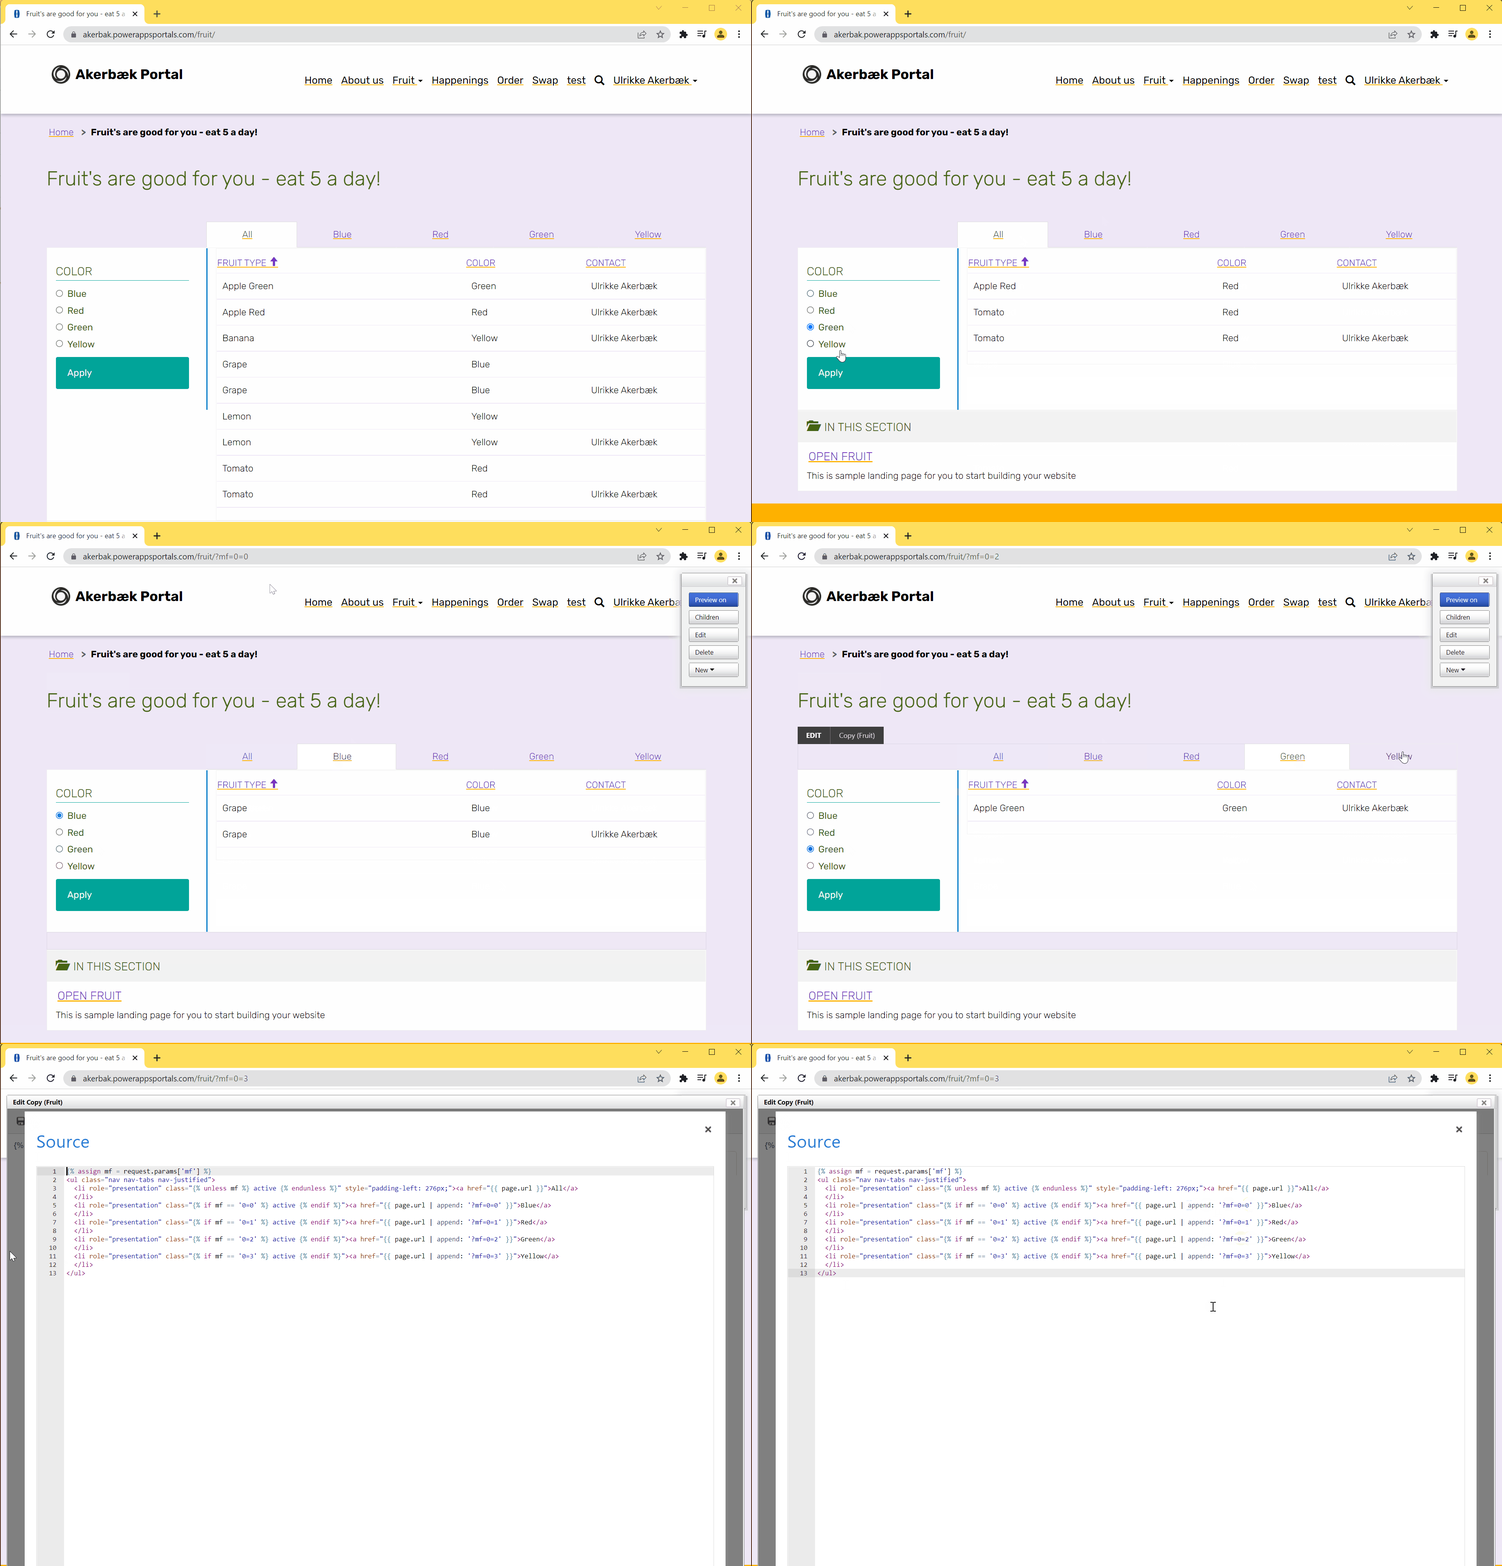
Save your web page, refresh the cache and open the webpage in a browser. You will see a tab line at the top of your page, a filter section to the left and the list in the middle.
If you want to enable the filter in the traditional filter panel you need to select the filter option and click the “filter” button. If you use the tab links filter you created it’s as easy as a simple click to filter the list.

Now – that’s great – but I don’t want to have the filter tab line on top AND the filter on the left. What can I do to get rid of the default filter panel?
There are two things you need to do:
1. Set the list filter orientation to “Horizontal”
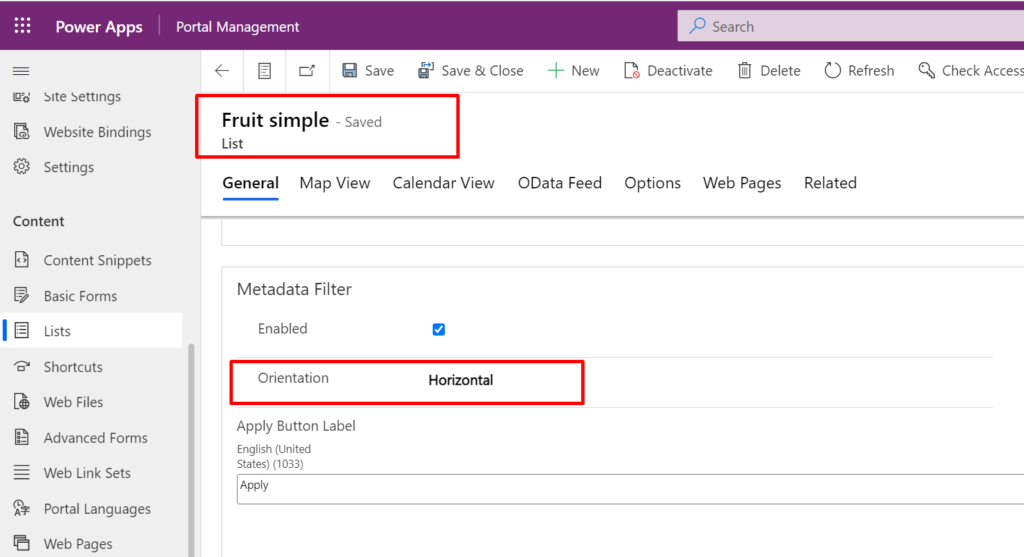
2. Add this code snippet to the bottom of your Page Copy HTML code
<style>
  #EntityListFilterControl {display:none}
</style>Code language: HTML, XML (xml)
The code will look like this:

Another thing you can do - besides adding inline styling that hide the filter panel - is to use custom code to display your portal list. The code example you find in Microsoft Portals Documentation is not working properly - so I created my own version. Read this blog post to learn more:
https://ulrikke.akerbak.com/2019/09/28/portals-custom-entity-list
Save your list and the web page, refresh the cache, and refresh your web page in the browser.
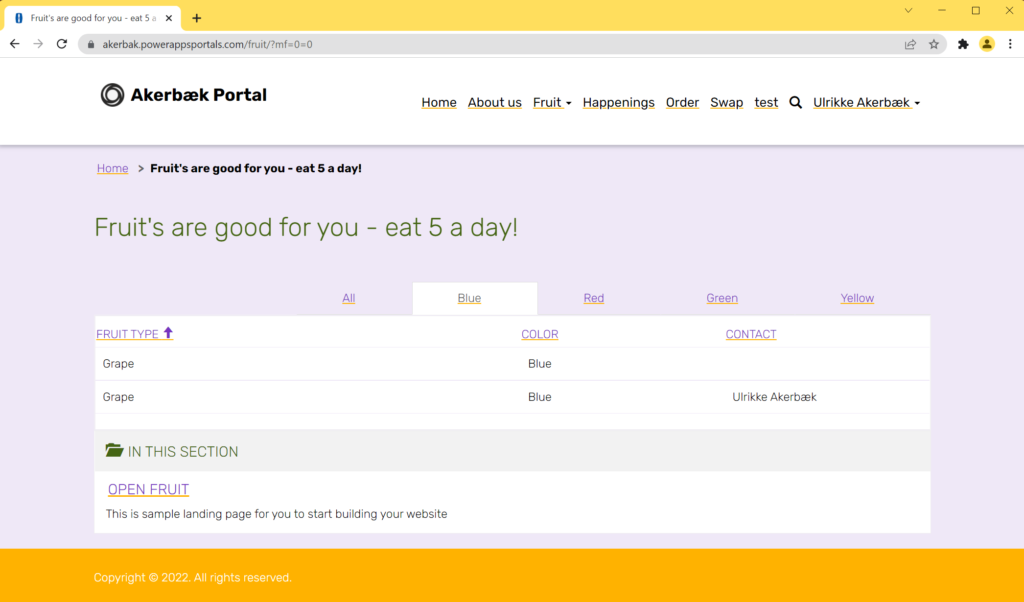
Hope you learned something valuable about filters that you can apply to your own project.
Tip! This approach can be used to pre-filter the list. If you want to enable a certain filter when a user opens the page - simply add the metadata filter number and option to the webpage URL link and the list will be filtered and ready when the page loads.
Good luck and have fun!
Hi! Thanks for a really nice blog with a lot of very useful information! I’m quite new to Portals and I am trying to figure out if it is possible to have a global filter on a list on the Home page (or any page), so that when it is selected it is also applied for all subpages too. Do you know if that is possible…?
I have one table with countries and one table with cities, with a one-to-may relationship. My goal is to have a list of countries on the Home page, with a filter on it (drop down). When I then choose a country from the drop down on the Home page I would like the same filter to be applied to all the subpages too so that when I navigate to a subpage with my list of cities I only see the records that are related to that country which has been selected on the Home page. Any idea on how to make this, or something similar to it? 🙂
Hello Mila. Thank you for reaching out. Happy that you like the blog. Have you seen this blog post? https://ulrikke.akerbak.com/2020/03/25/show-child-elements-in-power-apps-portals/ It describes how to create a list of accounts on one page, and then a page that displays the related contacts for that account. This approach is the best practice way, and can work for your use case as well. I hope it works – but if you need additional help please reach out. Good luck.
[…] Filter Power Portal list with url parameter […]
Hi! Thanks for a really nice blog with a lot of very useful information! I’m quite new to Portals and I am trying to figure out if it is possible to have a
1. filter on the subgrid of the basic form not showing, it’s showing in the tables form designer, we’ve enabled allow filtering property is enabled but not showing in the website basic form’s subgrid. OR
See the attached image URL to understand scenario – https://ibb.co/VCFx0wR
2.Search box not working when column is related to another table entity, it’s working for some column which are main entity columns but not working for other entities column.
See the attached image URL to understand scenario – https://ibb.co/XLyqFBp
Can you please help us on this if anyone of this could work?